In case useful to anyone, here is the consolidated set of effects I used to clean up my audio narration of an online course for Udemy.com. All these settings are particular to my audio, and might not be right for yours. However the process and sequence may be a useful starting point. A description follows, with the macros (chains) that contain the parameter settings that you can download to bundle the effects.
Almost all the advice that helped me with this came from long time user Trebor.
In summary, the process was (1) removed 100 Mz rumble, (2) de-clicked, (3) increased the tempo, (4) decreased the pitch, (5) removed some rattling sounds, (6) de-essed, (7) added presence, (8) created pseudo stereo with Ozone Imager, (9) RMS normalized, and then (10) soft limited.
The steps are described in the following multi-part post.
Equalization to remove 100 Hz rumble
This removes low rumble, however I also found solved most of the popping “p” sounds. A pop filter on my mike would have helped with this up-front as the best solution, but I did now have that, and this equalization with Audacity solved the problem nicely.
Used the regular Equalization effect, with the 100 Hz rumble preset:
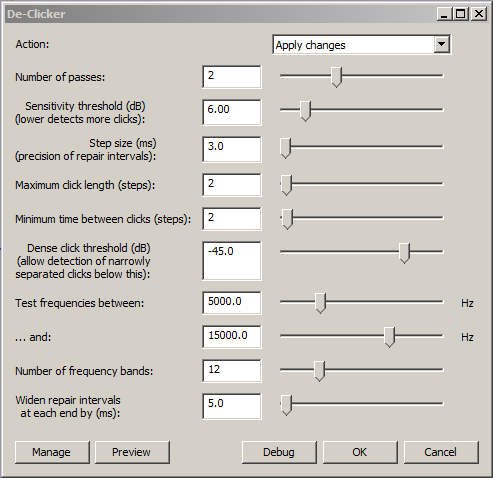
2. De-Click to remove clicks
This effect removed almost all of those little mouth clicks that so often show up in audio. You can get the plugin here.
The settings:
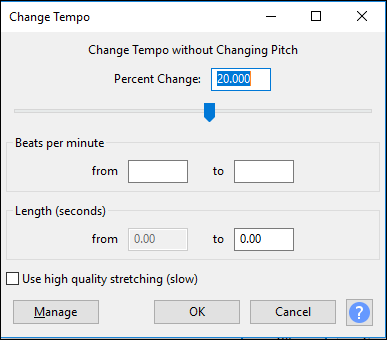
3. Increased the tempo
I had read the script way too slow. That might be ok in a classroom or on a stage where you make eye contact and use your body to add emphasis, but was boring in a recording. I sped mine up about 20%. That is a lot. Make your own judgements listening to your audio, ending up with fast enough to keep attention, not so fast it is an oppressive fire hose. You will find a range of advice on this. My take-away is that for in person speaking, the more charismatic you are and important your subject, slower is better. For audio with no or few visuals, faster is better. My sped up audio ended up being about 140 words a minute.
I found the “High quality” checkbox on the Change Tempo took much longer, and more importantly significantly distorted my voice - this option is apparently more useful for certain types of musical sounds.
4. Decreased the pitch
My voice was higher pitched than I wanted. I wanted it to be deeper, “warmer”, and found using the Change Pitch effect and decreasing the pitch by -5% was about right for me. Btw, it changes this number by itself to something close, in my case to -5.011, and that is fine - close enough.
(Multi-part posting continued in next post.)
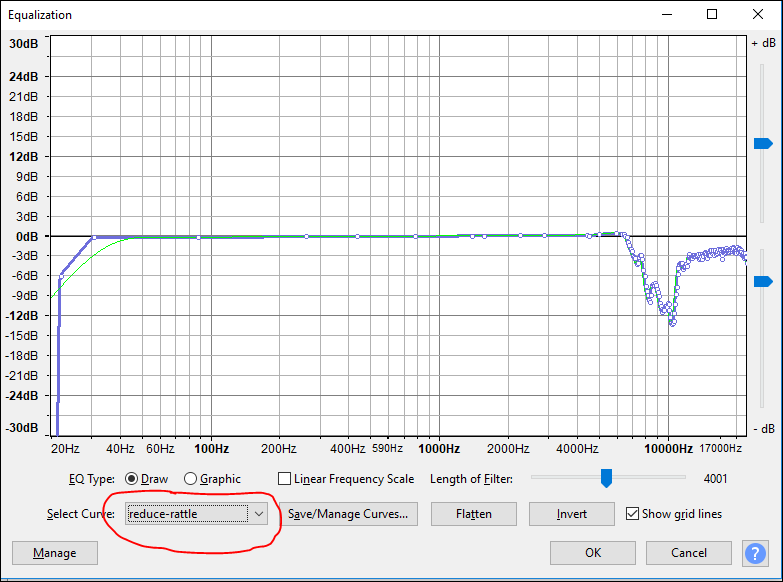
My mike had been on a cheap stand that vibrated, and added rattling. Trebor was kind enough to provide the following preset for the Equalizer that solved this: reduce-rattle.XML (10.5 KB)
Here is what it looked like in the equalizer:
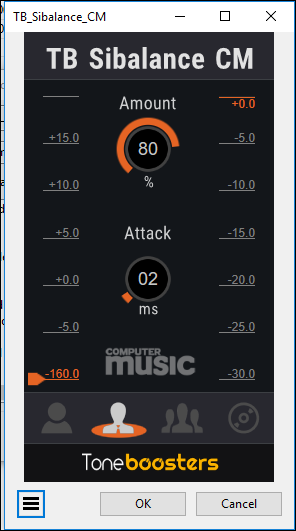
6. De-essed
Removed the “S” sibilance. I tried Paul’s De-Esser available here, but it does not use a relative algorithm, and squashed some of my audio to sound very muffled. So Trebor recommended the Sibalance CM plug-in, which uses a relative approach and works better. Here is how to get it.
I applied this effect twice, because as for a lot of VST plugins, the applied effect is not very strong.
Here are the settings. Note that the -160 on the bottom left is actually -10, a GUI glitch. Just see -10 when you look at -160 Also, I selected the “man” setting, clicking the picture of the man with a tie second from the left.
7. Added presence
After de-essing reduced some of the higher frequencies a bit, I boosted some of them with Marvel GEQ, available here.
Here are the settings I used, perhaps should have added more.
(Multi-part posting continued in next post.)
This is kind of interesting. Ozone Imager available here creates a fuller sound, for anything, and can be used to create kind of pseudo stereo for audio.
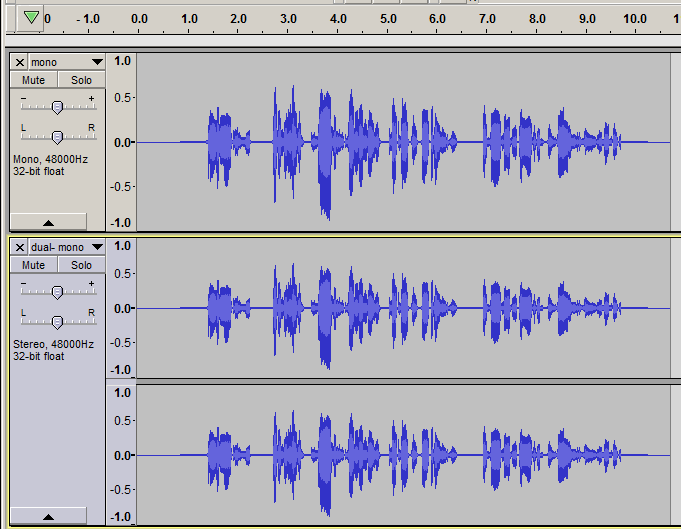
After processing as in steps 1 through 7, I then duplicated the mono voice track twice, for three copies in all. Then select the bottom two and join them into a stereo track. Then select that stereo track and apply Ozone Imager. I used settings 33 and 3.3 as in the image below. Then reduce the gain on that processed stereo track, Trebor recommends -12, I used -10 because I liked a bit more. Then select both the mono and the stereo track, and mix into a new track.
This gif from Trebor shows this process:
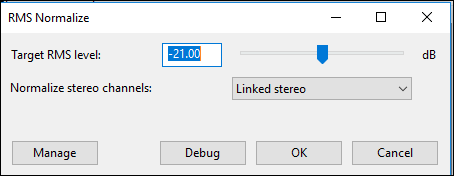
9. RMS normalized
Any of the previous steps may have moved the normalization around, so reset with RMS normalize, latest version as of this posting here. RMS normalize works better than regular normalize, since one loud peak will prevent regular normalize from having much effect. However, RMS normalize can result in a fairly loud track with clipping at some of the peaks. Experiment with the settings. I found the default of -18 dB not enough, and -21 was about right, significantly increasing the loudness, but with minimal clipping (then fixed in the following step below).
10. Soft limiter
There many now be some clipping. You can enable View / Show clipping in Audacity to see any highlighted in red. So apply soft limiting. I used -3 dB which produced a nice sound, and is a fairly common number used for audio submitted to professional services. Make sure “Soft Limit” is selected at the top for best quality results.
[Updated 2018-11-08 to include steps 1 and 2 in DPPMeffect1 file below.]
Here are the macros (chains) with the settings you can load to apply these effects in just a few steps.
My audio was recorded in mono of course, but in an interim step had become stereo. So first I split the track to mono, deleted one track, and proceeded.
First I applied effects 1 through 7 in one macro on the mono track. Step 8 involves making a stereo track, applying Ozone Imager, and then mixing that with the mono track, which must be done manually and so could not be macroed. And then I used a second macro on the resulting pseudo stereo track to apply steps 9 and 10.
The macros for steps 1-7 and steps 9-10 are attached as files DPPMmacro1 and DPPMmacro2 respectively. In Audacity 2.x these go in a “Chains” folder, and in Audacity 3.x these go in a “Macros” folder, found on Windows in “AppData\Roaming\audacity”. You can find the AppData folder by entering “%appdata%” including the ampersands but without the quotes in the Start search field.
DPPMeffect1.txt (1.7 KB) DPPMeffect2.txt (196 Bytes)
Hope this helps someone. Please donate to Audacity using the Donate link. And please pay it forward, and help others!