I’ve tried many things to remove all ‘pop’ spikes in audio. Recently, I’ve come close using the Label Sounds plug-in I found here in this forum: https://forum.audacityteam.org/t/improving-sound-finder/56382/1 Once the spikes are labeled, I simply remove them by selecting the audio and label tracks and using Edit> Labeled Audio>Split Cut.
The result is okay, but my question is: how can I improve?
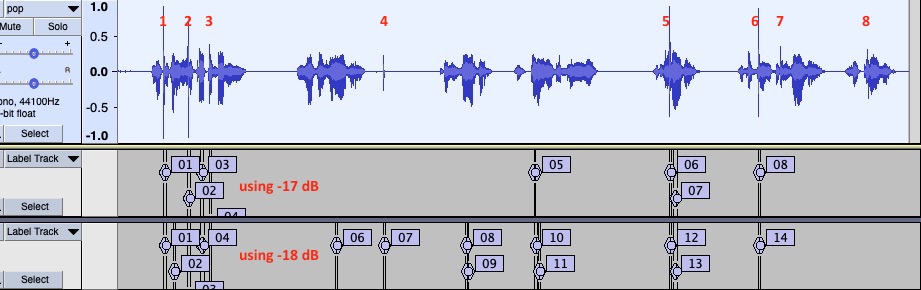
The attached audio and image demonstrates. The spikes shown as 1-8 in this image are what I want to remove, and you can see that I find most of them using these settings of the Label Sounds plug-in:
Threshold level: -17dB (or -18dB), Threshold measurement: RMS level, Minimum silence duration: 0.01s, Minimum sound duration: 0.01s, Label Type: Region labels, Maximum leading silence: 0s, Maximum trailing silence: 0.02s, Maximum number of labels: 9999, Label text: ##1
Notice that going from -17dB to -18dB allows spike 4 to be labeled at the cost of labeling non-spikes, and even at -18dB spikes 7 and 8 are not found.
Thanks for any help. I’d also be happy to receive other advice on my method.
Other info: I’m using Audacity 2.4.2 on Mac OS 10.15.7 and I zipped the attached file using Keka to stay within the 2MB limit (it opens fine with the standard Mac unarchiver) pop.7z (1.73 MB)
But I found the major limitation being missing the smaller smaller spikes verses distorting the rest of the audio. It seems the tool detects spikes based on a dB threshold, but it seems to me that since pop spikes are quite narrow there should be a way to detect spikes based on their sharpness.
In scientific spectroscopy, the peak width at half height is used to distinguish sharp verses broad peaks. In the image below I try to make my analogy clear by showing a crude drawing of the ‘envelope’ defined by an Audacity sound wave.
I don’t know how to make plug-ins, so I don’t know how hard that would be. But, my idea is: (1) define a waveform envelope for the audio based on user defined resolution, (2) apply the pop mute based on a peak width at half-height for that envelope. Step 2 means finding a local maximum, going to half that height and measuring the width – which for the narrow peaks should be easy. It could be that dB threshold could be entirely replaced by the width at half-height, or a combination of might be needed.
That’s correct. Anything over the “threshold” level is reduced.
One of the use cases that this effect was written for, was to reduce the level of applause in a recording of a (classical) music recital. In this case the “bad” audio was not a “spike” but rather a sustained high level of noise.
The best “solution” for the pops in your recording would have been to avoid the pops in the first place.
It sounds as if the pops could have been caused by blowing on the microphone. If that’s the case, then a mechanical “pop filter” would be the best solution.
Steve, Thanks again for your comments. I’m well aware that doing the audio right in the first place is obviously the best way to deal with problems like this. Believe me I try to help those involved in recording to do just that. But I know from years of experience that’s just not gonna happen for the audio I deal with since it comes from many different people in many different environments.
Given that reality, could you address the points that I make? Or if not hopefully someone else can. Thanks.
In the waveform (above), the red line tracks the “amplitude envelope” of the waveform.
The “Pop Mute” plug-in creates an envelope follower signal like that, and then applies negative gain when the envelope (red line) exceeds the threshold level.
Think what would happen if a very low frequency High Pass filter was applied to the envelope - higher frequencies would pass through, and lower frequencies would be attenuated. In theory at least, this would allow you to set the threshold to a level that catches the “higher frequency” narrow spikes while missing the “low frequency” gradual rises and falls.
In my experience (>20 yr) cleaning up LPs, none of the automated declickers is worth a crap. They all leave artifacts.
The only process that results in a clean file is manually declicking, zooming in to the peaks and using the “repair” tool to flatten them. Even then you have to be careful – if your area of damage is more than 128 samples, multiple runs at declicking can result in aliasing.
Thanks, Trebor. I did some tests using the DeClicker plug-in using the settings you showed, and it did, in fact, get rid of smaller clicks that the PopMute plug-in missed. The combination of these two definitely improved the audio I’m working on, and I appreciate that. At the same time, it must be admitted that most problems are still there, just less intense.
Maybe some day I’ll take the time to implement the idea I mentioned above after learning how to write plug-ins.