Is there any Audacity representative out there, who is either a sound engineer or an expert at Audacity noise removal settings for 30 year old audio cassette tapes? I would like a standard outline, of some sort, to use as a guide, so as to enter correct values into the Effect/Noise Removal menu, i.e., Step 2 Values of Noise Reduction, Sensitivity, Freqency smoothing, and Attack/decay time. I just want a simple standard of those values that will optimize removing tape hiss from my audio cassette tapes from the 80’s. There should be some sort of standard that will work with most tapes. Are there any noise removal templates, for me to view, that contain the above values? I would be very much grateful and appreciative of help in doing this.
Have you read:
http://manual.audacityteam.org/o/man/noise_removal.html
http://wiki.audacityteam.org/wiki/Noise_Removal#Improved_Noise_Removal_in_current_Audacity ?
Try starting with the default values and see what it sounds like. Some users who only have light noise prefer Noise Reduction (dB) reduced to -12 and Frequency Smoothing (Hz) increased a little. But tapes may have heavier noise, so you may not find those settings appropriate.
If the tapes are Dolby and you have Dolby equipment, turn the Dolby Noise Reduction on.
Really only you can tell what the best settings are.
Gale
You may also want to clean the transport mechanism, pinch-wheel and capstan - and ensure the device is set up and adjusted properly - see this article in the Audacity Wiki: http://wiki.audacityteam.org/wiki/Recording_from_Cassette
WC
I have read as much as I could understand, and that’s not much. I don’t understand much of the language used. I just don’t understand the meaning to the instructions, because I don’t understand the functions to the Noise removal settings. So, what I was wondering, could you give me just a simple template to the settings to start from? My tapes don’t have alot of hiss. They are still in good condition. To start with, what should I set the Noise Reduction to? What should I set the Sensitivity to? What should I set the Frequency Smoothing to? Finally, what should I set the Attack/Decay Time to. I don’t understand the function to these terms. I just want a list of simple settings. Is there any template I could find, that you know of–some gate, of some sort, online, maybe?
You should probably stop wishing for magic bullet settings. Noise Removal and Vocal Removal are two Audacity tools that look grand in the advertisement but don’t work so good in real life.
Tape hiss — or any hiss really — is a killer problem. You can’t actually suck the hiss out of a performance without damaging the show. You’re far further ahead getting access to a high-end, properly set up cassette player with tape type settings (Standard, Metal, Chromium Dioxide) and Dolby B and C settings. Sometimes you can do amazing things by playing a standard tape under Dolby B.
There should be some sort of standard that will work with most tapes.
Sadly, no. Follow these instructions and post a sample of the works here.
https://forum.audacityteam.org/t/how-to-post-an-audio-sample/29851/1
Koz
I agree with Koz here - before I started transcribing my tapes I sent my trusty old Nakamichi NX-2 off to the menders for a full service.
However if you are just wanting to rely on Audacity’s noise removal you want to have a look ta this page in the Manual (the alpha 2.0.6 Manual - bit this section is ok for 2.0.5 too): http://manual.audacityteam.org/man/Noise_Removal#tips
The green note section titled “Alternative Settings” contains slightly softer settings that I now use as my “standard” settings for removing FM hiss or web-stream carrier noise. I used these settings as I found the Audacity default settings produced detectable tinkly artefacts.
But note that with a good well set-up deck and good tapes (I always used TDK-SA which the Nak was specifically set up for) I never used noise removal on any of the tape transcriptions I made.
WC
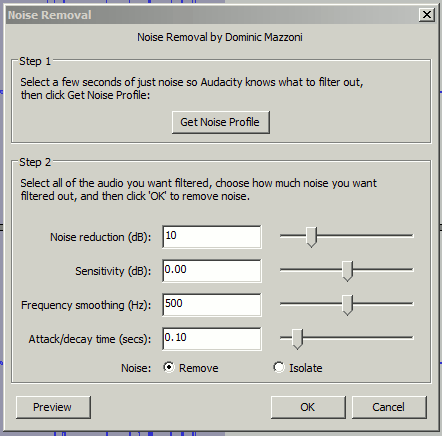
The most important parts of the Noise Removal effect are:
-
Noise Profile.
This is a sample of the noise that the effect is trying to remove. Ideally you should select 5 or 6 seconds that contain only the background noise. -
The “Noise Reduction (dB)” setting.
Move the slider to the left for less effect, or to the right for a stronger effect.
If the effect is not strong enough then not much noise will be removed.
If the effect is too strong then a kind of metallic bubbly distortion will appear in the retained audio.
Generally it is better to have some (but reduced) background noise with no metallic bubbly distortion, than a lot of noise reduction with bubbly artefacts. Better to err on the safe side and not try to remove too much noise.
The other settings can usually be left at the default values (as shown here: http://manual.audacityteam.org/o/man/noise_removal.html)
Noise reduction is an inexact science. It’s all about trade-off between reducing the noise and how much damage is caused to the remaining audio. Ironically it work best when the noise level is very low initially. High levels of noise are impossible to remove but can sometimes be reduced a little.
Start off with a good “Noise Profile” and the default settings, then try changing the “Noise Reduction (dB)” setting to determine how much noise you can remove without making it sound “wobbly”. That one control will usually get you 80% of the way to “as good as it gets”. Tweaking the other controls may give slightly improved results, but there are no hard and fast rules - it all depends on the individual recording. Getting 80% of the way is quite quick once you get the idea not to expect too much ![]() Improvements beyond that are likely to require a lot of fiddling and may not be worth the time and effort.
Improvements beyond that are likely to require a lot of fiddling and may not be worth the time and effort.
A very common problem is going for the gold and adjusting Noise Removal for a velvety, studio quiet background and then posting here complaining that the show got all honky and bubbling — or the voices got hissy and distorted.
Yes. That’s correct. Hiss and voices have a lot in common and changing one will almost always change the other. It’s a balancing trade-off.
Koz
Hey, Koz, here is a sample of my tape. It is just at the end of the 4th song and at the beginning of the 5th song of my tape. I don’t think the noise in the middle is very big. So, what do you suggest should be the 4 Noise Removal settings for Step #2?
Sorry, Koz. I forgot to upload the file. Here it is. I had to shorten the file, though. The original one was too big.
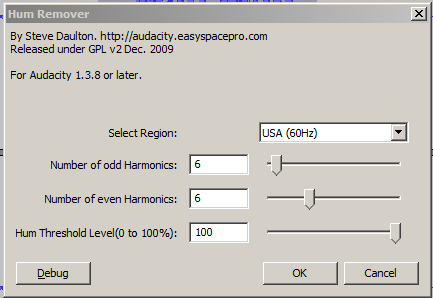
There’s quite a bit of mains hum on that , which can be removed with Steve’s obviously titled plugin …
Then apply Audacity’s native Noise reduction to reduce the hiss ( don’t over do it: too much makes it sound computery).
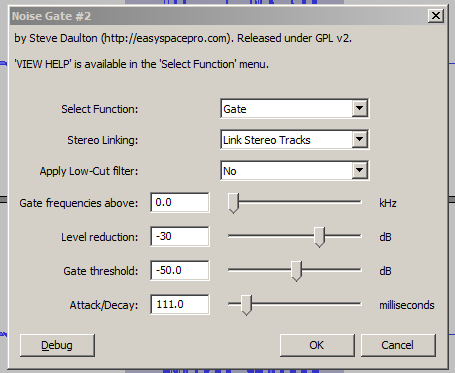
Then squelch the hiss at the start (and no-doubt end) of the track down to near flat-line silence with a noise-gate , e.g. another plugin courtesy of Steve …
Trebor, how do I, or, where do I put those plug-ins? What is the process in using them?
Steve’s plugins are in a format called Nyquist : they are files whose name ends with “.ny”, e.g. noisegate.ny
Obtain the “.ny” files from the download links I gave in my previous post , ( both downloads are zip files, which need to be unzipped, aka unpacked, to reveal the “.ny” file inside ). Then put the “.ny” files, (not the “.zip” files), into Audacity’s “Plug-ins” folder. If you’re using a Microsoft Windows Operating System the path is to that folder is something like " C:Program FilesAudacityPlug-Ins " , see … Missing features - Audacity Support [installation]
Then close all Audacity windows, then restart Audacity. After that the plug-ins should appear in the Effect drop down menu, like the image below …
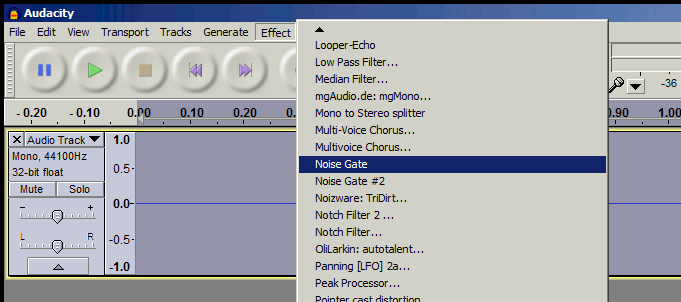
Note that plug-ins appear below the “dividing line” in the Effect menu.
So, Trebor, you are saying to, first, use Steve’s Hum-Remover plug-in, using the settings you used on my file, then, second, use the usual Audacity Noise Removal tool, then, finally, use Steve’s Noise Gate plug-in, using the settings you used on my file? Is that correct? If it is, then, for Audacity’s Noise Removal tool, do the following settings look appropriate? Noise Reduction (dB)=24, Sensitivity (dB)=0.00, Frequency Smoothing (Hz)=150, and Attack/Decay Time (secs)=0.15
Thanks, by the way, for the plug-ins. I did what you said. They are in the Effects menu now.
After I do all of this, would it be good to use the Normalize tool?
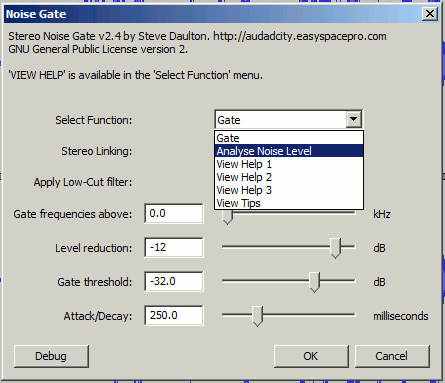
IMO Yes . Depending on the amount of noise-removal applied you may have use a different threshold value on the noise-gate than my suggested “-50dB” value , Steve’s noise-gate can suggest a threshold value if the plugin is changed from “gate” to “analyse” mode …
24dB is way too much. Noise-reduction inevitably damages the music, so use lowest value which is acceptable to your ear.
These are my typical noise reduction settings …
NB: Unusually noise-reduction effect a two-step process : first you have to capture a “noise-profile”.
Yes, Normalize on [default?] setting, “0dB”, will make the recording as loud as is possible without resorting to dynamic-range-compression, ( if you’re making an mp3 format audio file you may have to normalize to -1dB, rather than 0dB, to avoid the mp3 from suffering from a distortion called clipping ).