thoughts as i read it - would like some things that later appeared to be noted earlier
link to brians click repair needed
ditto chris compressor
up front - not everyone will read to the bottom
mark label points after recording and diddling gaps ?
better - just say put in place holder for labels
will be adjusted precisely in step 12
10 - * save* original track as backup! at least for now.
11?? mine is always under already
does the location matter?
12 - 1 - more details pls
12 - 2 - or insert labels now instead of earlier ?
or better line up precisely the placeholders done earlier
need tips on easiest way to align them and link the space between them
labels should be near start of new track not end of previous
unless the gap was shortened enough so that there is not a long silence between selecting a track to play and it starting
13 - insert appropriate name in label boxes - may not be songs
14 - normalise, gain, compress ??? other ??
new - 18 - open cd burner program
drag and drop each wav from both sides of the lP
in the sequence you want it to play
19 - burn cd of lp
20 back up burn program project for later repeating to do another cd
okay
some of this answered in next section
would like mentions earlier pointing to later
i would add note to adjust hiss if desired next to click in the
top part not just the last section
To start with I would cross-reference this page and the one on digitizing 78’s. If somebody then finds either one they can get to the other. The basic steps are the same but of course some of the details differ quite a bit.
Step 13. Version 1.3.12 adds the option to add the track number "01, “02”, etc. on the multiple export. I tend to do any entire album at a time so I can just let Audacity add these numbers.
Step 17. I also export the labels (File → Export Labels) so if I want to rework the project at any time I can bring the labels back in with the de-clicked, de-noised wav’s. When I archive a project I may or may not also save intermediate wav’s from de-clicking or after manual edits. This is again to save effort on possible rework; so I don’t have to always go back to the original ‘raw’ recording.
Optional steps: Add tools or effects for doing steps 2 and 3:
Remove DC offset - either use Effect → Normalize (without amplifying) or Brain Davies’ deNoiseLF
de-rumble - either high pass filter or combine this step with the previous using deNoiseLF
de-noise - use Audacity effects or external tool like deNoise
Personally, I perform these steps using Brian Davies’ tools right after ClickRepair. I import the final result back into Audacity for step 9. Because I run through the sequence of external tools my files are named ‘*-cr-dr-nr.wav’. I prefer to run ClickRepair first. I feel it’s got the best chance to finding clicks on the original recording before any other processing has had a chance to mess with it. Maybe someday I’ll really test this by doing the same file both ways and see if there’s a difference.
Interesting - you seem to have changed your mind about the order of processing here. When you responded to my thread on ClickRepair Click/pop removal - ClickRepair software back on 23Jul08 you said back then that you did deNoiseLF first, then ClickRepair and thirdly deNoise (and this is the order that Brian Davies recommends in his manual and thus what I based my suggestions on in the tutorial - as I personally don’t use either of the deNoise functions or their equivalent in Audacity). So I’d appreciate a fuller understanding of your change of mind in regard to the order of processing.
Thanks for the feedback - points all well taken - I will have to restructure the tutorial somewhat following other feedback from Gale Andrews on the Manual editors mailing list - so it may take me a couple of days to get round to incorporating your feedback.
The bottom is the “authorized” place to place the links a- according to the style guidelines for editors of the manual.
it gets underneath in my workflow, because the original capture track is deleted, leaving the label track at the top – the imported de-clicked track is imported to underneath the label track by Audacity. But no, it doesn’t seem to matter if the label track is above the music track – I did some tests and it still exported the multiple WAVs ok – it just looks “neat and proper” with the labels underneath
making CDs is already covered in another tutorial in the set – so no need to replicate it in this tutorial.
Thanks for the feedback whomper – other points all well taken – as I said to PDXrunner aboveI will have to restructure the tutorial somewhat following other feedback from Gale Andrews on the Manual editors mailing list - so it may take me a couple of days to get round to incorporating your feedback.
Now that you mention it, I have done the de-rumble and offset removal first in the past. I have changed my physical configuration several times in the almost 2 years that I’ve been making needledrops, and I guess that has affected my personal procedures some as my computers and OS’s have changed. The setup I’m using now has little to no offset so that’s not a concern. There is some low frequency rumble that is observable if I zoom in on the waveform in the lead-in, lead-out, and other quiet sections. Where I’ve looked, clicks are visually discernible from the rumble, so my current thought is to get rid of the clicks from the minimally processed file. I really should try to do some tests to see if I can hear differences when running the tools in a different order.
I may try some experimenting with the 2 projects I’m currently working on: a 78rpm album of Strauss Waltzes by the Minnesota Sym. Orch. with Eugene Ormandy, and Crown of Creation by Jefferson Airplane. From a listen through a while back to the Airplane, there is one song on there that I’m expecting to be particularly problematic WRT click removal - very distinct ‘fuzz’ effect that I half expect to not be able to do any click or noise removal on. I gave the LP a good cleaning last weekend, and maybe I’ll get around to recording it in the next few days.
Thank you for the work you do on behalf of the forum.
PDX
Waxcylinder got me thinking about this more, so I ran a little test this morning on the order of the post-processing steps.
Question: Does it make a difference whether you de-rumble or de-click first?
Recorded a 12" 78 rpm side. this is a 75 year old recording of the Blue Danube Waltz, performed by the Minnesota Symphony Orchestra with Eugene Ormandy. (recorded in 1935 according to the info that I could find on the web). I recorded this as a flat stereo transfer without RIAA equalization. I took the phono out from my turntable to an E-MU 0202. I’ve found that the input level controls on the input have enough boost that I can adjust for either phono or line level signals. There is no DC offset present in the raw digital recording. Save the recording as a 32bit WAV.
I used Brian Davies’s tools rather than Audacty’s - it’s what I’m familiar with.
2a. Sample 1 - Run ClickRepair (30 - deCrackle Off - Auto, All - Pitch Protection - Reverse - X2). These are my default settings for LP needledrops. They are not necessarily optimum for 78’s.
2b. Sample 2 - Run deNoiseLF (Noise floor -45dB - Limit 30Hz - ‘General’).
3a. Sample 1 - Run deNoiseLF with the same settings as above.
3b. Sample 2 - Run ClickRepair with the settings above.
Import Sample 1 and Sample 2 into Audacity. Duplicate both tracks.
Invert the Sample 2 duplicate.
Mix and render Sample 1 duplicate and inverted Sample 2 duplicate. The result does show some differences the I could hear with the headphone amp on the E-MU jacked way up. I could not hear differences between the processed samples when I listened to then normally (flipping back and forth between them.)
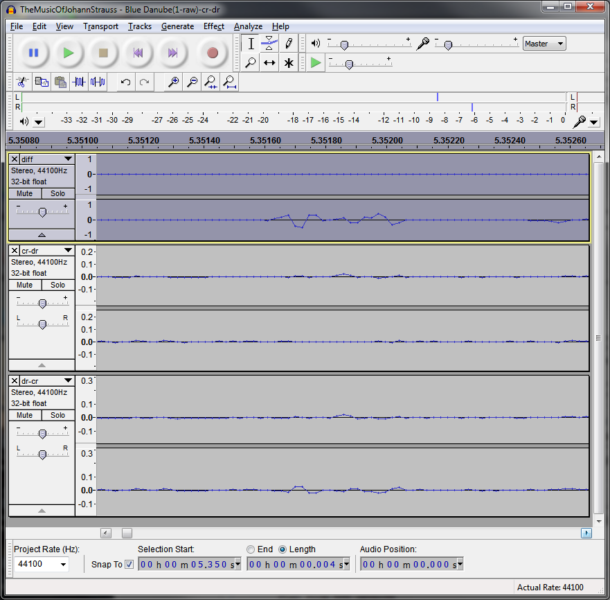
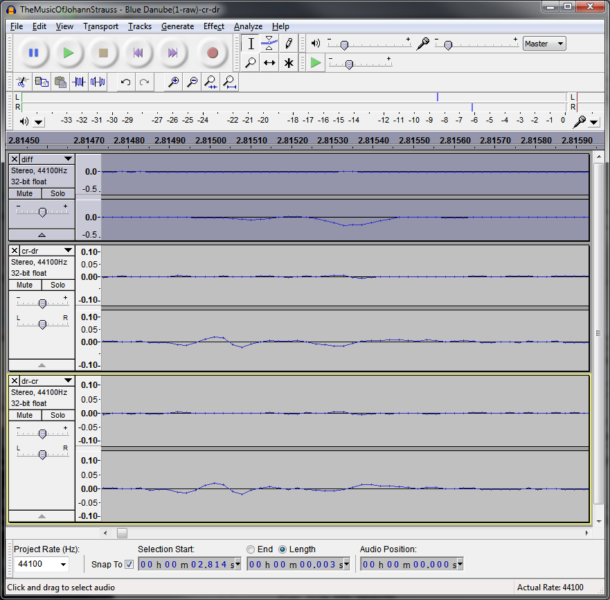
Here’s a visual analysis using Audacity to look closely at the waveforms at 3 different ticks on the difference track. The displays show, in order, the difference track, sample 1 (ClickRepair first), sample 2 (de-rumble first)
7a. On this sample the tick apparently has come from sample 1, as the waveform in sample 2 is smoother.
7b. This tick has apparently come directly from sample 2. The ‘tick’ looks like an inverted form of what shows in sample 2, which was inverted to make the difference track.
7c. On this view, it appears that the difference tick comes from both samples. The first part of the tick looks like it’s directly from sample 1, and the trailing part of the tick looks like it’s from the inverted sample 2.
Conclusions: For this small test it doesn’t seem to matter. With either processing order, there are some clicks that will get passed through to the final file. However, if different tools are used the results may be different. Audacity’s Click Removal works quite differently than ClickRepair. Audacity’s offset removal (Normalize, with no amplification) followed by a high-pass filter will act differently than deNoiseLF. I would guess that if there is a DC offset present, that removal of that first would probably be best, so that whatever click removal tool you use has a good waveform to work on. So maybe the procedure I’ve been using lately is not the best for the general case, even though for my equipment and tools doesn’t matter much.