Would it be valid to have a NyQuist code loop going through the selected more-than-128-samples-to-be-repaired area and apply successively the repair tool to contiguous (or slightly overlapping) 128 sample chunks until reaching the end of the small area to be repaired ?
If so, does anyone know what that NyQuist code would be ?
I explored that idea a few years ago. It doesn’t work ![]()
The reason that it doesn’t work is that “Repair” looks at the audio either side of the selected samples, and attempts to interpolate the waveform to join the audio either side. If we try to repair in sections, then it will be interpolating between good audio and bad audio.
I understand. Yet I would be interested to try it on several samples I have to see what it might produce. By any chance, would you have some code for that already, as I am not sure I could program it directly.
You can try this manually, without the formal code.
The windows at the bottom of the Audacity frame can be switched to Samples with the tiny black arrow to the right of the number display.
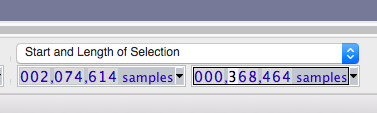
Switch to Start and Length with the blue up and down arrows.
Pick an area in the damaged sound, apply Repair and pick the next area 128 samples earlier or later. Apply Repair again. Repeat as needed. That’s what the software would be doing if Steve can’t find his experimental code.
You might be able to build it into a Macro.
https://manual.audacityteam.org/man/macros.html
Koz
Thanks a lot for your fast answer, Koz.
So I tried the experiment manually and as a matter of fact, the bad area of 2079 samples was greatly improved doing that. I was not exactly applying repair on contiguous 128-sample areas but rather on overlapping 128-sample chunks, i.e. doing repair on a 128-sample chunk (say start at x0), then positioning next selection at x0 + 64, and repairing this new 128-sample chunk, then selecting x0+(642) and repair this new 128-sample chunk, then x0+(643), etc.
I am aware this would not necessarily yield good results on any bad area, but I think it might work in many of the ones I have to address, in my case.
I could try the macro approach, but I do not know how I could make it applicable to bad areas of variable length.
That’s more or less what I found when I tested. “Sometimes” it produces good, or at lest “acceptable” results. Other times it just smears the damage over a longer region.
That’s a bit like using the repair tool in Lightroom/Photoshop - don’t ask me how I know … ![]()
Peter.
OK, thanks to all of you.
Another idea : has there been an attempt to apply Bezier or B-spline smoothing to bigger than 128 sample to-be-repaired areas? Would that be an interesting approach?
Have you used ClipFix? https://manual.audacityteam.org/man/clip_fix.html
That uses cubic spline interpolation to reconstruct missing peaks.
No, I didn’t realize it was doing so. Thanks, it will certainly help.
I’ve made that
interpolate.ny (489 Bytes)
plugin together with Steve back in the days. Since Nyquist can’t operate outside the selection, this effect basically copies the first half of selection and overpasting it (crossfade out/crossfade in) to the second half. It works perfect when you need to repair bigger amounts of sound. The problem in sound (that you need to repair) must be right after the middle of your selection for the best efficiency. After using this plugin, go to the middle of your selection and use the classic Audacity repair effect to avoid the click. That’s it!
Probably you will need another 2 plugins of mine:
selection-right.ny (209 Bytes)
and
selection-left.ny (213 Bytes)
They make labels left and right outside the selection with the length of the selection. Enjoy! ![]()
Thanks vpd. That reminds me that there is also “EZ-Patch”: EZ-Patch
Now that Audacity can access Audacity’s Macro Scripting commands, it would be possible to make a plug-in that extends the selection. For example, you click on the centre of the region to be repaired, and the plug-in creates a selection that is centred on the cursor position. There is an important limitation with this: You cannot then apply a Nyquist effect to that selection in the same plug-in, it has to be run as a separate plug-in. That is, one plug-in to create the selection, and another plug-in to do the Nyquist audio processing.
Thanks a lot to you both. I’ll try these plugins and see if I can repair. In my case, the to-be-repaired sound is often a glitch in an acoustic guitar chord transition, and I get quite a bunch of them when the music to be played requires fast chord transitions like samba rhythms. I’ll see how I can use these tools to improve that situation.
Thanks again.
I tried it on some of my to-be-repaired areas and, providing repair the central click afterwards, it works very well ! Waou! Bravo ! Thanks a lot to both of you for your help ! ![]()
![]()
![]()
You’re welcome! The inteporlate plugin provides perfect results, if you do figure it out how it works. This is the algorithm:
- Select an area with some “damaged” sound and press “Z” (or use Edit > Find Zero Crossings);
- Use the selection-left plugin and then drag and extend the selection to the first marker of “left-selection” label;
- Press “Z” (or use Edit > Find Zero Crossing) again;
- Use the interpolate plugin (ones or a couple of times);
- Go the the second marker of “left-selection” label, zoom in and make a very little selection around it.
- There could be a “hop” in the sound wave right at the marker, so use the classic Audacity repair tool.
Voila!
Steve, I still wonder why the algorithm above isn’t used yet to be created an Audacity integrated “Sound interpolation” effect?
I’ll post it in “Add new features” section. ![]()
![]()
![]()
The algorithm has some quite severe limitations which I think would need to be improved before it can go mainstream.
A simple example to demonstrate the main limitation (a “worst case”, just to show the problem)
- Generate a 2 second tone
- Apply “Fade Out”
This is the “source” audio that we will apply the effect to. - Apply interpolate.ny
Note that there is now a huge discontinuity at the half way point. This is because the start of the first half of the selection and the mid point of the selection do not match.
How to solve this?
If maintaining the exact length is not important, then we can simply crossfade the first half with the second half (see: Crossfade Clips - Audacity Manual). It the selection extends left / right of a “bad bit”, then the bad bit ends up at the quiet ends of the fade-in fade-out.
If maintaining the exact length IS important, then it’s a lot more difficult. Somehow we need to extend the first half to double it’s length without creating a glitch at the point where it repeats. One possibility is to crossfade copies of the first half until we get sufficient length. Another possibility is to “time stretch” the first half (for example with the “Change Tempo” effect).
It would probably be possible to create a Macro that uses Change Tempo and Crossfade Clips, but it looks a bit tricky.
Yeah, I understand your point and completely agree! ![]() And that’s why I named this effect “sound interpolation”, but not a “sound repair”.
And that’s why I named this effect “sound interpolation”, but not a “sound repair”. ![]() Lets leave it as it is!
Lets leave it as it is! ![]()