I have often found that the standard Fade-In/Out effects do not produce the fade “shape” that I want.
Sometimes I want to make a “partial” fade (for example, fade out to half volume).
Both of these can be achieved using the Envelope tool, but it can be fiddly, time consuming and is not accessible for visually impaired users.
To overcome these issues I have made a plug-in called “Fade+” (fade plus).
Some of the GUI layout is a little unconventional, but will hopefully work well with screen readers.
I think this would make a very useful addition to Audacity and would very much appreciate any feedback regarding using this effect. FadePlus.ny.zip (3.7 KB)
Just a few comments, not tried it much yet or really read Help.
the ;info line says “Select the required Preset” - given the GUI has no text that says “Preset”, is it better to replace “Preset” with “Fade Shape and Amplification Range”? Or at least, “Presets” (plural)?
Instead of “Start” and “End” (which could be verbs) could we have “Starting” and “Ending” or maybe better, “Initial” and “Final” to match with the Sliding Time Scale effect?
Do we really need the “Amplification Range” control? The help suggests that to fade from 1.5 times the original amplitude to half the original, do:
Range 0 to 200
Start 75%
End 25%
I think a lot of people just won’t be able to figure the maths of doing that. We can do the same with Range 0 to 100, Start 150%, End 50%, so I think the help should give that as the first method. The disadvantage of that method is you can’t use the sliders to do it, and if you use text entry, the Start slider will initialise to 100% again. I think I’d be inclined to do away with “Amplification Range” and let the sliders go to say 200%. That might also mean you get a usefully larger increment when you move the slider using the arrow key. I appreciate there is a clipping danger, and you may not want to have a “Normalise to 100%” control, but my initial reaction is that setting percentages of an amplification range is too confusing.
Is there a Nyquist envelope plug-in under possible consideration, or is this it? Most of the original requests I’ve seen for a Nyquist alternative for envelope tool wanted to work with dB levels (or at least have an option to do that) so that you could take a region and amplify it from say original to 0 dB, or from -5 dB to -2dB. They pointed to how easy this might be with Amplify, if only it had “initial” and “final” amplitude settings. I really think this needs to be catered for somewhere - people are not going to go to Amplify, find the peak, then go to Fade+ to figure the % amplification needed to get to the dB level they want. I appreciate there may be little room for complicating Fade+ further, but my intuition suggests many more people would find fading to dB levels useful than percentage fade speeds.
If there was a “Fade Direction” control, could Fade Out set “Start Amplification” to 100% and End to 0%? If people wanted to use this primarily to change the fade shape, that could be a handy time saver.
YES! I Like it.
(I knew there was a better description - just couldn’t find the right words)
Now changed in the ;info and (hopefully) all occurrences in the help screens.
This was an experiment - one of the “unconventional” GUI features to try and help with screen readers.
The ideal solution would be if changing the “Amplification Range” instantly changed the Amplification sliders so that they displayed the selected range (changed from “0% - 100%” to “0% - 200%” to “0% - 400%”), but unfortunately this is not possible in Nyquist plug-ins.
Apparently, in screen readers the sliding scale is always read on a scale of 0 to 100.
There are alternatives, but each has pros/cons:
1) “Amplification Range” Pro:
Scales always read (correctly) 0% to 100%.
Most fades are from or to 100% - which is very quick and easy for mouse users.
Con:
Confusing.
2) No “Amplification Range” but allow text entry for values over 100%. Pro:
Simple.
Most fades are from or to 100% - which is very quick and easy for mouse users.
Con:
Slider value shows different value to text value.
Value reverts to 100% if up cursor is used on the slider.
Value reverts to 100% on next launch.
3) Increase scale to 0% - 200% Pro:
Scale reads correctly for sighted users.
Con:
Sliders read incorrectly on screen readers.
About 95% of the times that I use this effect I want to fade-in/out to/from 100%. Over 50% of the time I’m fading-in/out from/to 0%. Using a mouse it is very much easier to move the slider to the extreme left/right than to move it mid-way.
Same ‘cons’ as (2) for values over 200%.
4) ;control for “Fade In / Fade Out” with one “Amplification” scale as 0% - 100% (default 0%) and the other as 0% - 200% (default 100%)
Compromise solution with Pros/Cons as above.
5) Change the wording from “Amplification Range” to “Amplification Multiplier”
Options would then be: “x1 / x2 / x4”
Is this any less confusing than (1) ?
6) Change the wording from “Amplification Range” to “Gain”
Alternatives could be “Amplify before Fade”, or “Amplify Selection” …
In effect the same as (1) but with slightly different description.
Unless anyone has a better idea, it’s “pick your poison”.
My preference is for (1), (5) or (2).
I’ve tried option (3) extensively and it becomes really irritating.
New version (see bottom of post) now uses “Amplification Multiplier” and allows text entry up to 400% (help screen also updated). This is where user feedback is invaluable.
No I don’t. The main reason is that it will cause “envelope shaping” to fail (see below).
This is it.
Having tried umpteen alternatives for adding multiple “control points”, this is the clear winner.
Multiple control points would be the closest emulation of the Envelope tool, but it has overriding drawbacks: How many control points?
To allow complete freedom of each control point, and a smooth transition from one to another, there would need to be controls for the time position, amplitude, and slope. A minimum of 3 sliders per control point. Then there is the problem of defining the time position - % of the selection length? (what’s the % for 7 control points?) - seconds? (what happens if the control points go beyond the selection? How do you apply the same curve shape to a different length selection?)
Evenly spaced control points?
Works well for linear extrapolation, but requires quite a lot of control points to create a smooth non-linear fade. “Fade+” creates 50 control points in one go.
If, for a 10 second selection, you want to make the first 1 second rise smoothly by 6dB, the next 7.5 seconds to fall by 12dB and the final 1.5 seconds to fade out with an “S” shape curve, you would need to process in 3 sections. This can be done much more quickly with Fade+.
I think that Fade+ can do everything that the Envelope tool can do (except that it is destructive). In many cases the desired effect can be achieved more quickly and easily with Fade+.
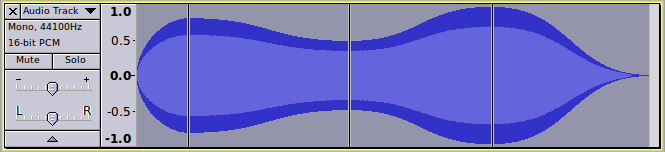
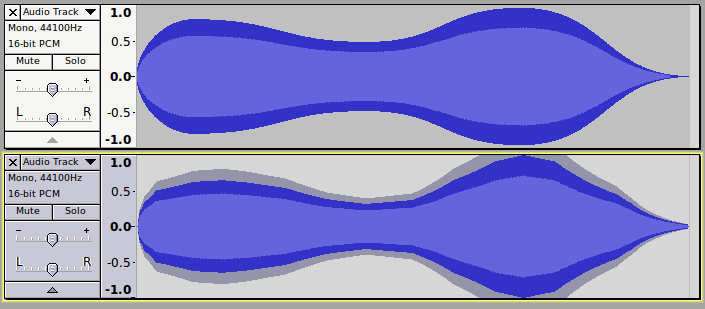
Complex curves and envelope shapes can be created by processing in sections - the following envelope took less than 1 minute. (Ctrl+J to join the sections back together.)
The lower curve was created using the Envelope tool and took three times as long, zooming in and out horizontally and vertically, a lot of twiddling with the mouse, and the fade out at the end does not sound as good.
The effect could easily be converted from linear scale to dB - in fact this plug-in started life with a dB scale.
I switched from dB to linear in response to feedback from David Bailes regarding accessibility.
VIP’s (visually impaired people) need to know what the valid range of values are. Screen readers may not read text that is to the right of the slider and the sliders are always read on a scale of 0 to 100. The most simple solution to this seemed to be to put all of the ;control text to the left of the slider and all sliders on a scale of 0 to 100. This means using a linear scale for amplification. As a linear scale is used extensively in Audacity it should be familiar to most users and arguably more intuitive for novice users than dB.
What does that mean?
Are they talking about instantaneous amplitude values, average peak levels within a time window, RMS values …? I suspect they mean “loudness”, which is not at all easy to implement.
Saint Saens Symphonie No. 3 “avec orgue” (Organ Symphony) ends with full orchestra and organ playing fff, then after the final note the reverberation goes on forever (depending on the performance venue) - so we set the fade to amplify with a final amplitude of 0dB - does that mean the reverberation swells up to 0dBfs noise?
We could set a time window function - 20 seconds should be enough to handle Saint Saens, but then what happens if the selected audio is only 10 seconds long?
Probably what they mean is similar to using an adaptive attack/decay dynamic compressor (such as Chris’s) and then shaping the volume envelope. Unless I’m misunderstanding what is being asked for I don’t think it is easy at all as it is so dependent on the character of the selected audio.
Easy solution - Normalize/Amplify it before you start, (then use an “Amplification Range” of 0% to 100% and if necessary Normalize/Amplify again after).
Normalizing could be included in the effect, but (a) do we need a third “normalize” effect when we already have “Amplify” and “Normalize”? (b) Normalize would have to be OFF if a track is “Envelope’d” in sections (as in the screenshot) or the sections would not match up.
Also, if processing is done on 32 bit tracks, this effect does not clip (Audacity 1.3.12). If the peak amplitude is inadvertently made to go over 0dB, then as long as it is a 32 bit track they can use Amplify/Normalize to bring it back down to within 0dBfs.
I like this idea and have already tried it out (the version that I use at work has this feature). It is also very handy when making “drop-in” fades.
The drawback is:
What is the “reverse” of a fade-in with a fast “initial fade speed” and a slow “final fade speed”? Is it:
a) A fade-out with a fast “initial fade speed” and a slow “final fade speed”?
b) A fade-out with a slow “initial fade speed” and a fast “final fade speed”?
If we have options for “Reverse (symmetrical)” / “Reverse (complimentary)”, should this apply to just custom fades or to preset fades as well? (should “Reverse (complimentary)” make a “Fade-In (elliptical)” become a “Fade-out (Exponential)”?
Do we want this extra complication?
For mouse users and Amplification scales of 0% - 100%, switching from fade-in to fade-out is already very quick and easy.
New version (attached).
Changes since previous version:
info line “Select the required Preset” > “Select the required Fade Shape…”
“Start” and “End” controls renamed “Initial” and “Final”.
I can see the problem with having the Amplification sliders going from 0 - 200%. It’s probably insoluble unless we can have something like a Fade In and Fade Out preset that sets 0%, 100%/100%, 0% respectively then ignores both the set amplification % and the fade speed controls.
We now have the “cons” with the slider resetting and its scale not matching text entry, plus the “Amplification Multiplier”. I think that new wording and the x1, x2, x4 does help, but if I’m correct, you could still get the maximum amplification possible now by allowing text entry up to 1600 and getting rid of the Amplification Multiplier (while keeping the slider scale 0 - 100%).
Is it really helpful to be able to set a 400% amplification with a 100% setting (with the extra step of changing to a 4x multiplier), as well as by just entering “400”? I think it’s “OK”, but I just wonder if it’s worth the extra control and the extra complication to serve the relative minority who want to amplify over 100%.
I note the help now says you can enter up to 400% as text. Maybe you should add text in the GUI for both amplification sliders “(text entry up to 400%)” or similar? That would also help people wondering why 1000% gives the same result as 400%.
If this “is” the Nyquist envelope plug-in, I still think the word “Envelope” should be in its title somewhere, so encouraging its use as an Envelope Tool replacement (by using it in sections of audio). Or maybe even “Fade/Amplify Special” or similar. But not just “Fade Plus” or some other modifier for fade.
I think we should keep some sort of perspective about having all sliders 0 - 100 % for screen reader purposes. Are we going to turn Noise Removal on its head and have its three sliders on a 0 -100 scale?
The fundamental problem for novices (and even more advanced users) is that the envelope tool is fiddly, and imprecise. Are you really amplifying to 0.5 or 0.495? Then there is the novice confusion that “0.5” is “-6 dB” when looked at in Amplify. Nonetheless I think novices do grasp “Amplify” and that 0.0 is the peak, given the excellent layout of that effect and the comforting sliders and boxes. If they could do Amplify in an infinite number of steps they could get some crude fade from the current level to 0.0 dB.
I think these sort of users do need the scale to be in dB. I sent this off to several people who have asked for a Nyquist envelope replacement (without commenting at all) and the two who replied so far both pointedly wanted dB. As one put it, “can we have it in dB please so we can just choose the target level and go?” As I understand it, they are not on about a gain change value (for example, “reduce it by 5 dB”, which could be confusing); they are on about setting a gain (they don’t care about the calculations) to get to the new peak level (defined as in Amplify).
I think the real problem is that this is both an advanced fader (for which 0 - 100% is possibly more intuitive) and an envelope replacement (where 0 - 100% is I think quite unintuitive). If this was not a Nyquist plug-in (and no doubt in ignorance of technical issues), I might even be considering an interface where “Initial” and “Final” could both be one of “Gain: (%)” or “New Peak Amplitude: (dB)”.
What should the effect do?
Should the final amplification be infinite (because the end of the selection is silent)?
Should it do the equivalent of “Normalize to 0dB”, then “Fade-In” (as the current Fade-in effect would)?
Should it fade in with a linear fade that rises from -inf dB as steeply as possible without clipping any of the waveform?
Should it look at the amplitude within a time frame and calculate from that (for example, looking at the peak value every 500 milliseconds)?
Should it do something else?
It’s a simple idea as long as you’re talking about constant amplitude tones, but I’ve no idea what it means for real world audio.
\
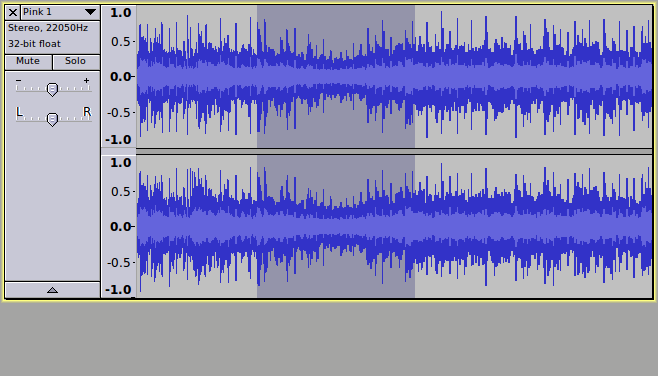
Much of the time I want to fade to or from 100%, but there are also quite a few occasions when amplifying over 100% is necessary. Before I made this plug-in there were quite a few occasions when I wished that the Envelope tool would allow greater amplification than it does.
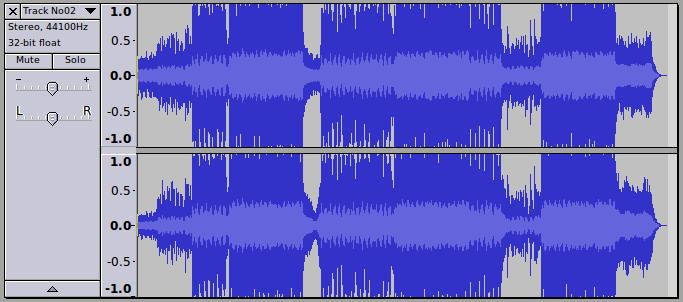
There’s a section in the track which for one reason or another is a bit too quiet (shown selected) and needs to be amplified - seamlessly.
The usual procedure would be to use the Envelope tool to pull up the level to match the rest of the track. Unfortunately it is not always possible to do this in one go because of the limited amplification that can be done with the Envelope tool, so it involves getting it as close as possible > Mix and Render > repeat the Envelope tool process.
Using the Fade+ (or whatever name) effect, the level can be corrected by processing in 2 halves. The first half can be “faded up” from 100% to around 140% and the second half faded down from 140% back to 100%. Of course the amplification amount in the middle needs to be exactly the same for both halves otherwise the waveform will not match up. The problem we have if we have typed 140 when the slider only goes up to 100 is that when we get the effect back up for the second half is that the “140” has changed to “100” - (now did I fade up to 140% or only 135%). If we use the Amplification Multiplier, then we first fade from (2 x) 50% to (2 x) 70% and when we recall the effect it shows correctly what the last settings were so we know that our second fade must be 70% - 50%.
This example also shows an application where having a third, or even a fourth amplitude (control) point is useful, but it makes the interface a lot more complicated. The plug-in can be easily extended to include a choice for 2,3 or 4 control points, but each point and each curve section would need to be defined by the user, which greatly increases to number of controls. Certainly more “Envelope like”, but too complicated for “general release” in my opinion.
To sum up the question of “do we need 0 - 400% text entry AND the multiplier?”
I can’t think of many cases where a user would need 1600% amplification, but I think it is valuable to have the option to use either “text entry over 100%” OR the multiplier. So yes, we have both sets of “cons”, but we also have both sets of “pros”.
(there are quite a few things in Audacity that can be accomplished in more than one way, and having the choice is often useful.)
How about this?
When “Amplification Limit” is set to 100%, shoving the slider to the extreme right (or anywhere above 100%) will set the amplification to 100%.
OK. At a rough count I’ve had e-mail contact with at least 16 people who’ve asked for a GUI Fade or Envelope Tool with slider/text input, so I’ve sent most of them Fade+ and asked for comments. I’ve asked if they want dB input and if so, what it should do (circa half of them said at the time they wanted dB values). Wiki Feature Requests only shows 8 people who want text initial/final input values in Fade In/Out, so underplays the demand, but at the time we were asking people to enter on the Wiki themselves.
I think my gut feeling from looking at those e-mails is that possibly your suggestion 4) is closest to it, definitely not 2), and they don’t want clipping. I think they are looking at something like the envelope tool would do if you had one control point at silence (or wherever) and you could actually set the control point at the end of the fade so that it placed that sample so you’d not be able to amplify it without clipping. A couple expressed this in another way as something like using Amplify infinite times with the final time set to 0 dB “New Peak Amplitude”. They aren’t considering if there could be clipping before the last sample, though.
I also pointed out the practical issues to the two people who responded yesterday. One gave an analogy like the above if you could use the envelope tool that way. The other said what they meant was that setting Final value to “0 dB” would be analogous to setting whatever value was necessary (e.g. 85 with a 2x amplification factor in current Fade+) so that when you looked at the whole selection afterwards in Amplify, no more amplification was possible. Your suggestion 2) wouldn’t necessarily give that result.
One thing I am sure about though is that Fade+ isn’t what most of these people are looking for (as it is at present).
OK. It’s the “reset value” problem, and I guess a Nyquist effect problem too. In an inbuilt Audacity effect, the text entry value seems to be recalled (and reused via “Repeat last effect”) even if the value is outside the slider range. I think the balance of advantage is probably with allowing text entry outside the slider range AND the “Multiplier”, but really think in this case that the GUI (or the ;info line) should mention the text entry range (you’ve done that in “Fade Envelope” below).
I would agree, but I also figure that a “power user” version of this effect (the URL noted in the README) is a definite option. It may be an answer to the “demand” for dB input (if it can’t be distilled down to one behaviour that will suit everyone).
I’m OK personally with “Fade Envelope” or anything like that. I’m conscious of the quantity of “Fade” effects we’ll have when we have your XFade, this effect plus the two Fades and (so-called) Cross Fades. I quite like the idea of something like the “+” that denotes this a more “advanced” alternative, but just don’t like “+” or even “Plus” very much as the way of doing so.
What I had in mind (which may not be possible) is a Fade In/Out preset that moves the sliders to either end of the 0/100% range as appropriate if they are not already there (for example to save some degree of effort in an Audacity session if user is primarily interested in fade outs).
“Amplification Limit” is still another control in addition to the two amplification sliders, so it doesn’t help with simplifying the interface. What does setting the limit to “Unlimited” do if the text entry limit is 200% as per the image?
Just had four responses to date. To summarise, one likes your Fade+ with a gain % but thinks more fade points are important - much more so than the different shapes. The other three (only one of whom specifically asked before to target a dB level) say they would find it “essential” that it “gave you the final dB value you’d end up at” (as one put it). One suggested an “allow maximum length of clipping (ms)” choice box to cover for possible clipping.
Much as I’d like to oblige, I don’t think this is possible - not because of a technical limitation, but because of a conceptual problem.
Here is a screen shot of an actual audio recording that I have been working on recently.
My question is, if I select to fade the entire file up from a target level of -12dB to a target level of -2dB, in what way do you want it to fail?
Amplify to a target level is fine for constant amplification, or where the audio is at a constant level, but to apply a fade or variable amplification to audio that has variable amplitude I can see no way that it makes any sense. Unless someone can come up with a logical method of implementing target levels that will work predictably on all, or at least most audio samples, and is at least reasonably intuitive, then I would like to drop that idea and make something that will work.
Perhaps if I posted a link to the above audio file those three users could show me what “should” happen if a fade from -12dB to -2dB was applied. It would be interesting to see how similar/different their solutions are.
I have an interesting alternative which I will post shortly. It uses text input so the user can enter as many “control points” as they like. The fade from one control point to another is linear and each “control point” is defined by a “time/amplification” pair of values.
I’ve had some feedback from David Bailes regarding the second recent version of Fade+ (with the “multiplier”).
He likes it and reports that it works well with screen readers, though he raised the question of using a dB scale (for amplification, not for target level) so that it will fit with the the standard “Amplify” tool. I can easily use a dB scale for the amplify amount - the only question is how to handle fading to/from silence (I can’t have an infinite slider). I could have a scale of +/- 50dB and set -50dB to produce -inf (-49dB to +50dB will still produce -49 to +50dB)
It’s a little more than three users . Unfortunately, none of them I’ve dealt with are that technically inclined, and I presume they haven’t contacted you about this (I took the liberty of giving them your address). Please do post a link to that file, anyway. But fundamentally I think being able to do what these people want in some way or other is important, or I wouldn’t be pushing the case (one other person has replied today saying a dB target “would be great for making custom tone sequences”).
If there is no sensible way to limit the gain on those loud sections in your clip to not exceed 0 dB (so the effect itself operates as a kind of compressor), I think I’d say let the audio clip and take the consequences. After all, if I wanted to set target fade levels on quiet audio that looked as if it might work without clipping, I 'd have to guess the amplification levels and if I got it wrong I’d still get clipping anyway. Also, even with your pop music kind of test case, maybe some one wants to go from -10 dB to silence. Who knows?
Sounds like it might suit that guy.
I think having a dB scale is important for just that reason (it’s directly comparable with the Amplify method). If we can only have dB or %, dB seems the more intuitive choice to me, even though “what it means” may be harder to grasp than “make it 50% as loud” . I can’t quite visualise what happens with screen readers though. Had we needed your scale to go from -50 dB to +10 dB for some reason, and screen readers only read 1-100, how does that work?
Amplify actually only gives you a reduction of -50 dB even if you enter a much greater negative amount. So I’d think we shouldn’t assume people who use -50 dB really want -inf. A checkbox “Treat -50 dB as silence” might be an idea, but would that mean a slider in a Nyquist plug-in?
Note that a dB gain has the same issues as dB target with how to handle clipping.
That’s easy - there’s no problem with generated tones because the amplitude is constant.
If I change the amplification scale to dB, then this can be very easily achieved by simply generating the tones at amplitude 1.0, then, if they require a fade from a target level of, say -12dB to say -3dB, they simply set the start amplification to -12dB and the end amplification to -3dB.
Hands up who would expect a fade effect to dynamically compress the audio…
but that is only one symptom of the problem.
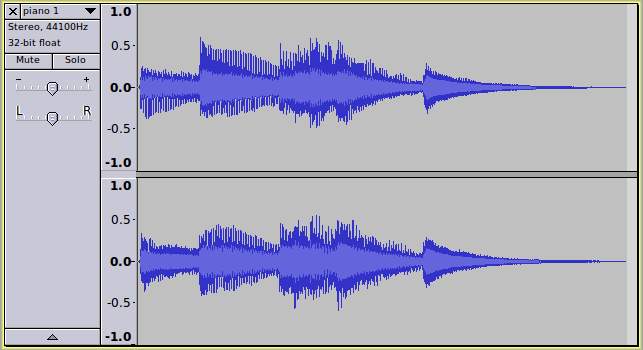
If we look at the last example, the “sensible” thing for setting a target level would be to base it on the peak value for the last 5% of the waveform, but what about Koz’s piano? the last 5% of Koz’s piano is almost silent. What if the audio is completely silent at the end? No matter how much you amplify silence it is still silence.
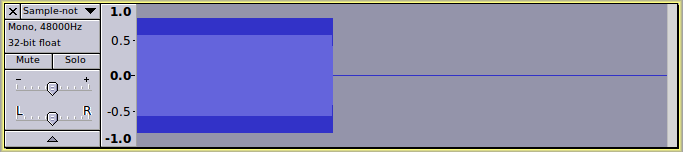
How do I calculate the required amplification for a set target level (any target level) with this sample:
According to David Bailes, they would just use text input, but this is why he particularly wanted the range of values to be specified on the left of the control rather than on the right (screen readers do not always read text on the right of the control).
It would mean an additional control (could be a “choice” drop down menu).
I think having -50dB as silence would be pretty safe as long the user was clearly informed. If, in the unlikely event, a user specifically wanted a fade of -80 dB to 0dB, they could run a fade of -40 dB to 0dB twice (though I think it would be extremely rare that anyone would ever need to do that).
I’ll go for the dB scale (which is what I had originally ) as there does appear to be consensus on this, and it ties in nicely with the Amplify effect.
The comment from Paul Beach on this was “dB is familiar to the ears; however % is easier to see. Try viewing the waveform as dB. It is not very helpful.”
A dB (amplify) version should be up by the end of the week.
BTW, I posted an updated version of my “Noise Gate” here: Noise Gate - #3 by steve
bar any typo’s that need correcting the noise gate is complete.
True, but it’s another step that may not be that obvious to some users. If we can’t figure a sensible way to accommodate this demand for “dB targets”, I think we’ll have to at least try to address this in the help somehow. Amplifying to 1.0 is fine in this case, but amplifying to 1.0 before the fade won’t help a lot of the other cases.
Right, but a) a lot of these people would simplistically like “targets”. Only those who can see the problems would be concerned that a fade could compress the audio.
And b) one basic problem is that we’re trying to combine a fade and an envelope into one tool because we already (will) have so many fades. Although all these requests have suggested adding input boxes for custom levels to fade, that’s because fade is the nearest equivalent tool. I think the use case these people have is for a general purpose, less fiddly, accessible envelope replacement, and not specifically for an advanced specialised fade tool.
While I appreciate the conceptual problems in implementing something, I think people have got to have (and will have) some common sense here. They have a clear picture of what envelope tool does and what Amplify does. As one said, “I know if I amplify silence as much as I can with amplify, I’ll still end up with silence!! Isn’t that obvious? You don’t withdraw EQ because someone could screw up and clip the audio, or make it sound like a 3 inch radio. Please, let’s give folks target levels to take all the guesswork out. If the target can’t be reached, fine. It’s just that, a target.”
Could one solution (if implementable) be to cap the gain to +50 dB (if they want more, do another pass)?
Unless we hide what -50 dB really does in the help, that’s a bit of a mouthful for the left-of-control text. “Initial Amplification (dB): -50 to +50 (-50 = silence)”?
OK. So I assume the default for Initial Amplification is -50 dB and for Final Amplification 0 dB, and we lose the “Amplification Multiplier”? I’m wondering if losing the latter gives us a possibility for a “Presets” choice control with a few options maybe like “Full fade out”, “Full fade in”, “Half fade out”, “Half fade in” to give us a minimal, obvious % option too? Choosing a preset would mean modifying the amplification values/sliders would have no effect.
That is exactly the pointy that I’ve been trying to make - how to sensibly achieve a target level is different from one audio track to another.
For the three screenshot samples that I’ve posted, if someone said they want to fade in with a 50% or -6dB target level, I’ve no idea what they mean!!!
I can assume that with Koz’s piano sample that they mean they want the final note to have a peak at -6dB
I can assume that with the “pop music” track that either they want the final quiet section (the last 5% of the track) to have a peak of -6dB, OR they want the end of the final loud section to be -6dB.
I can assume that with the “tone + silence” sample that they want the end of the tone to be -6 dB, OR they have lost their marbles, OR they are imagining that the amplitude of the tone continues to the end of the selection and they want that imaginary line to be -6 dB at the end of the track.
Alternatively I could assume that in each case they want the final non-zero peak to be -6 dB
OR
I could assume that they want the average peak level of the entire track to be -6dB
OR
I could assume that they want the target level to be -6dB based on the highest peak in the selection
OR
I could assume that they want the target level to be -6dB based on the highest peak in the last “x”% of the selection (with a control to set “x”%)
OR
I could assume that they want the final peak to be -6dB unless that causes clipping anywhere in the track, in which case the fade should be as steep as possible without causing clipping
OR
I could assume that they will only use this effect on constant amplitude tones
OR
I could assume that what they really mean is that they want a target amplification amount, but they don’t realise that is what they want
OR
I could assume that they have been working on a few highly compressed dance tracks that have a substantially constant amplitude and want to set a target for the mean peak amplitude.
OR
I could assume that they want to fade to a specific loudness
OR
They could mean that they want a plug-in that automatically works out what they mean and does it (could require dark magic or cerebral implants )
If I try to implement any of these, it is likely to be the wrong solution in the majority of cases (except for the “magical” one).
OR
I could make a plug-in that has all of these options and requires a huge screen resolution to accommodate all of the options and a 400 page manual explaining them all.
Because of the very tight constraints on screen size (so as to fit on 800 x 600 display on all platforms), I’m going to keep the built in help screens to a minimal “Quick Start”.
Could I put a page on the Audacity wiki with a more detailed and complete “Help”?
I’d like to replace the “CrossFade” effects.
If necessary I could include a “legacy CrossFade” preset that exactly reproduces the CrossFade.ny effect.
As indicated in my previous post, it wouldn’t take the guesswork out at all.
I’d much prefer to use an effect that does what it says on the tin.
I think it depends on what they want to achieve.
Linear fades are sort of OK’ish most of the time, but there are many situations where either a) you would rather use a non-linear fade, or b) you want to fade, but not to silence. Currently the only way to achieve either a) or b) is with the (fiddly, mouse driven) Envelope Tool. That is what this effect is aimed at, and it makes both of these tasks very quick and easy.
For producing complex up/down/up/down/up/down envelopes, my “Text Entry Envelope” may be a better tool (though it is limited to linear extrapolation between control points).
True. I’ll put it in the text at the top of the GUI AND in the Help.
That would also mean loosing the ability to increase the amplitude above its original level.
I’ll go for two versions -
i) Simple: Presets only
ii) Advanced: Presets + Custom Sliders
I’m really wanting to get this moving, but it takes me hours to write and format the Help screens, which need to be rewritten every time there is a change, so the the help files will have to wait.
Although one person said before that (in essence) they’d like to end up with a selection where the highest peak was at the target, it seems to me what most are “envisaging” is that the first audio sample and last audio sample in the selection should have gain applied so as to be at the target level set in the effect (within the minimum/maximum gain that the effect is allowed to apply). They need no more assumptions than that, other than (like Envelope Fader now) you can produce clipping, and other than (as now) applying gain to silence won’t have any effect. Otherwise, garbage in, garbage out. Aforesaid “one person” would be happy with that, and I’m hoping I’ve persuaded one of these other people to post here about what they are looking for.
Are there still technical objections, or is it a philosophical objection that we can’t express it as a target because the target won’t always be achievable? At the moment I’m tending to think if the objection is about providing something that can’t always do what is on the tin, the objection is relatively trivial compared to how useful/time saving this would be in many cases. Or can we find a way to change the label on the tin to meet the philosophical objection?
If there isn’t a technical objection, would a way forward (after you’ve worked up Fade Envelope) to make some stripped down demo plug-in that does the above, and see what people make of it? It’s looking like views are becoming more entrenched on both sides.
Longer term I don’t see why not, if it was a page about “how to use Fade Envelope to achieve various goals” where we could benefit from a step by step guide with images. I think if we are going to have “help screens”, the content of the bundled text file should be identical with the help screens, but both could have a link to an illustrated Wiki page.
More generally, I’d like to get much more organised about publicising/making available new Nyquist plug-ins when they have reached a sufficiently mature stage that they are suitable for an end user. At the moment I seem to be stumbling across various new Nyquist plug-ins in various Forums here, and I’m not clear about their maturity, and I have no idea what other ones there are. I’d like to agree one place for these to go on the Forum (I’m happy to create a new subforum if that helps). As soon as mature, I would like to see these added to the Wiki Download Nyquist Plug-Ins page. I’ve moved your anechoic reverb effect out of the April fool’s thread to this thread in the “Adding Features” forum, for want of anything better.
I see the above as independent of a process for requesting new plug-ins be included in Audacity releases, which possibly means posting to audacity-nyquist, Cc to -devel.
Personally, I’m OK with that. Possibly it may be judicious to include “In/Out” in whatever the title of Fade Envelope is.
I’d like to see that when you have time. If there are no objections to replacing the two “Cross Fade” effects, I think there could be room for an alternative “envelope” plug-in, and I haven’t yet completely given up persuading you about finding a home for some kind of “target dB” field.
I’m not quite following. Doesn’t an amplification value of +1 dB and higher let us increase the amplitude above the original level?
I’m reviving an old topic - please forgive me. (hangs head in shame)
For my own use, I made a dB-oriented version of this, and used it extensively on a recent project, which had many fade-ins and fade-outs.
Sadly, I’m a technically-inclined person who understands math, and I don’t need or want “fade to level.” Most of the time, I used this tool as a fade-in or fade-out, so that the beginning or end was 0dB, which I understood to mean “no change in level” (as opposed to some sort of “target level”), and the other end was either “silence” (-90dB) or some known level. Occasionally, I’d use it with amplification, and I’d “struggle” with such calculations as: I want to go from 0db amplification to +4dB, so I’ll amplify the whole thing +6db, and go from -6dB to -2dB.
I guess what I’m trying to say is, some tools require more knowledge - knowledge about what you want, and what the tool will do for you. I’m okay with that. I mean, for goodness’ sake! We’re talking about a tool which assumes that the user understands the difference between Elliptical and Exponential! By the way, I never did fully figure out what the custom “Initial / Final Fade Speed” settings did… and that’s okay! Despite the fact that I didn’t use every setting offered to me, I still found this to be a highly useful tool.