Hello. I hit “RECORD” and record myself saying the numbers one through ten. I then hit “STOP”. I close the file and name it “Count”. I open the file and I hit “PLAY” and when I get to “three” I hit “PAUSE”. I then go to “EDIT” and then to “SELECT” and then I hit “LEFT AT PLAYBACK POSITION”. I then hit “PAUSE” and then I hit “PAUSE” again at “seven”. I then go to “EDIT” and then to “SELECT” and then I hit “RIGHT AT PLAYBACK POSITION”. I have just completed Audacity’s very accurate method of (“editing”?). But how do I record what I just (“edited”?) and make it a separate Audacity file? In other words, how do I make “three” to “seven” a separate recording? Thank you very much.
If you want that selection from 3 seconds to 7 seconds for an exported file like WAV, File > Export Selected Audio… .
If you want that selection in a new track in the same project, Edit > Clip Boundaries > Split New.
Gale
Thank you for your reply. But it does not work. I forgot to mention that I run Audacity 2.1.1 and Windows 7. I made the recording “One Through Thirty” and used “left at playback position” and “right at playback position” at 5 and 13 and I hit the drop the dropdown menu and tried to follow your recommendations (“WAV, File > Export Selected Audio… .”) and (" Edit > Clip Boundaries > Split New") but the text in the dropdown menus lacked the black colored font so I could not follow your recommendations. Is there something I’m not doing or doing wrong? I appreciate your help. Thank you. I eagerly await your reply. (No sarcasm intended,)
Actually I am male. ![]()
OK, that’s because although you can make changes to the selection while playing or paused, you cannot save, export or change the audio data by running effects or moving pieces of audio around.
Just press the yellow Stop button then you can do the two commands I suggested.
Gale
Mr. Andrews: Sorry for the mistake. I hit “STOP”. I tried both of the suggestions you mentioned and the “3 seconds to 7 seconds” was totally ignored and the “shadow” or “hightlight” totally encompassed the entire recording 1 through 10. I hope we are on the same page. When i mentioned the numbers 1 through 10 and 3 and 7 I was referring to the recording I made and not the number line found on the Audacity. (1.0, 2.0, 3.0, 4.0 etc,) I mention this in case you have confused the two. But your suggestion is not working. I hit stop and the black font appears in the dropdown menus but when I do either function the shadow or highlight encompass the entire recording. I only want it to encompass 3 through 7. In other words it makes a copy of the entire recording but I want a copy of the small amount that I used “left/right playback position” on. What do you suggest?
Gale is a non-woman, last we checked.
Would this be a good time to find the goal? If it’s to patch or correct a precise portion of a performance, that’s not how I would do it.
Open a new Audacity and create replacement content by pressing Record and announcing or whatever the work is. Audacity will not record in place, so you can’t press record and have your voice fill the hole in the show.
Trim and measure (or re-record) the new work as needed. Export as WAV (Microsoft) and then import that file into your show. It should arrive on its own timeline.
Use the Time Shift Tools (two sideways black arrows) to push the new content sideways until it matches the bad content. You can choose what to listen to with the MUTE and SOLO buttons on each track. Then fade the bad content with the Envelope tool (two white arrows and bent blue line). Jocky, trim, edit, manage until the patch cannot be heard.
Audacity will melt the two timelines into each other when you export the final show.
This process will give you very precise control of the original show and the patch without the two timelines bumping into each other and without changing the time of either. You can apply the Envelope tool to the patch as well to fade it in to match the place where the bad content is fading out.
Koz
Uh…KOZ! Perhaps you could read my last response to Gale. I was waiting for him to reply. I am ultra-curious as to why I am getting different results. But basically what i want is to copy any portion of a recording and make it a separate file without altering the original file. I’m not one to sit and wait without experimenting, however. But I crash and burn. I would love to learn how to break up a song and put different sections in different sequences. The terminology on Audacity is staggering. I’m wondering why Gale would tell me something that doesn’t work and then fail to respond.
On most forums you would wait 48 hours for one response, not get four or five responses in one day. ![]() And if one of the other helpers replies you get a faster reply that way.
And if one of the other helpers replies you get a faster reply that way.
What I wrote does work if you have a selection in one or more tracks, and have stopped, but you must be doing something you are not telling us or we don’t expect you to do.
Not clear what you mean, but I guessed you had exported the whole track using File > Export Audio… then clicked on the track. If so you have no tracks now.
So now you have one or at most two tracks in Audacity, with a grey selection present in the track you played. Correct?
I guessed you were listening for numbers being spoken out in the file you were playing. That does not make any difference. The selection does not have to be at exact seconds.
My current guess is that you clicked below the track(s). This deselects the track(s), which you can see by the fact that the track colour to left of the blue waves (where it says Mute and Solo) is now light cream rather than grey. You thus have no selection in any tracks and if you then export the selection or Split New, rather than greying out the menus, Audacity by default selects the entire length of all the track(s).
To get your selection back, assuming you see a yellow border round the track, press ENTER or RETURN on your keyboard. Or, hold SHIFT on your keyboard and click above Mute/Solo where it says “Hz” (or anywhere else that is not a slider or button). For more explanation, see How do I select audio in one track?
Gale
Uh…no. Let me explain it again. I open a new Audacity. I connect my microphone to my pc. I hit “RECORD” and I say into my microphone, “A, b, c, d, e, f ,g ,h ,i ,j, k, l, m, n, o, p, q, r, s, t, u, v, w, x, y, z.” I then hit “STOP”. I then hit the “X” in the upper right hand corner of Audacity and close it. Audacity asks, “Save changes before closing?” I hit “YES”. A window pops up and asks, “Save Project As” and I name it Alphabet. The folder and the Audacity icon appear on my desktop. I open Alphabet and I want to make a copy of me saying the alphabet h through q. I hit the green triangle named “PLAY” and I hit the two blue bars of the “PAUSE” button when I get to “h”. I then hit “Edit”- “Select”- “Left Playback Position”. I then hit the two blue bars of the “PAUSE” button and I hit the “PAUSE” button again when I get to "q’. I then hit “Edit”- “Select”- “Right Playback Position”. I then hit the “STOP” icon. How can I make the h through q a separate recording? On the number line I see a long gray bar. The audio track below it is surrounded by a yellow line. What do I do? How can I make that h through q a new recording? I appreciate any help that you may afford.
It would help to make your posts more easily readable if you used paragraphs.
One way to do the job…
- Open the project.
- Press “Play”.
- Get ready on the Ctrl and M keys.
- When it gets to “h”, press “Ctrl+M” then “Enter”. This creates a label.
- When it gets to “q”, press “Ctrl+M” then “Enter”. This creates another label.
- Press spacebar or the click the Stop button to stop.
There are several ways to do the next part. Here are two ways:
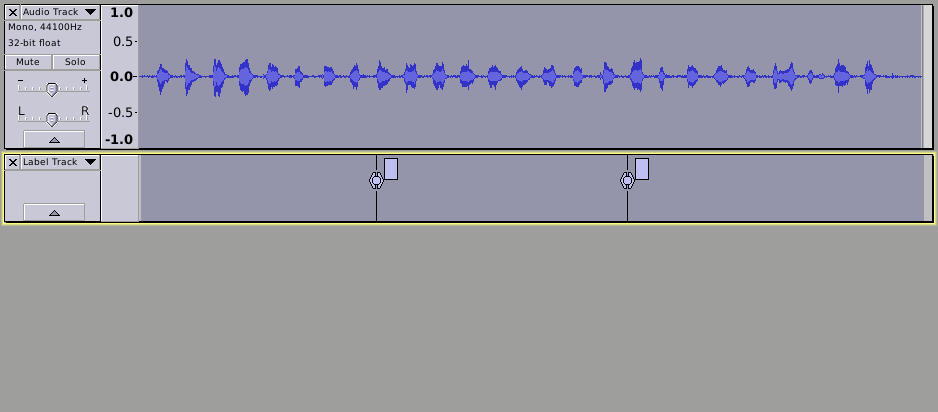
7a) Click and drag on the waveform to select from the first label to the second label.
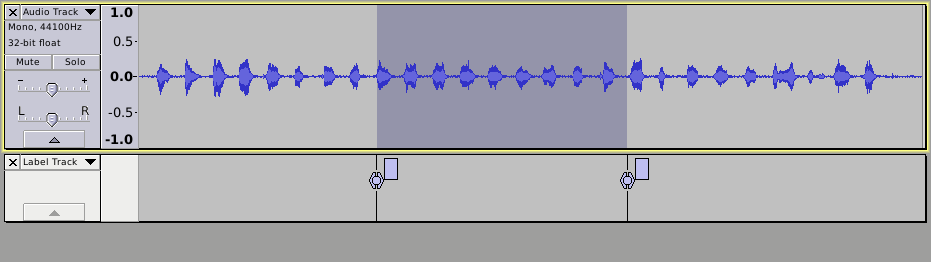
8a) “File menu > Export Selected Audio”. Choose a new, unique name for the file, This file will contain the selected audio only.
Alternatively:
7b) Click and drag on the waveform to select from the first label to the second label.
8b) “Edit menu > Remove Special > Trim Audio” (or “Ctrl*T”). This deletes the parts that are not selected, leaving just the part that was selected.
9b) You may now export, or save as a new project.
This is an easier way than using labels, except that instead of Pause then Edit > Select > Left at Playback Position and again Pause, Pause, Edit > Select > Right at Playback Position, don’t do any pauses. Just press [ (left square bracket) on your keyboard when you hear “h” and press ] (right square bracket) when you hear “q”. Press Stop.
You are then (with fewer steps) at exactly the same position as all the steps you wrote out, and File > Export Selected Audio… works if you simply do that and don’t do whatever you are doing to deselect the track.
Gale
Yes that’s quicker, though if I don’t manage to do the key presses quickly enough, I find it easier to adjust the selection if I have fixed reference points (labels) as a guide. Personally I find labels to be invaluable for this type of thing, and on longer recordings it is possible to label many positions on the track, not just the two in this example. If there is sufficient time before the next cue, I can even type in a label name before pressing Enter.
I’m a BIG fan of labels for this type of work too - I find them preferrable and much more usabel than the square brackets.
One thinhg that is very useful is that the label’s position can be readily adjusted if needed.
I also find myself using region labels quite often in these situations as the region can ten readily be selected by clicking on the region label.
WC
I think the square brackets are a convenient way to create selections for labelling as region labels.
Gale
Yes, i agree the square brackets are really good for that.
ok, I’ll give that a try sometime ![]()