Hi - using Audacity Version 2.0.6 and MAC O/S 10.6.8
There appears to be a wealth of possibilities under the EFFECTS section … but it’s somewhat overwhelming to figure out how they work. Where do you suggest I start reading - other than here?
If I understand correctly, NORMALIZE does not reduce the dynamic range, but rather lowers the peak of each track to match. But then, what happens (as with classical music), when there’s a loud movement, followed by a quiet one and you need to keep it that way? Right now, I have created a CD with 20 songs … but one of them was recorded significantly louder than the rest and I’d like to tone that one down. Is NORMALIZE the right tool for this?
And to use it … how do I ‘select’ all the other files to find some level? And must one always work with the AUP files with all these EFFECTS … or can one work from the WAV files also ?
I’ve also had a look at the EQUALIZER but not been successful to see anything on the graph … what’s the trick to using this? …(or where should I look?), as its potentially interesting if one can cut a certain frequency. Can this be done before burning a CD ? Tks!
You may want to upgrade to version 2.1.0 which has significant new features: Audacity ® | Downloads
Start here for a description of the effects that are included with Audacity.
If you have the entire classical performance on one track in Audacity, select that track then do Amplify or Normalize, the relative volumes of the songs or movements will not change.
You should start by understanding that “loudness” does not necessarily correspond to “level”. A song can sound “louder” without having peaks that are any higher than another song that sound “quieter”. See loudness war in Wikipedia. Songs that sound louder have usually been compressed to limit the dynamic range. Probably the only way to deal with this is to listen snippets of two songs back and forth, and adjust the level of the louder one until they sound about the same. You can’t undo dynamic compression.
Try the Equalization page in the manual.
– Bill
If you’re not a purist and you’re listening in challenging conditions, you might like Chris’s Compressor. Chris wrote his software so he could listen to opera in a noisy car. It does take into account scene by scene variations… and gets rid of them.
I use it to even out on-line radio productions, which, in the absence of the radio station broadcast compressor come out unlistenable in the car. Chris rides the volume up and down and an announcer mumbling in his beer comes out perfectly listenable as does the other host’s nuclear detonation laugh.
http://theaudacitytopodcast.com/chriss-dynamic-compressor-plugin-for-audacity/
Both Amplify and Normalize works on peaks in the blue waves. Neither has any idea what content is or how loud anything is. The joke is the gunshot at the end of an hour show that can pretty much destroy the whole show because the gun sound will “take over” the tools.
And yes, as above, “loudness” is a real problem. Any trouble visualizing a kid screaming on a jet? Why? The kid can’t actually be all that loud. Behold, the psychoacoustics of loudness.
Koz
The kid screams at 3000 Hz and the mother comes to aid.
The mother screams at 1400 Hz and the father comes to aid.
The father groans at 100 Hz and no one comes.
“Hey, was this a bear? Let’s get away from here.”
Steve’s replay gain tool might also be useful.
It set’s the loudness according to a preference level, after a-weighting the content.
Select all tracks, open the plug-in and choose “normalize”.
The songs should now be at the same relative loudness.
You can afterwards use amplify (with all tracks selected" to increase the volume a bit in order to come near 0 dB.
That is, if Amplify proposes 3 dB then the loudest track (peakwise) has -3 dB. Thus, you can enter the value 2 dB and all tracks are amplified by that. The norm is in this case the loudest track which now has -1 dB.
The relationship between the tracks is the same as after the replaygain normalisation.
Don’t use normalize after replay gain. All tracks would have -1 dB in this case.
Thanks for all the tips … very interesting. I’m fairly conversant with ‘Loudness’, having studied acoustics some years ago … all relative ![]()
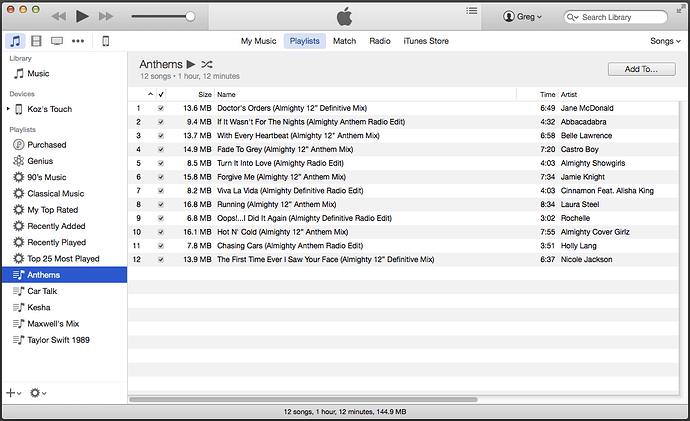
Koz … I think you mentioned that iTunes does not allow you to Copy and Paste. ‘What a bummer’ I thought, if that is true … as once you have a PlayList, one needs to be able to transfer the Song list and Track Times to create a CD cover.
Well … I experimented a little and succeeded to copy two long PlayLists into a WORD document like this.
Perhaps this is ‘old hat’ to some … but thought I’d post this anyway. Feel free to transfer it to another thread if need be.
To Copy a PlayList from iTunes
SELECT PlayList Name
Hit LIST (top right)
EDIT – then, SELECT ALL
Once selected (all grey-blue)
Right click and Select COPY
Then open a WORD document and PASTE
Hope it also works for others. (I have WORD on my MAC)
cheers
I have WORD on my MAC
I won’t tell a soul.
Another way to do that is screen capture the text and print that on the CD papers.
No LIST (attached).
I meant copy a list of the songs you like from the iTunes store and accumulate them for a massive downloading later. Can’t be done as far as I can see.
Koz
But iTunes can be used to print CD covers for you from playlists (and the music folder) - just select the playlist and use File>Print and the select the Theme (style) you want.
WC
