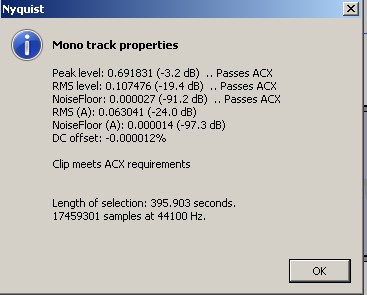
My ATR2100 isn’t hooked in directly to my computer. It’s connected via XLR to the Scarlett Solo, which is hooked into my computer. In Audacity, I select “Scarlett Solo” as my microphone (my ATR2100 doesn’t even show up in the list because of how it’s connected through the Solo). When I record that way (like how I did for my Silence Sample), my noise floor passes ACX check, pretty much always. When I run ACX check on the Silence Sample, this is what it tells me (screenshot attached). I use the 44100 Hz project rate, because that’s the requirement for ACX audio files. Unless I’m missing something. Which is entirely possible, because just when I think I’ve got my head around this issue I get even more confused.
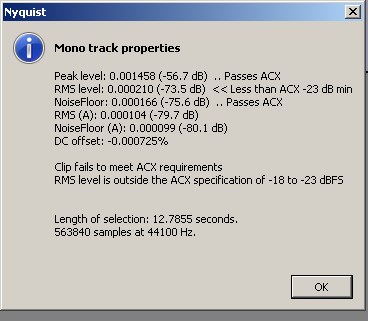
After normalizing some of my audio tracks from a recording session, this is the sort of thing I get [the file that easily passed all checkpoints after normalizing was the very short clip - the ones that fail are longer ones (those fail on the RMS); my noise floor is almost always in the -'70s on ACX check]:
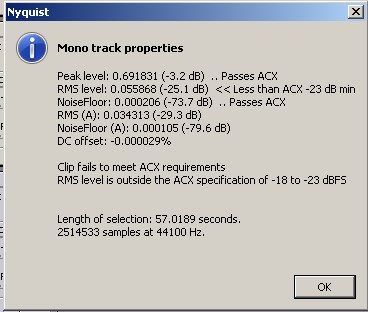

In your picture, your RMS is a -73 and your noise floor is a -75.6 and yes it does pass. HOWEVER, when you get your RMS between a -18 and -23, your noise floor will now fail. When you boost your REM, you are boosting your noise floor as well. You will boost your RMS by 54dbs which will now make your noise floor boost up, now making your noise floor fail. Remember a -57 is louder then a -60.
My Alisis interface shows up in Audacity as a USB Codec. Also remember to keep your phantom power switch off. It is not needed for dynamic mics.
That is the very point I was making. If it is close with a 1 min clip, you will struggle with a 30 min clip, thirty times more.
Now, when I run Compress Dynamics, followed by Normalize (at -3.2) on those same samples (where I ran only Normalize at -3.2), I always pass everything - noise floor gets to ~ -'90s. But that brings with it the problem I mentioned at the very beginning of this thread. So it seems that the trick will be to figure out how to tinker with Compress Dynamics so it doesn’t give me that problem … or at least, minimizes the problem.

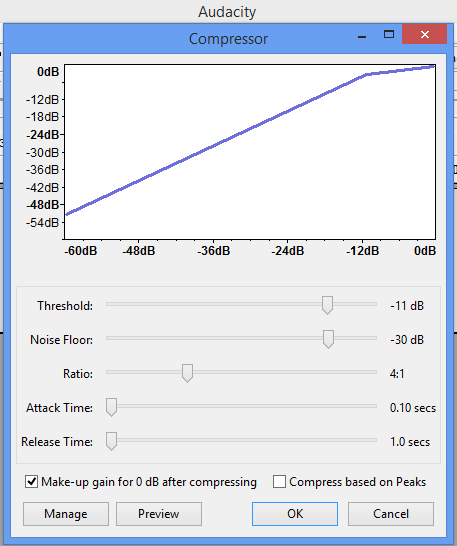
Those do look much better. I am going back to a 4 to 1 compression myself. I just like the way it make the audio sound a little thicker and brings out the softer words. Great Job! ![]()
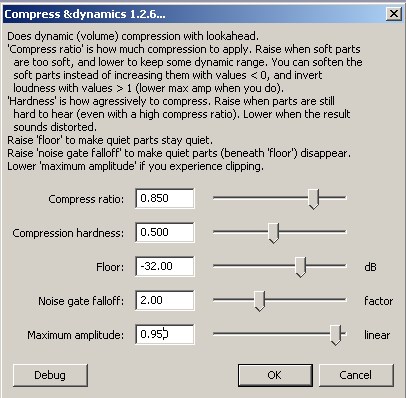
Your input will determine how your compressor will function. If you can not record close to the same level each time, you will have to play around with it a little. These are the settings on my external compressor and I transformed into Audacity with great results.
- Input level between -6 and -12.
- Background noise -75 or lower.
- Threshold -11dbs.
- Noise Floor -60.
- Ratio: 4 to 1.
- Attack 0.10 and release 1.0.
- Check make Up Gain and UN-check Compress based on Peaks.
Remember, this is what works for me, it may not work for you. ![]()
I use these settings (they’re not the default ones), based off a YouTube video I saw a few weeks ago. Obviously I’ll probably need to play around with them in order to address the issue I mentioned in the original post.
Compression is a very “Personal” issue with a lot of producers. Your settings above shows very light compression. Try 1 to 3 x 1 or 2 to 1 or 4 to 1 and see if you can hear the differences. Compression is used sometimes on background vocals, drums, soft instruments to either squash them, or bring up the lower volumes, without raising the total track volume. You will know when you have compressed to much, I promise. ![]()
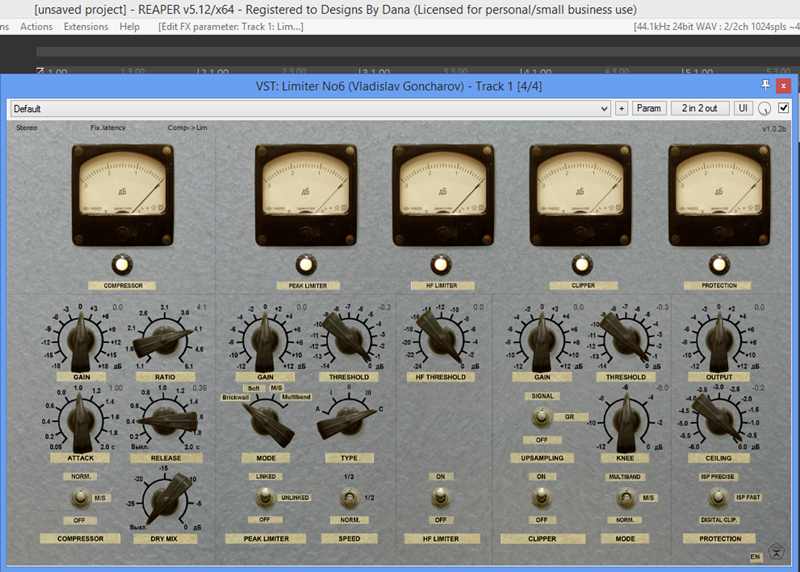
I have not seen that Plug-in for Audacity before. The picture below is one a play around with from time to time. I think it is written in Russian maybe. The one below that, is the one I use with Audacity.
So now the next hurdle to understand a bit better is the sequence in which these files should be edited/mastered/finalized. At what point should things like compress dynamics or normalization be done? At what point should noise reduction be applied? At what point should any plosive repair, de-esser, or de-clicker be applied (if needed)? I’m assuming after all the edits have been done (such as cutting, deleting, etc.). I know some of that has already been addressed here, so I thought I had a handle on the basics as far as that goes - but I’ve encountered different opinions in places (like the ACX blog and its comment section), so of course my concern is doing something out of order and screwing everything up.
That is a great question and will mostly depend on what needs to be done. Myself, I always do my compression first. Since I use an external compressor. Each situation will be different, depending on your needs. You should always run your eq first before using any notch filters, de-essing or plosive repair, or your eq will just put your previous setting, back to where they were, if you are using those same bands. The last thing I do is normalize. Here again, it will depend on what filters / plug-ins you are using at that time. Remember, when you start doing all this, you are now becoming a “Mixing Engineer”. That is why these guys and gals spend tens if not hundreds of thousands of dollars for their formal education. Most of them will tell you the same, you have to play with the settings.
They will also tell you that 90% of them, do not “Master” their own mix. Hence, that is why we have “Mastering Engineers”. Here again, as a Home Studio, we must take on that roll as well. It’s funny, when I first started Podcasting, I would send a two min clip to a friend of mine to see what he thought. He would reply with a “?” or simply say “run with it”. After 5 “run with its” in a row, I stopped bothering him. I sent him a 3 min clip I wanted to put on ACX with my profile and he replied with a “?”. When he did that before, he would always tell me what he did not like about the audio, this time it was just the “?”. So I e-mailed him back and asked him what he thought needed to be changed and he said “Nothing”. He was just curious as to what I was doing. It never hurts to have another set of ears listening to your work.
Most humans are self prejudicial. Where others will say it sounds fine, we say we don’t like it. There is a thing called “Over Production” and many times, less, is way better then more when it comes to audio mixing for vocals. Now as far as mixing a 12 member band, I would not even know where to start! I could record them, but I do not have the experience to mix or master them. Unless they wanted it for free. If that was the case, I would give them a life time money back guarantee. ![]()
![]()
If you need to remove DC offset or reduce low frequency noise, do that first, otherwise it can cause clicks at edit points.
If you need to use a software “dynamic range compressor” and “noise reduction”, then noise reduction should be before compression. Compression will often cause the noise floor to fluctuate, which makes noise reduction less effective.
Amplifying can be done at any time. Assuming that you are using the default “32-bit float” format, you may amplify up and down as much as you like without causing any damage to the audio - well, almost - if you are amplifying by many hundreds of dB then there will be some loss of sound quality ![]()
During editing, when working with a single track recording, I prefer to work with the track normalized close to 0 dB and control the playback level on my amp. Others prefer a somewhat lower level. That’s a matter of preference and what you’re familiar with. Limiters and compressors are certainly easier to use if the track has a peak level of 0 dB. After applying Equalization, the peak level may become higher or lower. if it goes above 0 dB you should definitely amplify to a lower level before you do anything else, otherwise there will be clipping distortion on playback.
You should always check the peak level immediately before exporting the final edited version, and amplify if necessary. If you do need to amplify at this stage, run ACX check again after amplifying (because amplifying changes “all” of the levels - the RMS and the noise floor as well as the peak level).
Other than that, it’s fairly flexible.
A fairly typical workflow might be:
- Record
- Low pass filter
This also removes DC offset. - Amplify to -3 dB
If the peak level before amplifying is below about -18 dB you will probably need to delete and start again. A good peak level for the original recording is around -6 dB and MUST be blow 0 dB. If the peak level is 0 dB (or higher), delete, turn down the mic gain and start again. - Run ACX check. If it’s a long way off, delete and start again.
If the noise floor is much too high, delete and start again. A 'little" too high is probably fixable. - (optional) Amplify to a level that you are comfortable working with. Usually this will be between 0 dB and -6 dB. The exact level is not important as long as you’re happy and can hear clearly.
- Notch out any annoying hums/whistles
There should not be many, and if present they should be low level (hardly noticeable), otherwise delete, fix the problem and start again.
A very low level hum or whistle is probably not fatal and could be filtered out later, but it will become really irritating for you’re constantly aware of it while you’re editing. - Editing.
This takes a lot of time, so if you’re not happy with the sound quality at this stage don’t waste time trying to salvage the recording. Cut your losses and start again.
The most important thing here is to achieve a good “flow” in the reading without distractions. Never insert “absolute silence”, it is very noticeable and is distracting even to the untrained ear. If you need to insert a pause, paste in a bit of “room tone” (the noise floor). All external sounds should be removed, for example, if you can hear a keyboard click, that should be removed - it’s a distraction that will “break the spell” for the listener. Exactly how far to go in terms of vocal noises (such as breaths or mouth clicks) is a matter of opinion, but they should not be distracting to listen to. Some audiobook producers like to eliminate all mouth clicks, while others leave them in as long as they are not distractingly loud.
See the ACX website for a wealth of information about editing. - Post editing processing and “mastering”.
There could be a lot or a little that goes here. As a minimum, this is where you ensure that the peak, RMS and noise floor meet the required standard.
Thanks so much for the input, you guys. As I’m working on this project, I’ll be returning to this thread to re-read the info multiple times so it can sink in. This is not stuff that comes naturally to me so sometimes it takes a while before everything “clicks” in my head. There was one other question I meant to ask but forgot: should I master all the files as one long track and then split that up into the multiple tracks I’ll need to upload when the project is complete? Or should I master each file separately? My instinct says that mastering one long file will help it sound consistent, but I could be way off base on that.
It’s worth doing a “rough master” just to check that you’re in the ballpark (it would be a tragedy to get to the end of the book and then discover that you’re way off), but that “rough master” is really just for peace of mind. The final mastering is done at the end so as to ensure consistent quality throughout (as you said).
You can find the submission requirements here. No longer than 120 min, 1 chapter, file size, ect… http://www.acx.com/help/acx-audio-submission-requirements/201456300
Right, I was aware of that - I just wondered if, for mastering, it should be done as one long file (then split into chapter files for submission). Or if it even made much of a difference.
Oh for sure. I’m trying to avoid the tragedy, so I do a lot of checks on various tracks as I go along.
Sorry, I should have paid more attention to your post. ![]() I have talked with several people about this and most say they shoot for a even number, if they can. If they start at -22 then they play with the numbers on each chapter to get them close. Some say they place the chapters together, then normalize the whole file and re-split the chapters. I just bought a LUFS meter that should allow me to place each chapter on its own track and render them all at the same level but I have not done it yet. So to answer your question, I have no idea!
I have talked with several people about this and most say they shoot for a even number, if they can. If they start at -22 then they play with the numbers on each chapter to get them close. Some say they place the chapters together, then normalize the whole file and re-split the chapters. I just bought a LUFS meter that should allow me to place each chapter on its own track and render them all at the same level but I have not done it yet. So to answer your question, I have no idea! ![]()
You can find the submission requirements here. No longer the 120 min, 1 chapter, file size, ect…
You probably meant to say “No longer than 120 minutes…” Your sentence seems to say they no longer care about time and chapter breaks. They do.
Koz
This is another place where meeting ACX requirements with some margin can be handy. We do know that people who pass each chapter are published authors, but it’s less clear how they got there. It’s even less clear if ACX checks it that way.
We do know that it’s possible to get some leeway in the requirements if the measurements aren’t too far off and you’re a terrific reader. Someone recently got Judy Dench to read a legal brief and it was riveting. That’s the joke that these people can collect an audience reading the phone book.
Koz
In my case I’m pleased to say that I have completed Chapter 3, and heres the result.
It’s exactly 30 minutes long.
It took about 30 to 40 minutes to record - I actually forgot to measure it. But the original file was 33 minutes long.
Editing took about another hour. Removing extended silences, outside noises, and obvious heavy breathing. Not using Effects - just highlight and Cut.
So resulting track is 30 minutes. ACX Check revealed that the peaks were pretty close to 0.0 but everything else was passing the ACXCheck.
Applied Limiter at -3.5 and this is the result.

So Recording to Desk Pass… with only 1 Effect applied - magic.
Chapter 2 went pretty much the same, while Chapter 1 - for obvious reasons took me what seemed like WEEKS!!! but in reality was probably only a few hours ![]()
I’ve discovered an interesting way to check consistency across tracks too.
un-mute say two or three tracks, with headphones on, and play. Because of the different silence gaps, you hear it as though three people are speaking to you. You will soon see if they are wildly out of range of each other…

As those who have followed this list know now - @DL Voice, @Dana_Tucker and others … the biggest secret is not just minimum room noise, but NO room noise. If using a Dynamic mic, you can increase RMS by being close to the mic. Don’t amplify, as that only amplifies everything. You don’t need a million dollars worth of equipment ( although it would be nice ) you just need consistent sound across the entire recording, within the parameters laid down by ACX.
good fun.