Hi all! I feel like I’m missing something really obvious - like it must be right in my face, and here I am clueless. I appreciate whatever help you can give me.
I’m using 3.7.1 on a 2019 Mac Air. I also edit on my brand-new iMac, up to date with 3.7.3. I can’t find what I need on either.
What I’m trying to do: set a minimum volume across an entire track. Not little patchy manipulations for a sentence here, two sentences there. But select the whole track, click whatever magic effect is necessary, and voila, everyone is speaking at at least X volume.
It seems so basic! But everything I find has to do with lowering maximum volume, while I’m trying to do exactly the opposite. Help me out here? And please be aware - although I’ve been editing interviews for many years, I’ve gotten by with only the basics - learning just what I need and no more. Some of your advice might go over my head - please be patient.
I don’t know of any way to do that automatically and you probably wouldn’t want to because between sentences the background noise will be boosted to match everything else.
There is a Leveller effect that you can try. It’s (oddly) categorized as a distortion effect: Effect → Distortion and Modulation → Distortion → Leveller.
The “Leveller” effect does, in fact, distort the audio. It uses a weird compression scheme that is independent of input level. It was originally designed to compress speech within macros (then called “chains”).
A better way to proceed (depending on the differences in level between the quite parts and the loud parts) is:
1 Apply the Compressor or Limiter effect to reduce the levels of the loud parts. These are real-time effects so you can adjust them to get as much compression or limiting as you need without distorting the audio too much.
2 Amplify the entire track.
Bill, thank you! I recognize you from some earlier help you gave me.
If I do it that way, is there any way to reduce the chance of making it noisy - bringing up the non-speech volume with the speech? Some kind of if/then application that wouldn’t amplify sounds that’s below a certain floor?
I just realized that the new Compressor effect has a make-up gain slider.
So, forget step 2, just add the Compressor to the track as a real-time effect. Start by setting Lookahead to 1 ms, Attack to 1 ms and Decay to 10 ms. Play the track and play with the make-up gain to get the quiet parts where you want them, then lower the threshold to stop the loud parts from clipping. You can set the graphic display to show the output to make sure there is no clipping.
If there are unnatural-sounding changes in level, play with the Attack and Decay times.
Take your time and listen while you make adjustments. After a while it will start to make sense.
It seems Chris’s Compressor is still available. It’s worth a shot.
Chris liked to listen to opera in the car and he hated having to constantly adjust the volume for the different acts and productions. So he designed it so you just basically throw an opera at this thing and it all comes out the same volume.
It turns out it works similarly to Broadcast Limiters—the reason you never have to adjust the radio in your car.
There is one oddity. Chris is a look-ahead compressor. That means changes in actor/singer/orchestra volume don’t catch it off guard. It can see them coming. However that also means it doesn’t much like the beginning and end of the show. So attach several seconds of something to each end of the show to give Chris something to chew on, and then cut the extra off later.
koz, thanks for going to all this trouble! I’ll give this a fresh shot tomorrow. I turned in the file to meet deadline, but I’ve still got the raw to play with. Much obliged!
click on the link for “compress.ny” in Koz’s message
download to somewhere on your Mac
Start Audacity
Click on Tools > Nyquist Plugin Installer
Click the “Browse” button, find the compress.ny file, click “Open”
Click “Apply”
You should get a message that the plugin was moved to the correct place on your computer
Quit Audacity
Start Audacity
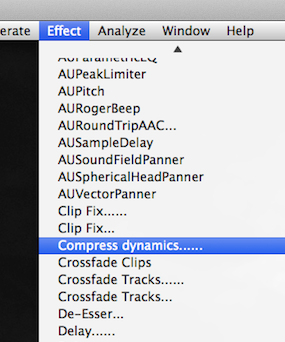
Click on your Effect menu and see if the effect “Compress Dynamics” is there. Depending on how you have your menu sorted it may be in the “Nyquist” submenu.
If it is not there, click on Effect > Plugin Manager
Look for the effect “Compress &dynamics” and Enable it
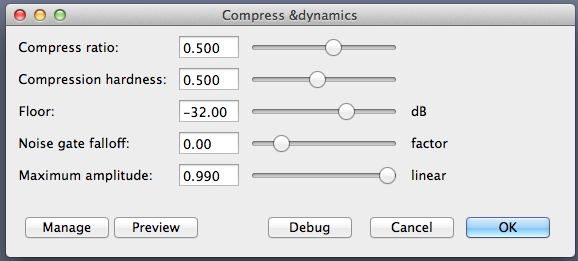
Start with these settings:
Compress ratio 0.9
Compression hardness 0.9
Floor -32
Noise gate falloff 0.00
Maximum amplitude 0.8
Use perceptual model 0
This is not a real-time effect.
This is a destructive effect, so you may want to do a Save As with a new project name before you commit the effect to the track.
Start by selecting a short portion of the audio that includes soft and loud passages. Apply the effect and listen to the result. If you don’t like it, Edit > Undo, tweak the parameters and try again. Rinse and repeat. When you get something you like, apply it to the whole track.
Depending on how comfortable you are with Audacity’s built-in Compressor, this may be easier. In my brief tests it does work well in bringing up the quiet passages.