Hello, I have a project with chapters. I normalize each file to -5db. They’re all pretty much normal speaking voice, so no loud signals. A current client says that one file is quieter than the others. How do I make sure all files are the same volume level? Thanks.
The audiobook people use AudioBook Mastering. Three audacity tools applied in the right order remove low pitch rumble and distortion, set overall loudness, and protect against peak or tip distortion.

There is a side benefit where your files will be the same loudness as audiobooks. Go back and forth with no change.
Koz
Thanks Koz. What order would you put Noise Reduction and Bass Treble?
Noise Reduction can usually go after because that’s not likely to change the loudness. If it does, you got a lot more problems than simple volume changes. Do you know what the noise is?
Do tone control before. You should be careful with those because boosting and suppressing midrange (around 3000Hz) can make a presentation sound louder than it really is. That is, dipping bass and treble leaving the mid tones alone.
What kind of corrections do you normally do? Are you trying to become a bass-heavy announcer through processing?
Koz
My floor noise is pretty clean. There’s no blips on the db monitor. I usually change the treble bass cause my mics sound kind of trill and sharp. So I try to soften the treble. Thanks for the effects order.
There’s no blips on the db monitor.
I can fix that. I don’t use the standard bouncing sound meter.
I stretch the sound meter across the whole Audacity work window and I change the range from the default 60dB to 96dB.
Audacity > Edit > Preferences > Interface > Meter.
96dB is the maximum volume range for conventional WAV sound files.
Also, there’s a color note. I use the rainbow colors for recording and the two-tone colors for playback. The two playback tones are RMS (Loudness-light green) and peak (dark green).
The recording rainbows start changing from pleasant green through more and more angry colors as you get closer to overload and clipping distortion. You should stop getting louder at the yellow or orange color and really pay attention if you hit red.
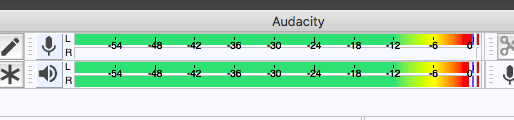
If your recording looks like that, you have serious over-volume problems and possibly no show.
Koz
Do you have sibilance or “Essing?” Do your “SS” words sound like they could drill wood? “SSister SSuzy SSells…”
If so, you may be able to correct that after Mastering. I use the Desibilator by Trebor.
https://forum.audacityteam.org/t/updated-de-clicker-and-new-de-esser-for-speech/34283/199
Try these settings first.
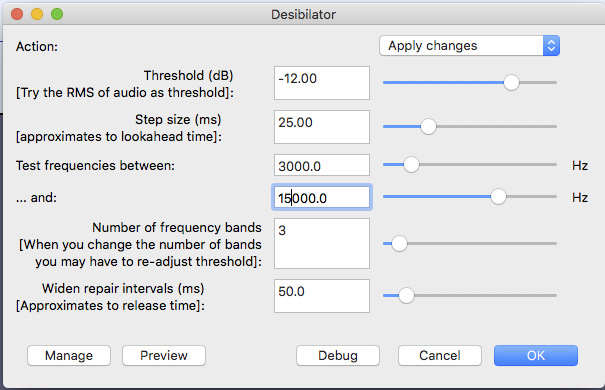
DeSibilator wants you to set the performance volume and if you apply it after Mastering, the performance volume is automatic. Getting rid of sibilance should not change the volume. It just gets rid of the ice-pick-in-the-ear sound.
Koz
Koz, thank you for the tutorials. I will try test them out.
Back to getting consistent volume levels across files, if I have already processed the files, is there a way to check and get all the files on the same volume levels? I have been doing it visually for now. If I do the audiobook mastering steps to the already processed files, I get sound distortion.
I will do the audiobook mastering steps starting for the next project. I had already recorded several files before posting my original question.
I get sound distortion.
[stunned look]
The mastering tools were designed to not do anything if they’re not needed.
Can you post some of the distorted work? You can’t go over about 10 seconds.
Scroll down from a forum text window > Attachments > Add Files.
Koz
is there a way to check and get all the files on the same volume levels?
Loudness Normalization is supposed to set the RMS level, and ACX-check will report the RMS levels which is a pretty-good measure of “loudness”. But it’s a kind of average so if a the loudness varies a lot in the same file it’s not as useful.
BTW - Normalization and Loudness Normalization make ONE adjustment to the whole file so it doesn’t even-out the volume within a file. (Limiting does even-out the volume to some extent because only the peaks above the threshold are limited.)
As an alternative to Loudness Normalization you can match the RMS levels as follows:
-
Run ACX-check on all of the files and note the RMS levels.
-
Choose the one with the lowest RMS level as your reference and then use Loudness Normalization (in the RMS mode) on the other files to match the reference.
By choosing the quietest one as your reference and only reducing the volume of the others you can avoid boosting any files into clipping/distortion.
(You can use a similar process by-ear, again using the quietest track as your reference.)
If I do the audiobook mastering steps to the already processed files, I get sound distortion.
I don’t know why that would happen unless you have a few extra-loud parts that are extremely-affected by the limiting. (The Audacity limiter is very good, but it can sound like distortion when over-done.) …If you run that same mastering process twice (almost) nothing will happen the 2nd time.
Or… Are you re-processing WAVs or MP3s? You shouldn’t edit/process MP3s multiple times because the file gets decompressed when you open it in Audacity. Then you go through another generation of (lossy) MP3 compression when you re-export, and some “damage” does accumulate every time.
Actually, I messed up a step. The Audiobook Mastering worked out for my files. Thank you all for the tutorials.
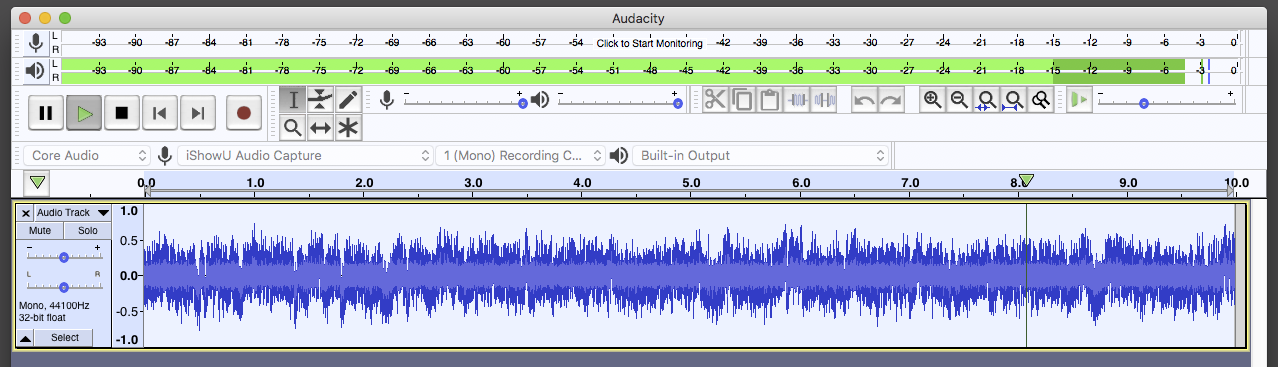
I am attaching one audio clip with samples from two different files. Is there a way to adjust the first 5 seconds to sound more like the second 10 seconds? The client says the first 5 seconds sounds louder. I did the audiobook mastering steps to both files as outlined previously in this thread. Thank you.
The client is right, there is a difference. You really want to wait for one of our Audiobook elves to pitch in here. Until they do, here are some steps I took to make them sound the same.
- Create a label at about 5.5 seconds so we can separate the tracks.
- Select left-half of audio, then Amplify, but Cancel or Undo, but note the suggested amplification level is 4.64.
- Select the right-half of audio, then faux Amplify. Note the suggested amplifcation here is 4.409, we’ll used these numbers later in step 6.
- Select left-half, Effect > Loudness Normalization; use defaults
- Select right-half, Effect > Loudness Normalization; use defaults. (Be sure to do these separately)
- Select all (Ctrl+A), Amplify, set New Peak Amplitude (dB) to 4.52 (=4.64+4.409/2)
I hope this helps. ![]()
BTW, it is not a good idea to re-edit MP3 files, but I think you already know this. ![]()