This plugin will display a summary report of your project, along with details for each of its tracks. This enables you to quickly see and verify all the stats and properties for the project and its tracks.
ProjectInfo.ny (10.5 KB) (v1.0.1)
Using the Project Info plugin:
After you have installed and enabled the plugin it will appear on the Analyze menu. For convenience you could assign a keyboard shortcut to quickly run Project Info.
There are three ways to select which tracks are included in the report:
- If there is no selection then all audio tracks will be included.
- If you use Select All then all tracks will be included, of all types.
- You can select individual tracks of any type, and only those will be included.
The report text can be copied from the popup message to your your clipboard. On Windows use ctrl-c to copy the text from the message window. Audacity on Mac and Linux should also allow copying the text, using their slightly different methods.
See the screenshots below for some examples of what a Project Info report looks like.
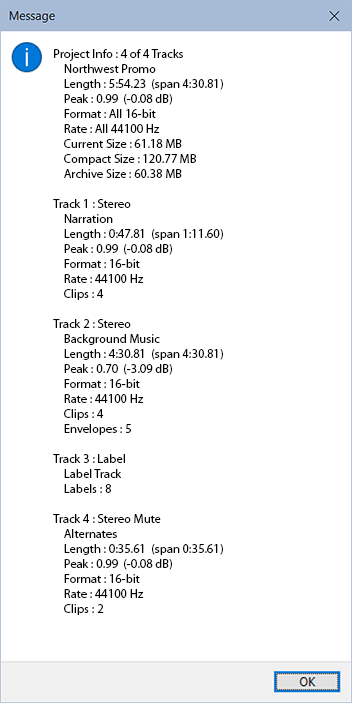
The report has the summary at the top, followed by details for each track. These two sections show some of the same details, with the summary showing the overall values, and each track item showing values specific to that track.
A brief summary is always included at the top, showing the project name and how many tracks were included in the report.
The full summary is only shown if all audio tracks were selected. It includes the overall Length, Peak, Format, and Rate. It also has some items specific to the summary:
- Current Size : The current project file size. This value is best viewed when the project is first opened, since the project file can contain additional temporary content while you work on it. This value is only visible for Audacity v3.x or newer.
- Compact Size : The smallest project file size if the 32-bit format is used. Use this format when you are actively working on a project, to ensure no loss of quality.
- Archive Size : The smallest project file size if the 16-bit format is used. This format can be used when you are not actively working on a project, as it gives CD-level quality while minimizing the file size.
In most cases the Compact or Archive sizes will be similar to or smaller than the Current size, but they can be larger than the Current size if your project contains large clips that are duplicates from within the same project, due to how smart clips work.
Following the summary, each track will have a section for its details.
- The track header shows the track number and type, followed by the track name. For audio tracks it will also show whether it’s Stereo or Mono, and if Mute or Solo are enabled on the track.
- Length : The total amount of audio on the track, not including any gaps. The span value is the selection length needed to encompass all audio on the track, including any gaps.
- Peak : The highest audio level within the track is shown as the linear amplitude value, along with the equivalent dB value.
- Format : The bit depth format in use.
- Rate : The sample rate in use.
- Clips : The number of clips on the track.
- If any tiny gaps between clips are detected then they will be noted here. Gaps smaller than 100ms will be noted.
Due to current app limitations, gaps under 1ms won’t be detected or noted.
- If any tiny gaps between clips are detected then they will be noted here. Gaps smaller than 100ms will be noted.
The next few items will only be visible if the item value is not zero.
- Envelopes : The number of envelope control points.
- Volume : The volume adjustment.
- Pan : The pan adjustment.
Tips
If your project is larger (or much larger) than the Compact size, it could be due to the presence of smart clips that have been trimmed to hide some of their content. If you don’t need to keep that hidden content then you can effectively remove all the hidden parts and shrink your project file size by using the below method. This method is only for Audacity v3.x or newer.
It might be a good idea to create a backup of your project file before proceeding. Having said that, I’ve used this method many times and never had a problem.
- Within your project:
- ctrl-a to select all
- ctrl-c to copy it all to the clipboard
- ctrl-n to open a new project window
- Within the new project window:
- ctrl-v to paste your project tracks into the new blank window
in this step it’s important to choose “selected audio only” which will ignore any hidden parts - ctrl-c to copy all of that back to the clipboard
- switch back to your original project window
- ctrl-v to paste your project tracks into the new blank window
- Within your project:
- hit the delete key to empty all your tracks
- ctrl-v to paste their contents back in
- verify that all looks correct
- save and close your project (the project file won’t shrink until you close it)
- you can also close that new project window, it’s contents are not needed
- This will get your project file size down to the Compact size, if all tracks are 32-bit, or to the Archive size, if all are 16-bit.
If you are converting all your tracks from 32-bit to 16-bit format (the setting is on the track menu) you need to verify that none of your tracks has any amplitudes over 1.0 linear or 0.0 dB, otherwise your audio data would be permanently clipped for any over-scale peaks that might exist. You could use the Project Info report to quickly determine the levels.
Screenshots of some Project Info reports: