I am running Windows Vista home premium and have Audacity 2.0.3 with .exe installer.
I have found the paste/mix facility within “Wavepad” very useful to extend sound effects without a noticeable gap/join, but have not been able to find a comparable facility within Audacity. Can anyone help me with this?
Yeah, I agree that “paste mix” and “crossfade mix” in “Edit” menu will be an awesome addition in Audacity. I used to use them a lot in Sound Forge. It’s incredibly useful when reparing sound in bigger selections (crossfade-mixing some “neighbour” sound regions over the damaged sound), extending effects (as you said), noise reduction with inverted mix, etc… But (as I know) for now this options are not possible.
I suggest the following: duplicate the track or selection (Edit > Duplicate), then work on the “clone” track/selection and when you’re ready, “fuse” the “clone” track with the original one (Select both tracks and mix/render them: (Tracks > Mix and Render).
I don’t use Wavepad, but from a quick search on Google it appears to be a primitive way of mixing two tracks.
Audacity is a multi-track editor so you don’t need to do that. Each imported file or recorded track can exist on separate tracks and are automatically mixed when you press play or export to a new file. You can also adjust the levels of each track in the project using the “Gain” slider on the left end of the track.
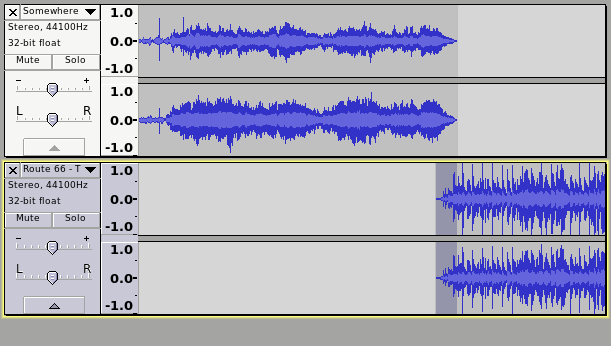
If you want one track to fade out while another track fades in (crossfade) then record or import the two tracks, then use the Time Shift tool to slide one track to the right so that it overlaps the other track. Then apply a “fade out” (Effect menu) to the end of the first track and a “fade in” to the start of the second track like below: The selected region in the second track is where I have applied the fade in. If one track is louder than the other you can adjust the levels using the track Gain slider (http://manual.audacityteam.org/o/man/audio_tracks.html#gain)
If you wish to mix all of the tracks together into a single track before you export, select all of the tracks (Ctrl+A) and then apply “Mix and Render” from the Tracks menu.
Duplicating as per vpd’s solution would be what I would do if you are pasting in content from the same track. You can also press F2 on your keyboard to turn on Envelope Tool if you want to fade out the audio that is coming to an end and fade in the audio that is starting in a more customised way.
Paste Mix and Crossfade Mix are existing “feature requests”. I can add vpd’s vote for those and johntheblade’s vote for Paste Mix.
Unlike Steve, I would regard those features as a time saver, rather than “primitive”. ![]()
Gale
Thanks for your help and comments guys
I see that “Paste and Crossfade” can be a time saver, but regarding “Paste and Mix” I don’t see how doing something can possibly be “time saving” compared with not doing it. ![]()
I know it sounds ridiculous, but it’s really time saving!
Example 1:
We’d like to cut off quickly some noise at 160 Hz
- notch filter to cut off 160 Hz
- copy processed sound to clipboard
- undo (we’re back to the original sound before filtering)
- invert mix of the sound in clipboard to the original sound (now we have something like frequency-pass at 160 Hz)
- compress the “healthy” sound (with compressor or envelope tool) to the level of noise (we have now the noise profile)
- copy noise profile to clipboard
- undo (till we’re back again to the original sound before any sound processing)
- invert mix (lets call it a “subtraction” mix) of the noise profile to original sound
Example 2:
It’s the reason this post has been started about. The paste mix option could save time and an additional audio track.
And here is the example: We use “regular interval labels” to mark the beginning of every bar in some track. We have some sound with echo (delay effect), which is 3+ bars long, but we’d like to mix it in the beginning of every 2nd bar and to let delay naturally fade out. If we had that paste mix option, we’d just go to the label of every 2rd bar and mix it. But now, we need 2 audio tracks to arrange this sound (as sound clip) at intervals of 4 bars, with a 2-bars delay in the 2nd audio track.
You mentioned this recipe here (Hum removal) but I can’t get it to work. Perhaps you could clarify in that topic.
There is another plug-in, similar to Regular Interval Labels that you may find useful: Beat Per Minute labels
So, lets say that you have 32 bars, and as you are using Regular Interval Labels I assume that the bar interval is exact.
You have 1 copy operation and 16 mix/paste operations.
I assume also that each 2 bar phrase is identical, otherwise the pasted “reverb” is not going to match the audio track that you are pasting into.
The way that I would approach the task would be to create 1 bar, complete with reverb, then use this “Looper” effect to generate all of the other bars: Nyquist Plug-in: THE KRONx ECHO LOOPER - #2 by steve (2 steps instead of 17).
There is also a “Metronome looper” that you may find interesting: Metronome looper
Even without using these plug-ins, I don’t see that pasting the “reverb” 16 times into the original track is much easier than pasting it 16 times into its own track. Having the reverb in a separate track has the advantage that you can see at a glance if you’ve made any mistakes when pasting. The “most” useful aspect to having the reverb in a separate track is that if, say you made a mistake on the 2nd paste but didn’t notice until 14 pastes later, you can go back and correct that one part without having to redo 15 paste operations.
Working with multiple tracks really is extremely useful once you’re familiar with it. If at any time you need to adjust one of the tracks in any way, you can do so. If the tracks are all mixed into one then you can’t.