OUTPUT WAVE FILE MUCH LOUDER AND DISTORTED

I am experiencing a new issue with output of wav files. After spending hours editing, balancing and mixing up to 20 audio tracks for a song track, I save the file and then output a wav file to be uploaded to Aria.com, which I use for analog mastering of my song tracks.

I do the first mix using studio monitors, then when I am happy with that, I slap on my Audeze LCD-X Open Back Headphones for the final mix prior to mastering. As most people listen to music with earbuds or headphones, I am mixing for that experience.

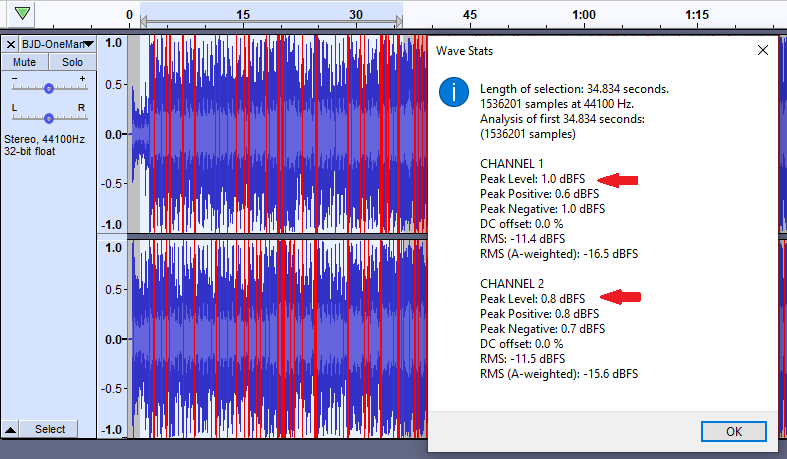
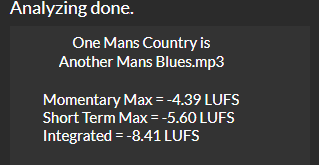
Today, I finished a final mix, which sounded great when played from Audacity on both the studio monitors and the headphones. I uploaded the wav to Aria.com as usual. But when I checked the Aria output the audio was much louder and distorted compared to what I heard directly from Audacity. When I played the wav file directly from the PC I had the same result. When I uploaded the wav file from Audacity back into Audacity, the entire track was solid red. Using the normalizing effect got rid of the red, but the wav file was still very loud and distorted. The amplification was 1.0 and changing it to 5.5 resulted in a smaller height wave form which was still very loud and distorted.

As this is a new issue, I presume that I changed something by mistake that is causing this.

Any advice or suggestions are greatly appreciated.

Thank you.

Big Jim Davis
http://reverbnation.com/bigjimdavis
http://youtube.com/bigjimdavis

PS I have StudioOne and ProTools, but I had four tracks recorded and mixed with Audacity hit the New Music Weekly Country charts in the past 18 months, and so far have resisted moving to a real DAW.

Hi Jim,

If you play the exported wav file in say, VLC, is it distorted or just the output from Aria?

Aria has several settings which you can select.
Based on your songs that I have listened to, try options “C” or “D”.
If you take care of the compression, limiting and EQ yourself in the mix and just want that extra little something
to finish it off, try option “A”.
aria.PNG
BTW, really enjoying “One man’s country is another man’s blues”.

Did you save your project? The solution might be easy…

mixing up to 20 audio tracks for a song track,

Mixing is done by summation, literally adding sample-by-sample. Analog mixers are built-around summing amplifiers. Regular WAV files (and CDs and your DAC, etc.) can’t go over 0dB, so if the sum goes over 0dB you’ll get clipping (distortion).

Analog mixers and DAWs have level controls for each channel/track plus a master level control so it’s more of a weighted average than a simple sum.

Audacity uses 32-bit floating-point internally so it CAN go over 0dB and there is virtually no upper (or lower) limit.

So one solution is: Export as 32-bit floating-point WAV. Re-import the mix and then run the Amplify or Normalize effect to bring down teh level, and then export to your desired format. Audacity will have pre-scanned your file, and if you accept the default settings, Amplify will adjust for 0dB peaks and Normalize will default for -1dB peaks. (Amplify will actually be attenuating… Negative amplification.)

Jim,
Adding to what DVDdoug wrote, try also normalizing to around -4 or -6dB instead of 0dB.
This gives the mastering service a bit of headroom when it applies compression, EQ, maybe a bit of gain, etc.

Not too familiar with Aria, but some of my clients use other services like Landr, and it will clip and distort if the source material
is too close to 0dB.
It’s made even worse if they select very loud or “aggressive” mastering options.

On another point, you mentioned that you prefer to stick with Audacity for mixing your songs, nothing wrong with that, however,
a full featured DAW will allow you to side chain compressors, EQ’s etc which will simplify your workflow when it comes to
optimizing levels of instrumentation versus vocals for example.

Side chaining is something that is extremely useful and unfortunately not available in Audacity.
It does have something similar, auto-ducking, but in my opinion, it’s too limited and not realtime.

P.S.

When I uploaded the wav file from Audacity back into Audacity, the entire track was solid red. Using the normalizing effect got rid of the red, but the wav file was still very loud and distorted.

Audacity shows potential clipping. Your regular (integer) WAV file was clipped with lots of 0dB clipped samples in-a-row and Audacity will “show red”. When you lower the volume that lowers the clipped peaks and this “hides” the clipping from Audacity and it will no longer show red, but the wave is still clipped (the wave shape isn’t fixed).

When you export as floating-point it will go over 0dB but it won’t be clipped, With so many tracks the mix might go over +20dB or more but the peaks are NOT clipped. But Audacity will still show red for porential clipping, and it will basically look the same as before because Audacity doesn’t show anything over 0dB, But this time when you reduce the level you’ll see a more-normal looking waveform and again you shouldn’t see red.

De-ess the vocal track on it’s own before applying any effects, (like reverb*).
Once in the mix it’s usually not possible to de-ess without collateral-damage to the percussion …

[ * reverb & basic-compression will both exaggerate sibilance ]

ToneBoooster’s has two free real-time de-esser plugins which work in Audacity on Windows,
1 complicated, called “sibalance” [sic], & 1 simple.

There is also Audcaity-specific “desibilator” plugin, (but it does not work in real-time).

Thanks to all for your review, suggestions and advice.

Based on your comments about clipping I applied the ERA-6 De-clipper to the four new tracks I added shortly before this problem appeared. I also set the normalization at -6db and normalized all tracks. I exported a wav file, then imported back into audacity. Less clipping showing, but the entire track was still red as a boiled lobster. Ran the de-clipper and normalization on the wav track, then exported to wav again.

Uploaded the new wav to Aria. First did the master with my usual B choice, but it was still a bit distorted and too hot, so I remastered using the A choice, then again with the A choice and wider stereo. I got a great mastered track that I can now send off to my radio promoter.

Prior to this series of events I have had no problems like this with Audacity. I did (finally) upgrade to Audacity 3.1.3 a couple of days ago and likely changed something in the process that is causing the wav files to be “too hot” on output.

If you enjoy country music, you might like the song I am working on. Called “Still Thinkin’ Bout You,” it’s about a man and woman who encounter each other at a high school reunion after 50 years. Sparks fly and things get confusing. If interested grab some headphones or earbuds and click the private link at https://www.reverbnation.com/bigjimdavis/song/32803803-still-thinkin-bout-you.

Thanks again.

Jim Davis

-6dB RMS for a final mix is way too loud, -14dB RMS is typical for music streaming, with 1dB headroom, (i.e. maximum peak -1dB) .
https://manual.audacityteam.org/man/loudness_normalization.html

Pale blue is RMS level.


De-clipping is salvage: the repairs it performs are not as good as unclipped, (should not be necessary).

Jim,

I didn’t analyze all of your songs, but “One man’s country is another man’s blues”, posted on Youtube back in 2018
is too loud as well.

According to YT, it’s roughly 6dB “too hot” and YT is actually turning it down.


Once I analyzed it further, not only is it too loud for YT, it is actually clipping.
First screenshot below, confirms YT’s stats:


Opening it up in Audacity, confirms the clipping:

For YT, the optimal level should be around -16 LUFS (please note that is is not equivalent to the old RMS and Peak system).
Below, the level of your song in LUFS:
BJD-LUFS.PNG
You also mentioned that you send your songs to your radio promoter.
This can be quite tricky too, as some “older” stations, will accept audio levels as high as 0 dB,
the station compressor and limiter take care of things.
However, many FM stations have converted to the LUFS system and they insist on the same audio levels as for TV broadcasts, i.e either
-24 LUFS for the USA, or -23 LUFS for Europe and pretty much the rest of the world.

If your radio promoter hasn’t complained, then good, the stations you are getting airplay on accept the higher levels, except that you still
need to drop by 3dB (for radio and 6 to 8 dB or so for YT) to avoid clipping and still allow about a dB of headroom.

If you still want your songs to retain loudness after dropping the levels, then use a compressor a bit more “aggressively”, but don’t
over do it or you will squeeze the life out of the music.

EDIT:

One last thing, there is a peak in the 5KHz region which tends to make things a tad sibilant.

The dynamic-range-compression applied by the automated mastering is going to increase sibilance too.


“On stage” EchoVerb courtesy of Voxengo’s stereo-touch plugin (free)
https://www.voxengo.com/product/stereotouch/

Trebor wrote:

The dynamic-range-compression applied by the automated mastering is going to increase sibilance too.

One of the many reasons I personally don’t use automated mastering services.
I can understand their popularity, and I suppose they do help those that just want to concentrate on making
music and not bother about mastering.

The down side is it all starts sounding the same and any deficiencies in the mix, are often made worse in the mastering process.
These services have improved a lot lately, but the client does not get the benefit of a real experienced person that can guide them
and provide feedback.

Of course, there is also the cost issue.