I have some questions related to normalise and amplitude (for simplicity, assume for this purpose that the normalize features of DC offset and channel independence are taken as a given) :
I read somewhere that normalise and amplify are purely arithmetical (I guess all processing is if you take the thought to a logical conclusion). What I take that to mean is that a linear and reversible algorithm is applied which does nothing to degrade or alter the character and quality of the sound EXCEPT to increase/decrease the amplitude on every single sample point of the capture by the same amount. Is this correct?
If so, can I assume the following corollary:
A) As long as no other processing is performed, can I amplify/normalise a capture in either direction as many times as I want, and still be able to put it back again exactly, bit perfect to the original capture, by re-applying the appropriate level of opposite dB amplify/normalise using the same process again.
B) If so, then presumably this recalculation of the exact original holds true even if the capture has been saved (or exported in 32 bit float) in between normalise being applied (i.e. not just relying on “undo” from the edit menu)?
I notice in other discussions here that some of you experts advise setting normalise to less than 0.0dB (I seem to remember reading various figures between -1.0dB and -3.0dB). I would like to understand why you don’t advise setting the peak level right up to 0.0dB ? If my file has an average level of much lower than the peak level, and there is only one peaks in a 1 hour length which will touch the max level, then wouldn’t any (tiny) amount of clipping only affect that one tiny section and be practically imperceptible? The duration of the clip with speech on the 0.0 limit would be so brief in duration, and so little over the clipping threshold that I can’t see it being worth backing off the limit to -1 or -3 to avoid it, because the result means the average level for all the rest of the recording will be reduced just to avoid one tiny incursion - does this logic sound reasonable or am I missing something? I want my files to be as loud as possible ideally.
If exporting to mp3, I think I read on here somewhere that clipping can result near the limit, even if it was not clipped in the original capture prior to mp3 encoding. How close to the limit are we talking for this to be possible ? This is a surprise to me and tells me I don’t understand properly what mp3 encoding does. Is the extra clipping accurately visible via audacity when the resulting (clipped) mp3 is reimported for viewing purposes?
They are purely arithmetic functions because they have no idea what sound is and pay no attention whatever to content. They use the highest peak in the performance as a guide for overall gain setting. “If the peak is XdB, then do that.” It’s stunningly simple math.
Neither Normalize nor Amplify are completely damage-free. Down at the bit level, they have to modify the data structure of the file to get a sound change, small though it may be. UNDO will always bring you back to where you were, but if you create a, say, 6dB change and export the file, import the file and create a -6dB change, the before and after will not be identical. Data will have been lost. To use a silly analogy, if you decrease the volume of a show 60dB, that puts the whole show down in the noise and data ambiguity of the file. If you then try to pull the resulting file back up to normal, all you will do is create very loud noise and trash.
These tools work best in moderation.
You can use the Amplify to 0 if you wish, but that can create problems in post production, so that tends to lend itself to archive use where it doesn’t make any difference and it gives you the maximum dynamic swing of the music. Again that can cause problems in post production: If you create an MP3 from a 0dB WAV file, you will almost certainly get clipping damage in the MP3. MP3 creates sound damage – always – and the damage could restructure the blue waves creating clipping damage. I regularly download broadcast radio podcasts as MP3 and they are a sea of red clipping indicators.
I want my files to be as loud as possible ideally.
Which makes you a special case. We also get posters complaining about any sound damage at all. “The data structure of my podcast is different down at the hex values of h4440…etc. Please fix this!!”
I’m surprised you missed addressing the dithering errors. Those are common complaints and under certain circumstances you can actually hear those.
Audacity is a juggling act between the idealism of a perfect sound production program and the more down to earth problem of how me mum is going to use it.
You have been reading “Koz” - that is one of his phrases.
“Amplify” multiplies each sample value by a given amount. For example, if you amplify by 6.020599913 dB, then each sample value is multiplied by 2.
“Normalize” is very similar to Amplify in that it amplifies (multiplies) each sample value by a given amount. The essential difference is how Amplify and Normalize work out the multiplication factor.
For “Amplify” the “amount to amplify by” comes first. If you set the Amplify effect to amplify by 3 dB, then any selected audio will be amplified by 1.412537545
The conversion formula between linear and dB is: dB_value = 20 x log( linear _value )
going the other way: linear_value = 10 ^ ( db_value / 20 )
For “Normalize” the “target level” comes first. You set what you want the peak output to be, and the effect calculates how much to amplify by. If you set the Normalize effect to a peak level of -3 dB, then each selection or track will be amplified by “whatever amount is necessary” to make the peak level -3 dB.
This is calculated by the formula:
amplification_factor = target_level / original_level
so if the original level is -6 dB and the target level is -3 dB the “amplification amount” will be:
(10 ^ (-6 / 20)) / (10 ^ (-3 / 20))
= 0.501187234 / 0.707945784
= 0.707945785
Interesting thing here: “0.7079…” turns up twice in the equation, why is that?
Lets write the same equation using dB values
0.501187234 = -6 dB
0.707945784 = -3 dB
-6dB - -3dB = -3 dB
Because dB values are logarithms, we can express multiplication or division of linear values as addition or subtraction of the logarithmic values.
In short, you could say that “normalise and amplify are purely arithmetical”
Lets say for example that you have a 16 bit track. 16 bit audio is represented by integers (whole numbers) between +32767 and -32768.
Let’s say that one specific sample has a value of +101 and you are amplifying by a factor of 1/2.
101/2 = 50.5, but 16 bit audio only has whole number values, so 50.5 will need to be “rounded” to a whole number value.
There are all sorts of very complicated reasons and methods for rounding audio sample values which I won’t go into, but the upshot is that it is not exact. This is why it is highly recommended to use “32 bit float” format while working on the audio. 32 bit float format can represent fractional values as well as whole number values and is accurate to about 14 decimal places. When working in 32 bit float format amplifying will be accurate to about +/- 0.00000000000001 so if you amplify up and down often enough then there will be some slight error, but far too small to be audible.
As an experiment I once created a script that would amplify up and down repeatedly, to see if any difference was audible. I left the script running for several thousand operations and there was no audible difference. If I had left it running for millions of operations then I guess that the difference would eventually become audible, assuming that my amplification factor and sample values were such that rounding was necessary on each iteration.
In practical terms we can say that amplifying in 32 bit float format is “exact”.
Modern D/A converters (digital to analogue) are remarkably accurate within the majority of their working range, but often become a “bit iffy” very close to 0 dB. There is a good article on the Internet (which I have sadly lost) that compares 15 high quality CD players. Of the 15, only 2 of them accurately converted 0 dB samples and the other 13 were slightly off. Allowing -1 dB headroom is more than enough to allow for this common hardware limitation.
Yes, but keep reading.
That is true. Converting to MP3 is “inexact”. The waveform that is represented in an MP3 is an “approximation” of the original waveform. When the MP3 is decoded back to uncompressed data, individual peaks may be a bit higher or a bit lower than the original. MP3 is a lossy compressed format.
That depends on the quality of the MP3 and the nature of the source material. At very high bit rates the peak amplitude will be pretty accurate (within less than 1 dB at 320 kbps). At lower quality settings the error can be greater. Allowing 3 dB headroom should be enough in normal (musical) situations.
Yes.
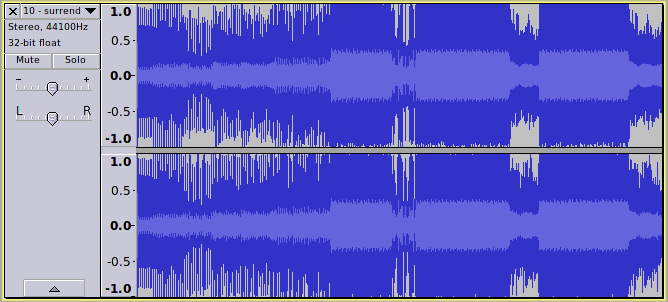
Here is an example of a commercial MP3:
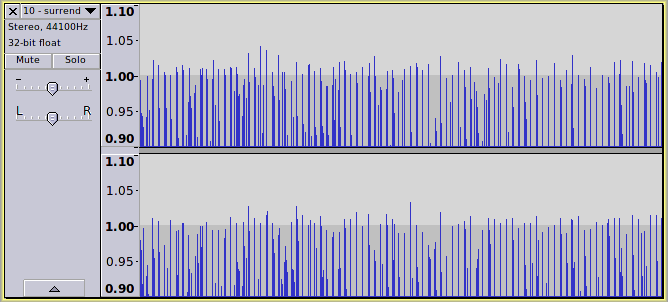
Zooming in we can clearly see that the waveform exceeds 0 dB.
but sound cards use integer format which cannot go above 0 dB, so the waveform will be clipped when playing this file.
You can see here that we are not just talking about one or two peaks in the track - there are hundreds of peaks that exceed 0 dB, and this is a common problem with many modern commercial recordings that have been heavily compressed to maximize loudness
Let me say a big thanks to you for those answers, you have really gone the second mile and I appreciate that. My understanding of the areas which were grey to me before are now much clearer thanks to your input, which is really changing how I am using Audacity. I’m not so far in to a big project right now, that I can’t start again and incorporate the knowledge I have learned in the last few days from this forum.
Your automated test result of repeated amplifications is impressive - you are a serious geek and I take my hat off to you. That description of the outcome tells me everything I need to know about how normalize/amplify will impact my wav masters in practice (I plan to keep them for many years and likely work on them over that time, but clearly I don’t need to worry if I loose the project files).
On your answers about how mp3 encoding can cause extra clipping if the recording was normalized up to near 0dB - what would you recommend as the highest safe(ish) normalize peak target if I am encoding recordings which contain only speech, in which there is a very wide dynamic range, and the target file format is, at worst, a VBR mp3 with Quality set to number 6 - 95…135kbps (that is the setting I have found from experiment which gives the best size/quality tradeoff for speech files stored on my blackberry).
Thanks again, if I lived on the same continent I would owe you a beer!
If you’ve not applied dynamic compression or “limiting” then you can probably go right up to 0 dB and you’re unlikely to “lose” more than the occasional single sample, which will be totally inaudible.
As the speech has a very wide dynamic range, you might consider applying a little dynamic compression as it can often make speech sound more intelligible and “professionally recorded”. If you have the time to try this then I would recommend that you give it a go, though it is a good idea to keep a backup copy of the original unprocessed audio in a high quality format (at least 16 bit WAV or FLAC).
If you use a lot of compression or limiting, then you will probably need to leave a bit of head room. For lightly compressed speech, 1 dB will probably be adequate.
You can test your MP3 exports by re-importing them into Audacity with “Show Clipping” enabled in the “View” menu. If that gives you more than the occasional red vertical line then you have probably pushed it too high.
From your spelling of “normalise” I’m guessing that you owe me a beer
Thanks again Steve, that gives me a feel for the dynamics of compression and encoding as it relates to clipping and normalising. I did experiment with compression a while back and began using it on previous projects, but then stopped as I felt like I was adulterating the recorded track, but maybe that’s a misguided approach. I guess as long as I have kept an original in an uncompressed lossless format I can always go back to it. You’ve whetted my appetite for a bit more experimentation I think.
You guessed right, I’m east of the Atlantic, well spotted!
Talking about compression has triggered some related questions which I had forgotten about - I remember not being sure what the difference in “levelling” was compared to “compressing” in the effects menu. And in the compressor there were some options I was unsure about, but I need to go back in there and refresh my memory of it.
The “Leveller” effect is a quick an dirty (very dirty) effect for reducing the dynamic range. It is actually a type of “distortion” effect (a “wave shaper”), Don’t use it unless you are simulating WWII aircraft pilots: “Team Leader to Bendy Bunny,… Bandits at 4 o’clock. Let’s get the blighters and we’ll be home for tea - bzz - crackle - Rodger Wilko Out” (or similar effect).
The Compressor effect is not the easiest to use, but works pretty well. It is documented here: Audacity Manual (also in the Audacity Help menu manual).
whooa… thanks - that has solved all doubts about which of the two I should use; but has raised all kinds of questions re the compressor, which I feel would really be pushing my luck (I did read that manual page a year or so ago, but regrettably my knowledge of sound is not good enough to fully benefit).
Maybe I could just ask you about the two check boxes at the bottom of the compressor dialogue window:
“Make up gain for 0dB”: presumably I would want to leave unchecked, bearing in mind I would eventually be exporting copies in mp3 format (i.e. thinking about the clipping issue). Is it better to normalise first, before compression, or compress first and then normalise (with a view to causing the least damage).
“Compress based on Peaks”: Which of these causes the least damage ? What is the practical difference it makes to the outcome?
Ah, just mulling over the “Compress based on peaks” checkbox - presumably if this is for speech recordings, with silences of a few seconds between some sentences, I would be better to use “downward” compression based on RMS (unchecked) which brings the peaks lower? If I used “based on peaks” (checked) it would increase the quiet passages / silences, and thereby ampify tape hiss and back ground noise ?
The Audacity compressor effect is effective but very quirky and not at all easy to understand exactly what it is doing.
\
“Make up gain for 0dB”:
I would suggest that you normalize to 0 dB before applying compression. This will make it easier to see where to set the threshold level.
Apply the compressor/
Normalize again to set the peak level where you want it.
\
“Compress based on Peaks”:
When not selected, the threshold setting refers to the rms level.
If you look at the waveform and are not zoomed in too far, you will notice that there are two shades of blue. The dark blue (higher level) shows the actual waveform, and you can judge the peak level by looking at that. The inner, pale blue, shows the rms level. You will notice that the pale blue is always at a lower level than the dark blue.
Compression based on the rms level is often said to sound “more transparent”. In fact it is very difficult to make a direct comparison between the two because to get the same amount of compression, the “rms” threshold must be quite a bit lower than the “peak” threshold, but the amount lower depends on frequency content. I would not generally recommend using the rms detection when using short attack / release times (“Attack” and “Decay” settings)
Personally I prefer to use “peak” (though I wish it used downward compression as I find upward compression confuses the issue).
The “make-up gain” setting is an “amplify” feature. When selected it automatically amplifies the compressed output in all selected tracks so that the maximum amplitude is 0 dB. The effect of this option is identical to using the “Amplify” effect (with default settings) after applying the compressor.
Set the “Noise Floor” setting significantly higher than the actual noise floor. For example, if the noise floor (the level of noise when you are not speaking) is -60 dB, try setting the Noise Floor to -50 dB.
If the original recording has a wide dynamic range, try setting the Threshold at about -12 dB and use a modest “Ratio”, say 3:1
Try an Attack time of 0.4 seconds and a release time (“Decay Time”) of 1 second. They need to be fairly short for speech.
If you want to try “rms”, deselect “based on Peaks” and set the Threshold about 4 dB lower.
When “based on Peaks” is off (not selected) you may notice increased sibilance (“s” and “t” type sounds become more pronounced).
Thanks again Steve - you have given me a lot to think about there. I think I will spend some time trying out some tests with the Compressor tool with your last post open on another screen.
Cheers for now…