Nothing wrong with any of that past a legacy discomfort of a maker insisting on using an actual vacuum tube. They break, have heat problems, turn on slowly and wear out. They make good advertising for people who don’t remember using vacuum tubes.
How are you going to record the work? Everything in that list is analog. Very nice analog, but still analog. Using the “Mic-In” on the side of your computer to digitize the work is emphatically not recommended.
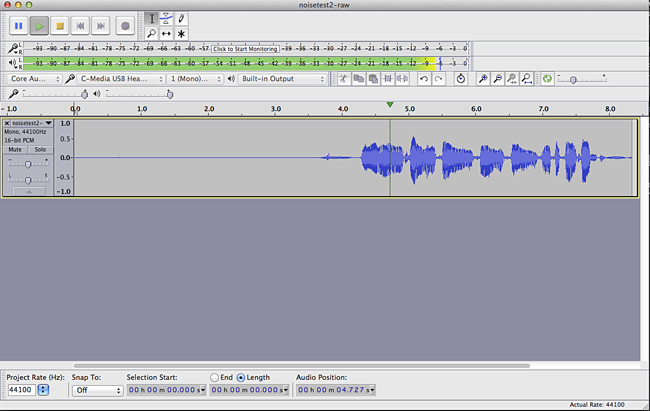
I’m going to come back to a question from earlier. How are you listening? The highly processed last clip is pretty much trash. It passes the ACX Check technical standards, but theatrically, it’s useless. Nobody would pay to listen to that.
You must not be listening to the work.
The Standard Hollywood Headphones are the Sony MDR 7506. If you ask to borrow headphones on any sound shoot, someone will hand you these. They’re not entertainment headphones. Their job is to show you problems before anybody else hears them.
After the work passes technical standards, somebody at ACX is going to listen to it. You should listen to it before you send it.
I have saved some sound clips from people I really like. Even Sarah Vowell who has a quirky voice I like listening to.
They may appear on the left only. I did something wrong somewhere. I’m a dot-com and I just shifted my web page to a new company. Anything could be wrong.
How were you going to get a good quality microphone system like that into your computer to record it?
How are you Quality Control listening to your own work?
There is a side issue with listening that’s not obvious. There’s a technique of voice presenting where you listen to your own voice while you perform. Once you get used to doing that, it helps you to maintain good volume and quality over a long time (whole chapter) without really thinking about it. If you just speak, you have the tendency to wander as you go. Nothing in the mastering I wrote will help if you change volume during a chapter.
I bet you’re wondering why nobody said the words: “Buy this microphone and all your troubles will be over.” Past liability issues, I’m not sure anyone builds a microphone or microphone system that is unconditionally useful. That’s one of the reasons I started doing sound tests with stand-alone personal sound recorders and cellphones.
Apparently, It’s Common Knowledge that you need to buy a Blue Yeti microphone. There are a number of forum posts from people having troubles with Yetis and some of them are permanent. It even has its own intermittant sound problem, the “Yeti Curse.” So no, it’s just not that easy.
That has not been a walk in the park, either. I’m scheduling a trip to the Apple store to find the magic of getting the recorded sound files between the iPhone and my Macs so I can process them in Audacity. The published methods don’t work for me and I’m at sea to figure out why. Plus there’s the minor issue of the iPhone not using conventional sound file formats.
I did find a second problem with the preamp in your list. I don’t see a way to plug in your headphones. Plugging headphones into the computer doesn’t work for live recording because of delay problems. You get an echo in your ears while you’re trying to perform.
There is a conventional way to get the microphone in your list into the computer. Behringer makes the UM2, the UMC22 and Focusrite Scarlett makes the Solo. All adapt a single analog microphone to the USB connection on the computer. I have a UM2 and I like it. The Behringer stuff works well for the price.
I don’t think we have had any complaints from any of those three that we couldn’t trace back to operator error or something else gone wrong.
So that, your microphone, an XLR microphone cable…
…and you should be good to go. I’m pretty sure all three preamps come with a USB cable.
This is a recording setup.
That’s the UM2 on the left. Those are furniture moving pads on the desk and the walls to help with echoes and other noises. The Mac doesn’t make fan noise in normal use.
Fair warning, once you get that straightened out, you will be a new user for home recording and need to start worrying about a quiet, echo-free environment to record in. Can you hear your computer while it’s working—can you tell if it’s on without looking? Fan noise is the next popular complaint for home performers. Then there is unplugging the refrigerator and only recording at night after the traffic noise goes away.
If it’s a one-off book, it may be desirable to hire an actual studio or hire someone else to record it. Nobody wrote you have to record your own work. Many writers do it because the advertisements make it appear simple.
I like your voice and I think you would make a good audiobook reader. So we got that part down.
There was a recent posting from a reader who had been using an IRL studio successfully and decided to try it at home. They are running into the same problems you are. Studios are there for a reason and it’s not because they have better microphones than you do.
Behold Ian who decided to record audiobooks from his apartment in Hollywood. He has the longest post in forum history. 39 forum chapters and about a year. He did get it working and he’s a successful audiobook reader and voice performer.
So, if I bought the equipment below, I would be okay, at least starting off?
I have an empty walk-in closet in a quiet back bedroom I thought I would deck out with blankets and stuff, and that would be my “studio.” If the cable is long enough, I would just string it out under the closet door and put the computer out there in the bedroom (I saw a photo of a home studio where the owner did that, putting the computer out a window and then shutting the window).
I have 14 books (and counting) so I’m kinda hoping (okay, maybe “fantasizing”) that maybe eventually I could record them all. I’m willing to put in the time and effort, I just (as is obvious) lack the technical knowledge. Your help has been invaluable.
So if I bought these two things, I could at least get started, right?
Fair warning many people get to the end of the first book and want to read it over. The two ends of the book don’t match. At the beginning you were a rank amateur foolin’-around reader and at the end, weeks later, you’re a polished pro. Usually that only happens on the first book. Also, you should know ACX puts a lot of importance in chapter to chapter matching, so that kills changing microphone or environment in the middle of the book. Get comfortable and then read for real.
That combination should work. There’s nothing wrong with an NT1-A microphone and the preamplifier should be able to keep up, although I would pop for the next one up, the UMC22. I did discover an electrical error in my UM2 after some critical testing. Oddly, “better” and larger preamplifiers are not recommended. They will accept two or more microphones, but are harder to use. ACX “soft” recommends reading in mono, one Audacity blue wave. That recommendation matches those three preamplifiers.
The natural cable length for a USB cable is about 6 feet. The natural length for an XLR microphone cable can be 75 to 100 feet. So put the UMC22 outside the studio next the computer and use the microphone cable length to advantage. That also puts your headphone connection and volume adjustment outside, so that will be a juggling act. You can buy headphone extensions. The headphones should be sealed units—gushy pads against your head so the ear sound doesn’t leak out and get into the microphone.
There is a Sennheiser recommendation I need to look up. The normal Sony recommendations don’t work for me because I can’t wear them for a long time. The Sennheisers I actually use are very comfortable for me, but have known sound errors I just put up with.
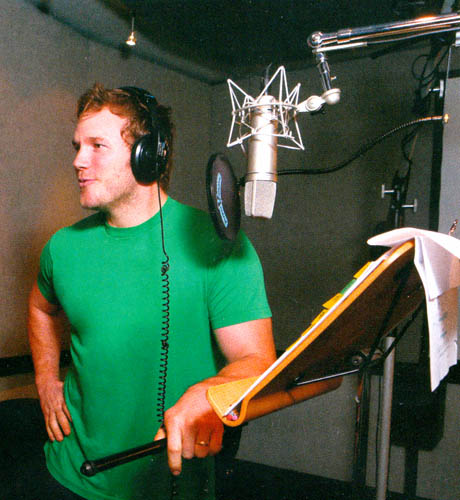
You will need to come up with a microphone stand. That’s what’s holding up the microphone in the picture—off screen to the left.
That’s an On Stage Stands folding tripod. I like mine. At this exact second, it’s folded in my closet next to the winter coats.
That’s a 9701B, heavier than the normal stand.
It will not be able to hold up the microphone without a little balancing act.
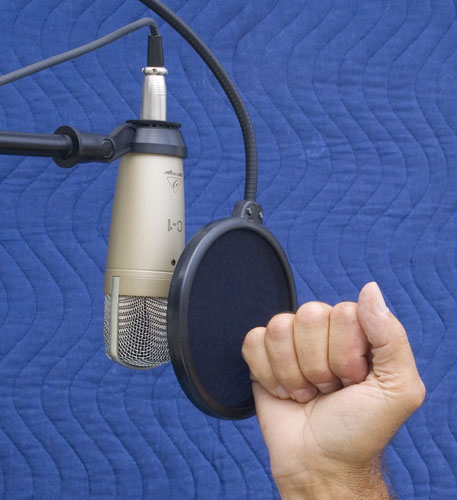
And you need to do something like that because the recommended lip-spacing is about a power fist in front of the blast screen.
That’s hard to do with the microphone sitting on the table. They do make stands that fit on a table or clamp to the table edge. Not everybody has floor available. And keep in mind you have to read while you’re doing that. How, physically, were you going to read? I use a printed page because I can still remember ink on paper. That’s the pink clip in that studio pix. You probably can’t read the actual book. Juggling that would be a nightmare.
The spider thing at the rear of the microphone is the vibration and shock mount That keeps floor and desk noises away from the microphone. Keep the microphone cable loose and floppy so it doesn’t carry noises. That’s the lazy coil in the studio pix.
The black tennis racket is to suppress your P-Pops. Chase in this sound example doesn’t use one and he’s too close to the microphone.
“PProbably say that’s a PPretty BBroad subject”.
If you have a good sound system, those popping sounds will shake a wine glass.
There’s some notes on the blankets and soundproofing later. I need to stop for a while and do Real Life.
I thought I’d read off my Kindle Fire. I’ll turn the sound off before I start.
I’m not worried about doing the work, heck, I wrote the novels. I’m not a big seller (I don’t promote) so I’ve only sold about a thousand books on Amazon, but doing audio will be a new challenge for me, and learning how to do it, especially the technical part, is something I’m really looking forward to.
The NT1-A is a side-fire microphone. You talk into the side, not the end like a rock band microphone. The instructions have you speaking into the gold dot. Many microphones put the company name right there, but Rode apparently didn’t.
The microphone works correctly upside-down or right-side up. It has a dead spot straight in back. So if you’re going to have noise in your studio, aim the back of the microphone that way.
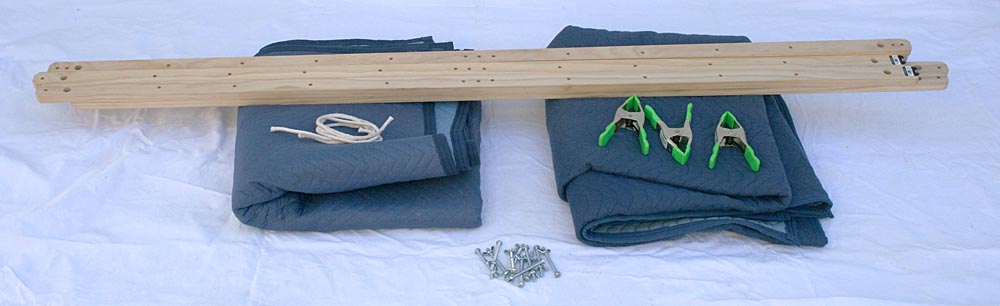
I made up wooden sticks that screw together into a studio. I got volunteered to do an important sound shoot in a conference room that had all the acoustic gentleness of a train station.
Each wall is double thickness and by the time I get all four of them assembled (40 minutes), I can put a recording studio anywhere I want. The producers walked away with a good shoot.
One forum poster made up a studio with hardware store pushed-together plastic pipes. No glue. It falls apart for storage.
For blankets, heavy is good. Price those blue furniture moving blankets. They work remarkably well. I am told sometimes they come with flame retardent, so leave them out in the sun for a while.
A feather quilt or blanket may look terrific and it’s warm on a winter night, but it’s not heavy/thick enough to stop sound. They sell special foam squares at great cost that do work well, but you have to cover the room with them probably at the cost of a small car.
Please note in this animation voice shoot, there are blankets on the floor.
Please also note in this broadcast shoot, there’s a folded-double blanket on the desk. This was a double shoot, so it looks way more complicated than it really was. This was done in our one and only soundproofed conference room, so I didn’t need the blanket studio.
One microphone oddity. The NT1-A takes 48v Phantom Power. So that has to be switched on in the back of the UMC22 preamp.
Condenser microphones work by having your voice vibrate a very thin, round metal film. You may be able to see it if you get the light just right. That can generate a very high quality electrical signal but it’s not very loud and it won’t go down a cable. At all. So the microphone has to have electronics inside to boost the horsepower enough to get your voice down the cable.
Some news gathering microphones actually have to change batteries every week or so. This microphone takes phantom power. The UMC22 preamp sends 48 volts up the cable to the microphone and the microphone sends your voice back down—on the same cable. It’s an electronic trick. Each direction is a phantom to the other.
Amaze your friends.
It’s OK to tap or scratch the grating and it doesn’t matter how loud you talk, but never blow into a microphone. Some microphones can be turned into electronic trash by blowing into them.
You might buy something from Sweetwater. They’ve been very good to me and have answered questions about products I didn’t buy. They have terrific product descriptions, illustrations and user info.
They were one of the first suppliers to let me see the back of a device. Yes, I know what all those holes and connections do, may I see them, please?
I bought the mike and the interface; the mike comes with an instructional DVD and the interface comes with written instructions --my kind of packaging! I’ll experiment with them and see if I need to buy anything more. BTW, I had trouble getting my credit card to work on the site so I ordered by phone and the guy very much approved of your interface recommendation, said that’s what he uses too.
I’ve got the mike hooked up to the interface, the interface turned on, the interface hooked up to my computer, but when I go to record, I only get recording through my computer’s built-in microphone. Alas, there was no instructional DVD, and while there were indeed written instructions, (three booklets actually) none of them were in English. I’ve scoured the net trying to figure out what I’m doing wrong (like maybe some secret on/off switch somewhere) but I’ve found no answer.
Can you by any chance guess what I’ve done wrong in the set-up? It’s probably something really basic (i.e. stupid). Thank you.
(Plus, with the interface hooked up to the computer, I can’t hear any sound out of my computer, either through its speakers or by headphone; however, I CAN get sound via either if I am listening to playback on Audacity.)
A few other questions: I understand the Gain is the Clip/Sig knob, but I don’t know which I’m supposed to use (Clip or Sig).
I don’t know whether I’m supposed to use the DIRECT MONITOR button.
No worries --I just figured it out and yes, it was incredibly stupid: I forgot to change the microphone-selection-button on Audacity to the new microphone. It’s now working fine.
The UMC22 Direct Monitor button allows you to hear yourself exactly as you perform. Your headphones need to be plugged into the UMC22. The other forms of listening are all delayed or have echo or other problem.
If everything is plugged in OK, you should have a POWER light on the UCM22 . I can’t get the instructions to tell me if there is a light on the NT1-A. That would be good to know. Do you see an NT1-A light when you have it all plugged in?
They do warn you not to unplug the NT1-A until after you shut down the UCM22.
Plug everything in, make sure the lights are on and start or restart Audacity.
Turn the UMC22 Gain 1 knob all the way up.
After Audacity starts and settles down, click on the device toolbar (next to the microphone icon) and look for USB Audio CODEC.
That’s the name of the Behringer software.
Pick USB Audio CODEC, and click once in the recording sound meters (microphone symbol) > Start monitoring.
Tap or scratch the microphone or speak.
Does Audacity wake up, do you get the bouncing sound meter? Let us know where you got lost. You don’t need to hear it yet. You just need to get some reaction.
It does bother me you didn’t get all the microphone parts. Did you get it from eBay?