Hello friends and thank you for all the support and valuable information that you all taught me.
Special thanks to Trebor; kozikowski; billw58. They gave me very useful tips to remove the background noise.
https://forum.audacityteam.org/t/firebox-or-inspire/174/1
Now that I achieved a clean background noise, I am now once again in need of your kind expertise:
• I applied all the suggested steps in the order that was suggested to make my talk clips clean (please see below).
• I have added 3 additional clips audio talk clips from other people. In addition, I will add their inputs to my audio talk clips.
• Since, their mics are different, and surely, they have different mic levels, and other factors.
• I want you to please help me in:
A. Suggesting effects that will adjust all the combined (from different mics and users) audio levels,
and balancing various audio levels.
B. What is the order of placing your suggested effects in the below steps?
I. Sound Formatting exports
A. While Recording: Use 44100 Hz and 32 bit float.
B. Export a raw capture copy at 32-bit WAV (and back it up)
C. Do all editing in Audacity at 32-bit float (that gives you the headroom you need)
D. Export final production to WAV 44100 Hz and 16 bit float (and back it up) - this is your master and you can burn CDs from this.
E. Export to MP3: 128 kbps - for use on a portable player
II. Suggested work flow to reduce noise:
- Amplify on default settings, (i.e. to 0dB).
- select a region for the noise-profile which has no voice.
- Apply Audacity’s native Noise Reduction (with the settings).
- Optional : select all of your track and put the code below in the Nyquist prompt to remove the faint 1KHz whine + 10 harmonics.
- Select any conspicuous unwanted noises between phrases, e.g. 11.40-11.60sec, press “Ctrl” +“L” to silence them.
Note: Make sure you remove all the unwanted noise in the silence parts (conspicuous unwanted noises (spikes)) which occur between phrases. Silence spikes by selecting them and pressing ‘Ctrl’ +‘L’, then apply noise-gate.
Then select the entire track and apply a noise-gate to squelch the noise between the phrases.
- Select the entire rack and apply a limiter to reduce the variation in volume, and make the track generally louder.
- Use Notch Filter at 171Hz Q=10.
- Steve’s pseudo-stereo plugin (“make stereo track”).
- and de-essing via “Spitfish” plugin.
Chris’s Compressor will even out volume variations in a performance. It’s the software equivalent of the broadcast compressor.
http://theaudacitytopodcast.com/chriss-dynamic-compressor-plugin-for-audacity/
Koz
Thanks for the reply. Using the compressor effect sounds like a good idea, but maybe I need a little assistance.
I tried it with the below combo, but it still did not level the different recorded audios (different users that recorded audios from different locations).
Do you think I should amplify each recorded audio clip separately, then have them all in one audio file, and then apply the compressor?
i am asking because maybe when each user/recorder made their recordings the loudness of the recording is not the same?
Your valuable feedback is always appreciated.
You may be using it wrong. I use Chris on a spoken word radio show where the two performers are wildly out of balance with each other. I change the first value, Compression Ratio from 0.5 to 0.77 and it smoothes out the volume variations just like the radio station does. You can use the default values and it should work well.
When you have Audacity open select the whole show by double-clicking in the blue waves.
Effect > Compress Dynamics 1.2.6… > OK.
The filter will be down at the bottom of the effect tool list. There should be a very noticeable change in the volume and evenness of the show.
Koz
Thanks, you are right. I finally downloaded the correct effect and the correct version. and you are right the effect worked well now.
i was wondering do you think it is a good idea to:
a. I should highlight each audio clip separately.
b. Amplify each clip with the default amplification levels.
a & b before I apply the compression?
One of the nice things about Chris’s software is it takes a lot of the work out of your hands – similar to a broadcast compressor. Nobody is going to drive up the hill to adjust the transmitter compressors for each song. It has to be set and checked every couple of months to make sure it didn’t break.
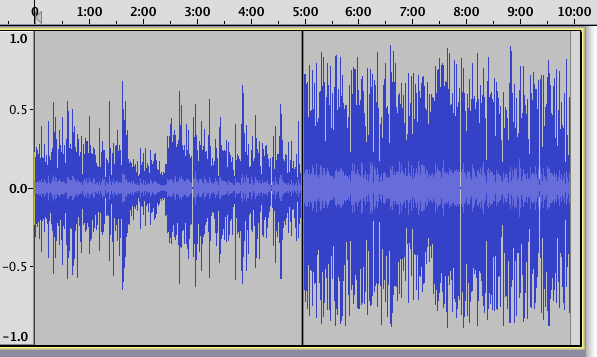
Here’s an illustration of Chris before and after. This is a segment of “Car Talk” and the podcast is a festival of volume variations – or at least it is before Chris. Note the After is louder, doesn’t overload or clip, and even though the theatrical expression is still there, the overall volume variations are gone.
You can probably leave all your clips alone and just apply Chris to the whole thing and listen to how they come out. If the clips are far enough off, then you will need to go the rescue route before yo do anything else.
I can’t help thinking as I read all this, are you planning on going through all that for each show? That plus editing time means you have identified your new career. Editing is one thing, but part of your process is show rescue. You should not have to “rescue” each show. Past the first one, you figure out what’s wrong with the shoot and fix it. Noise Removal, notch filters, etc., all affect the quality of the music no matter how carefully you apply them.
You’re training someone else how to do this, right, so when you get hit by a semi on the interstate the band won’t have to start over?
Koz