A simple effect that smoothly reduces the level of the selected audio then fades the level back up again to the original level.
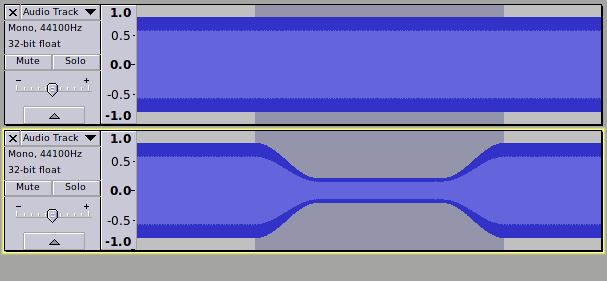
Track 2 (below) shows the effect on a sine wave when the Manual Duck effect is applied with the default settings (12 dB gain reduction, 25% fade time):
To install the plug-in, download ManualDuck.ny and place it in the Plug-Ins folder inside the Audacity installation folder.
On Windows computers, this is usually under “Program Files”.
On Mac OS X, it is usually under “Applications”.
On Linux, you can use various plug-in locations.
Restart Audacity, then the addded plug-ins will appear underneath the divider in the “Effect” menu.
Update:
The original effect - now called “Manual Duck (Simple)”: ManualDuckSimple.ny (1.42 KB)
A new version with a more versatile but slightly less simple interface: ManualDuck.ny (3.46 KB)
Steve,
For once I’m excited by one of your Nyquist offerings! (That is no reflection on any of your previous offerings. It’s just that I don’t “mess around” with my recordings).
However, this kind of processing is what I do all the time with the Envelope tool to balance my voice-over and the background soundtrack. What variables does this have? Amount of “duck” obviously, Fade time (obviously) but can the inward fade and outward fades have different values? The prospect of being able to select a piece of soundtrack and then specify: Duck to = -xxdB, Fade in =ss.sss, Fade out =ss.sss is very appealing. Is this how it works? Is it “Duck to” or “Duck by”? Can the fades be specified as absolute times? If not would it be possible to have this kind of interface?
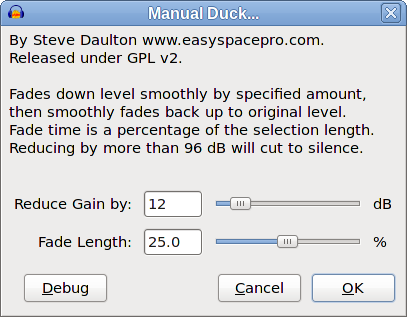
The interface is deliberately very simple. There are (currently) just 2 controls:
Re. your questions, in the current version:
The fades are symmetrical. Fade-In and Fade-Out times are equal.
“Reduce Gain by:” is exactly what it says. If you reduce the gain by, say, 12 dB, then the volume level when fully faded will be exactly the same as if you turned down the track gain slider (or the Mixer Board slider) to -12 dB.
It would be relatively easy to make a more “advanced” interface, though I like the simplicity of this version (originally the interface had only the Gain slider, but I thought that adding a “Fade Length” control was sufficiently useful while still keeping the interface very simple.
“Duck To: [dB]” would be problematic (though not impossible) to implement. An obvious example of the problem would be if the “Duck To:” level was set higher than the original level, in particular, if the middle section was silent. Also I think that “Duck by:” is far more useful as a “Manual Duck” effect than “Duck To:”.
I guess you are voting for a more “advanced” version of this effect?
What features would you like? Here’s some possibilities:
Separate Fade-Out / Fade-In times.
Customisable fade shapes (currently uses “Sine” curves. Could have an option for Linear fades, or any other shape fade).
Alternative units for the Gain adjustment, for example, linear scale (0 to 1) or as a % (currently only dB scale).
Options for Fade time in % or seconds. (currently % only, though could be “seconds” only, or a choice of either).
Separate “Fade-gain-to” and “Fade-gain-from” levels (so there is a gradual, linear change in gain during the faded section.
Boost or reduce gain so the effect can fade up to a higher level or fade down to a lower level (currently only “reduce gain”, though the gain may be booted by text input rather than slider control)
Multiple gain levels (currently the level just goes down, then back up, but it would be possible to have more gain level controls)
Separate “Start fade” and “End Fade” time settings for both the Fade-Out and Fade-In (currently the fade out starts at the beginning of the selection)
Steve,
Thanks for this new version. Having downloaded and played with it, the function is all I could wish for, or need. All I have to do now is to decide which shape of fade I prefer and what fade duration I want. I have worked out where and how to edit the code to add my own default values, once I know them, in place of yours. Just one piece of clarification about the fade shapes, please: am I right in believing that the Logarithmic shape is the one I can achieve with the Envelope tool (a concave face), that Smooth (Sine) is the one used by the Cross-fade effect (a convex face) and Linear is the one used by the Fade Out and Fade In effects?
This plug-in is going to save me many, many minutes on each soundtrack that I build. To compare…
Old process: Select Envelope Tool, then for each end of a piece of voice-over, set four points, drag inner two into position, playback to check mix, reposition the inner points if necessary and re-check mix, advance to next piece of voice-over and repeat, advance and repeat, etc.
New process: Select first piece of voice-over, Effect > Manual Duck, playback to check mix, undo and adjust Gain parameter in needed, recheck, when OK, advance to next piece of voice-over, select it and Ctrl+R, advance, select, Ctrl+R etc.
Having given this some more thought this morning, there’s an “ah, but…!”, isn’t there? The Manual Duck is “destructive” editing whereas the Envelope Tool is “non-destructive” editing. It is always possible to make a change to the Envelope Tool settings at any time provided the project has been saved. Once the Manual Duck has been applied and the project saved, there’s no easy going back: the change has been committed. Unless, of course, a second copy of the music track exists either within the project or outside of the project.
I still see this effect having value for doing a quick, rough mix-down of voice-over and music. But, for the moment at least, I think I need to ensure that I always “Don’t Save” the project when it’s in a “Manual Duck Quick Mix” state.
The Logarithmic shape is the same as the envelope tool. This is my personal preference when using the effect to “duck” music level below a voice.
The Linear shape is the same as used by “Fade In” and “Fade Out”.
The “Smooth (Sine)” fade takes its shape from quarter of a cycle of a raised sine wave. If you apply this setting to a constant (generated) tone you will see that the fade has an “S” shaped curve. This shape is often a good choice when cross-fading two tracks or if you want to “smoothly” adjust the level of one track but are not introducing another sound (for example https://forum.audacityteam.org/t/convenient-peak-removal/24022/1 )
The “Cross-Fade” effect (included with Audacity 2.0) uses a shape that is the square root of a linear fade. If you apply this setting to a constant (generated) tone you will see that the fade has a convex curve (a curve in the opposite direction of a logarithmic fade). This fade shape can sometimes be useful for making cross-fades, though I personally find it less useful than other “Equal power” fades. This fade shape is not implemented in the “Manual Duck” effect.
Correct. I would dearly love Nyquist to be able to access Envelope points, but currently it can’t - that’s a feature request.
You can of course “correct” a fade that is not exactly as you want it by using the Envelope tool.
I regularly use destructive fades simply because it is so much quicker than using the Envelope tool, though I take care to review the fade thoroughly before moving on, and I keep a backup copy of the source (unprocessed) audio. Occasionally I may need to tweak the fade using the Envelope tool, though usually that’s not necessary. Very occasionally I’ll need to replace the track (or part of it) with the original unprocessed audio - this is a royal pain, but a rare situation, usually due to the client changing their mind about what they want .
I would certainly recommend keeping backup copies of tracks before applying any destructive effect.
Is there a possibility for example to totally silence that part of music when you speak? I can’t do it manually because i have 26 tracks and they are 30 minutes long