I am able to copy an album to Audacity.
My input is USB from a record player
I am able to export a file to WAV format and it plays correctly with Windows Media Player
I then go to Itunes and try to add the file to albums.
Nothing happens and the album does not appear in Itunes.
In the past when I add file from CD’s there is no issue.
Is there something further I need to do to have it added to Itunes
I was able to add a WAV file to iTunes but it doesn’t read the metadata and the song title is coming from the file name and it doesn’t show-up under album or artist. (That’s not too surprising or a WAV file.) You might have to display your song list and “find” it that way.
I didn’t try adding the artist/album/artwork, etc., but it might work. (I believe iTunes has it’s own database.) Audacity doesn’t support embedded artwork for any format so you’ll have to use iTunes, or you can use [u]MP3Tag[/u] (which works with almost all formats, not just MP3).
If you want lossless, ALAC (Apple’s version of FLAC) is probably a better option. Almost all of the compressed formats are better than WAV with embedded tags/metadata. Plus with FLAC or ALAC you get a lossless file about half the size of the WAV. I wasn’t successful making an ALAC with Audacity and FFmpeg but I was able to convert WAV to ALAC with with [u]Kabuu Audio converter[/u].
And realistically… AAC (MP4/M4A) or MP3 (lossy compression) is good enough for digitized vinyl. They are good enough for almost anything and at higher bitrate/quality settings they can often sound identical to the uncompressed original (in a proper blind ABX test). However, it’s not a bad idea to save a lossless archive copy to avoid multiple generations of lossy compression in case you later edit the file or convert to another lossy format.
the album does not appear in Itunes.
What he said. We both expect that to work, but what you will probably get is a spray of music files all over the place rather than an album. In iTunes, you can create a Playlist and drag all your individual files over to it. You play the playlist to get the songs in order and the ability to skip back and forth.
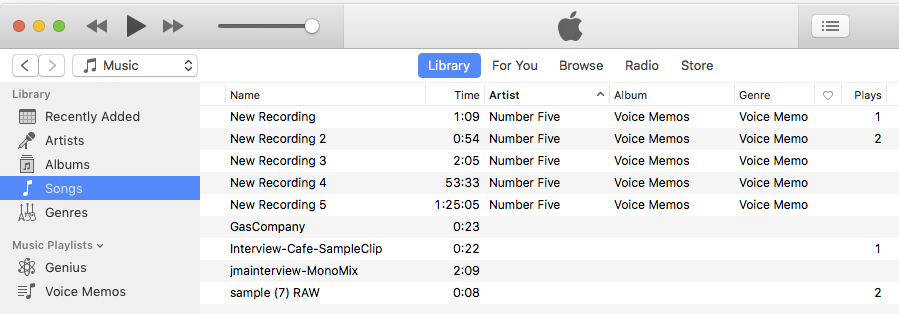
You can make iTunes wider and make it search for date or any other identifying mark.
This is not a good machine for illustrations, but this is my “music” list.
And I generated a playlist for all the voice memos.
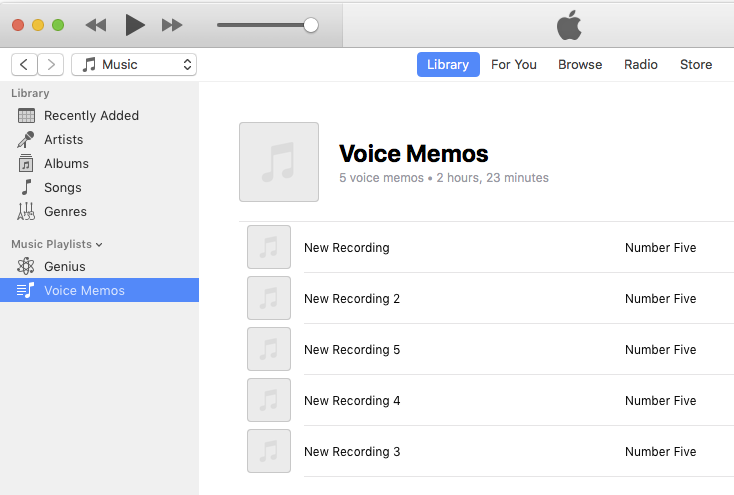
Playlists have a magic trick. I can arrange the songs in any order. They’re not stuck in a, b, c, computer order. Note memo 3 is out of order. iTunes is happy with that.
Koz
Yes, I see the album under songs, not album. It appears that it considers the total album as one song. As you suggested, I should then be able to add it to my playlist. I tried using analyze to separate the tracks, but that didn’t seem to work
You can right-click the song in iTunes, then select Song Info. Then you can add the album/artist/etc information and it should show-up as an album.
Based upon your suggestion I was able to have the album record show up in album. Thanks for the advise.
The last thing is to have Audacity be able to identify the the blank sound between tracks to be flagged as separate tracks.
Is this possible
I still recommend using another format instead of WAV…
The last thing is to have Audacity be able to identify the the blank sound between tracks to be flagged as separate tracks.
Is this possible
But since you’ll probably have to double-check to make sure the songs are correctly detected, and you might have to tweak the settings, it might be easier to do it manually.
Also see [u]Splitting a recording into separate tracks[/u]. But again, I just do it manually… I select/highlight one song at a time (zooming as necessary) and then Export Selection one song at a time. And, I might re-open each file to trim the silences at the beginning & end.
Also see [u]Click And Pop Removal[/u]. The digital copy can be better than the original vinyl, but you rarely get “CD quality”. There are also 3rd-party programs - [u]Wave Corrector[/u] (FREE) is fully automatic. [u]Wave Repair[/u] ($30 USD) works manually so it only “touches” the audio where you identify a defect. It can do an audibly perfect job on most (but not all) clicks and pops. But it’s VERY time consuming.
I reviewed the Silence finder documentation. This appears to be what I need. The question I have is at what point do I start the silence finder. I assume I would use the Ctrl-A.
I first do a record from my record changer.
Do I then File/export/WAV.
Once export do I then do a Ctrl-A.
To play MP3 and FLAC files on Apple Music or Apple devices, you’ll need to convert them to formats compatible with Apple’s ecosystem, such as AAC or ALAC. Here’s how you can do it:
Converting MP3 to Apple Music Compatible Format (AAC):
-
Using iTunes (Windows/macOS):
iTunes can convert your MP3 files to AAC format, which is compatible with Apple Music and devices. Here’s how:- Open iTunes on your computer.
- Go to “Edit” > “Preferences” (Windows) or “iTunes” > “Preferences” (macOS).
- In the Preferences window, click on the “General” tab.
- Click on the “Import Settings” button.
- In the “Import Using” dropdown menu, select “AAC Encoder.”
- Choose your desired audio quality (Higher Quality is recommended).
- Close the preferences window.
- Right-click on the MP3 file you want to convert within iTunes.
- Choose “Create AAC Version.” iTunes will create a new AAC version of the file.
Converting FLAC to Apple Music Compatible Format (ALAC):
-
Using iTunes (Windows/macOS):
iTunes doesn’t natively support FLAC, but you can convert FLAC to Apple Lossless (ALAC), a format that maintains high audio quality. Here’s how:- Open iTunes on your computer.
- Go to “Edit” > “Preferences” (Windows) or “iTunes” > “Preferences” (macOS).
- In the Preferences window, click on the “General” tab.
- Click on the “Import Settings” button.
- In the “Import Using” dropdown menu, select “Apple Lossless Encoder.”
- Close the preferences window.
- Convert FLAC files to ALAC using an external converter (such as dBpoweramp) or any available online FLAC to ALAC converter.
- Import the converted ALAC files into iTunes.
Syncing Converted Files to Apple Devices:
After you’ve converted your files to Apple-compatible formats, follow these steps to sync them with your Apple devices using iTunes (macOS Catalina or earlier) or Finder (macOS Big Sur and later):
- Connect your device to your computer.
- Open iTunes (or Finder).
- Select your device from the sidebar.
- Go to the “Music” tab.
- Check the “Sync Music” option.
- Choose whether to sync your entire library or selected playlists, artists, albums, and genres.
- Click “Apply” or “Sync.”
Keep in mind that this method involves using iTunes or Finder on your computer. Alternatively, you can use third-party apps that specialize in converting and managing audio files for Apple devices.
Remember to respect copyright and licensing agreements when converting and using audio files. If you want to convert those files back, you could use converters such as DumpMedia Apple Music Converter, TunesFun, Apple Music Converter, or TunesSolo Apple Music Converter.