Show Clipping is always enabled here, because I’m sensitive to “overdrive” conditions, but how does Audacity determine a “clip” condition? Further, how does it determine how much “reduction” is need to “fix” the clip? Also, how big of a selection in needed for Audacity to recommend a “fix amplitude” (turn the RED off) ? Is it spectrum dependent?
After seeing these “clips” [in RED] I go about spot-fixing them with a tight Selection, Zero-crossing key and Amplitude function. It can be time consuming. What is the best strategy here?
Also notice that when Audacity exports a file, and then loading that exported file in a new window, many of the 255 values (all bits = 1) are RED, but a suggested Gain is 0.0 dB so there’s noting to fix. and that implies EXPORTING cuts every “clip” to 0 dB, but should these conditions be “fixed” first, before exporting? or it’s taken care of automatically?
The red vertical lines (enabled in “View > Show Clipping”) indicate that a sample value is greater or equal to 0 dB. It is therefore possible that a red line could appear when the waveform is dangerously close to clipping but not actually clipped (frequently the case on commercial recordings).
For “integer” audio formats, 0 dB is an absolute limit beyond which sample values cannot go.
Ideally the clip indicators would only show when the audio actually IS clipped, but that is often not possible. If a waveform goes beyond 0 dB, then it will be clipped on playback, but as above, in many cases a clipped file will be clipped at exactly 0 dB so there is nothing above 0 dB to detect.
Clipping can also be present below 0 dB. If you record something too loud, then it will probably be clipped and the waveform show flat tops/bottoms to the waves. The flat top/bottoms are where the peaks have been lost (clipped off). If you then amplify the track to a lower level, then the audio will still be clipped, but at a lower level. “View > Clipping” is not able to detect the clipping in this case (because it is below 0 dB).
It is not possible to accurately reconstruct the peaks that have been lost through clipping. The “Clip Fix” effect attempts to reconstruct lost peaks, but at best it can only guess at what the peak might have been like. Clipping damage is permanent and cannot be accurately fixed, so the best solution is to avoid getting clipping in the first place rather than attempting to fix it after it has happened. If the clipping distortion is bad enough to be audibly distracting, then it is probably too far gone to be fixed.
Usually preceded by the phrase, “Help me clean up …”
We don’t do simple sentences so good: “The audio is clipped.” But we can do subjunctive: “The audio very probably would have been clipped had it been a little louder.”
Besides, if you ever want to turn that shiny 24 bit wav file into a more popular mp3 file, you’d better leave 3 dB headroom, or your mp3 will sound bad, even at 256 or 320 Kbps. And a 128 Kbps one will sound awful.
Most of the bad rap of mp3 stems from bad CD’s (over-compressed and even clipping). MP3’s get up to 5 dB louder than the original and combined with clipping, it always results in audible artefacts.
Not everyone hears it, but I bet you will, if you listen for it.
Sorry for dropping the ball on this topic. It’s been a hectic couple weeks, and must admit I’ve forgotten some of the main points here.
If a clip [RED] is displayed, and I select a `segment´ around that clip, do a Z for Zero crossing, then do an Alt+A for Amplify… how does Audacity determine the REDUCTION (in dB) required to supposedly fix that clip occurrence? Is it frequency dependent? slope dependent? etc?
Sometimes it suggests 0.2 dB, and other times 3.5 dB?
I presume that you are referring to the vertical red lines (enabled in “View > Show Clipping”) rather than the “Clip indicator” in the meters (Audacity Manual). To save confusion, let’s call them “red clip lines”.
Normally, the amplitude for digital audio must lie within the range +1 to -1 (as shown on the vertical track scale), which is equivalent to “0 dB” (maximum possible amplitude).
However, Audacity uses a special, very high quality format called “32-bit float”. This format is used internally by Audacity for all audio processing, and it is the default format for new audio tracks. One of the special features of “float” formats is that it supports sample values beyond the range +1 to -1 (above 0 dB).
To demonstrate this feature:
Generate a sine tone (Generate menu). Play it so that you know what it sounds like.
Using the Amplify effect, amplify to a “New peak amplitude” of +6 dB. You will need to enable “Allow clipping”. Audacity Manual
Check that your speaker volume is fairly low (or this will be very loud) and play the amplified track. The changed timbre is because although Audacity can handle over 0 dB, your sound card can’t, so the waveform is clipped at 0 dB by the sound card.
Export the track as a standard 16 bit WAV file.
Import the WAV file that you exported in step 4.
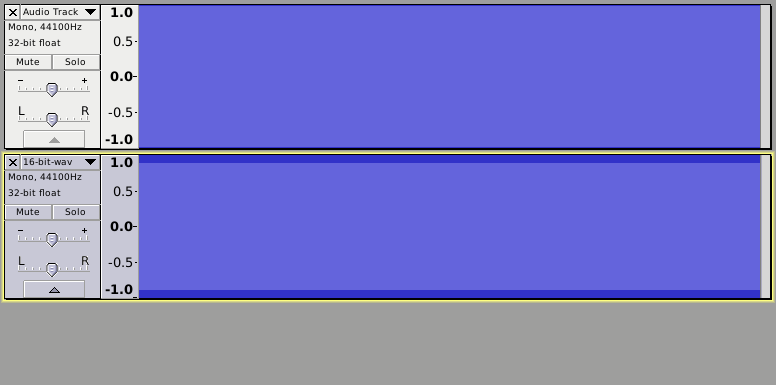
You now have two tracks in the Audacity project.
Right click on the vertical track scale to zoom out vertically (Audacity Manual), and one of these methods to zoom in really close horizontally Audacity Manual
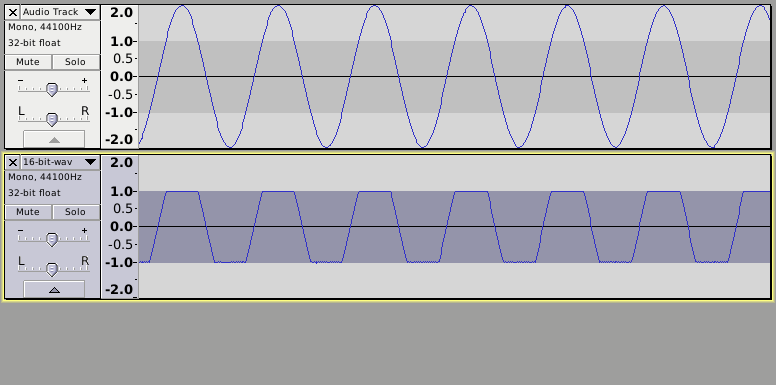
Notice that the original track shows a perfect “sine wave” that goes from +2 to -2 dB, but the second track, because it was exported as a normal 16 bit file, is permanently clipped at 0 dB.
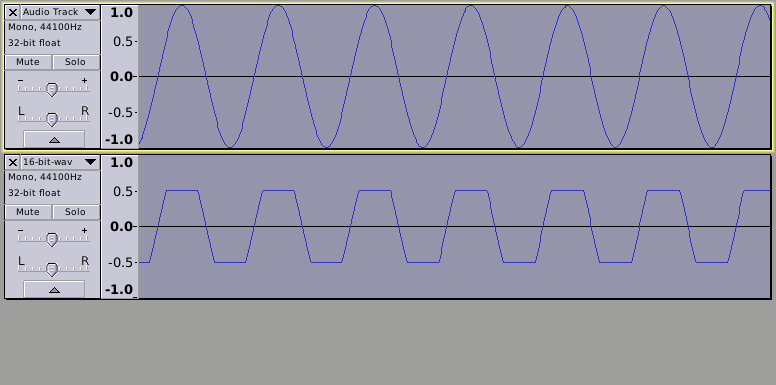
Amplify both tracks by -6 dB. Notice how the original (32-bit float) track is now within the valid range of +1 to -1 and still a perfectly formed “sine wave”, but the second track is clipped at -6 dB.