I have an problem perhaps someone can shed light on. I’m using Audacity for mac 2.0.5, my mac operating system in os x 10.9.5 – I think i used the .dmg installer.
My band played a gig, we recorded it via camera mic, and unfortunately, a guy who plays “rhythm bones” sat next to the camera and jammed along. It’s a pretty annoying sound, the ballads are useless to use for a live demo, but it’s not quite as bad in the louder songs if I could pull it down a bit or get rid of it. I don’t know that he “rhythm boned” by itself so I could isolate it with that feature in Audacity, does anyone have good advice for getting rid of or minimizing this sound? It’s pretty close to the sound of a drum stick hitting hardware.
Thanks in advance for any advice from someone who’s encountered a similar problem and found a solution. . .
I doubt that “rhythm bones” will produce a single narrow frequency. More likely they will produce quite a broad range of frequencies with a number of prominent resonant frequencies. It may be possible to reduce the worst of the prominent frequencies using the Notch Filter effect.
If you post a short (5 seconds) sample in WAV format, we can take a look.
See here for how to attach a short audio sample to your post: https://forum.audacityteam.org/t/how-to-post-an-audio-sample/29851/1
We can certainly get rid of narrow frequencies of sound. What we can’t do is get rid of a musical instrument. You’re in the same league as the concert people that want to get rid of that annoying person close by clapping through the whole thing.
Musical instruments cover many more frequencies than you think.
This is one single piano note.
If you filtered that out, most of the rest of the song would be gone.
But if you want to try…
I don’t think one hit is enough for Noise Removal, so you’ll need to make a Special Show with five or six hits one after the other. You can’t include any of the rest of the performance. Noise Removal works when you show it a sample of the trash and then, in a second step, it tries to remove the trash from the show.
When you get that, Effect > Noise Removal and drag-select the hit collection > Get Profile. That tells Noise Removal what you want to take out.
When select the song or portions of the song and run noise removal again, and this time apply it.
Start with a reduction value of about 9 or so. That’s pretty gentle and it will give you an idea of what it’s going to sound like. Higher values remove more noise.
For music, I think you need to reduce Frequency Smoothing to zero. Spoke Word shows need higher values.
Noise Removal is a juggling act between removing the noise and damaging the show.
I also tried manually removing the clicks one at a time and that didn’t even work. There’s too much overlap between the sounds in the performance. I got little holes in the voice and still didn’t get rid of all the clicks.
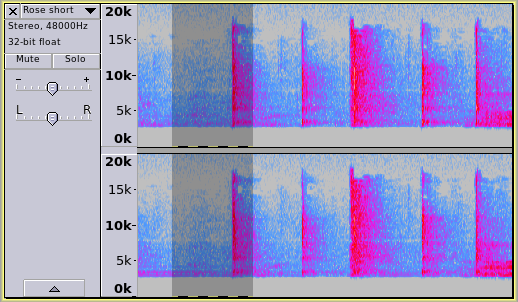
The problem can be seen by looking at the spectrogram view of the track.
Each of those red vertical lines is one click of the “bones”, and as you can see, the sound covers most of the audio spectrum. In other words, if to filter out the click will also filter out most of the other sounds in the track.
guys, I so appreciate the time & interest you’ve shown!
I got a bit more isolated clip of “bone man” playing along to our quieter break music, but as you said, pulling out the bones will probably kill the song. We have many of the songs from another night (bone free!), the only bummer is we had a very nice version of 7 Bridges Road that would have been a good one to save.
In the future we will gently encourage our rhythm bone fan to sit in another area of the room
On an interesting side note, it turns out that rhythm bones are taken seriously by some folks, and there’s even an online Rhythm Bone Society. Makes you wonder what would happen if they ever booked a band for one of their conferences. . .
thanks again, I really like this forum and have used Audacity for quite awhile for various things & really like the software.
Just out of interest, I’ve had a go at the task.
This is the result, which I think is reasonably successful, but it is a very slow and repetitive process - I certainly wouldn’t have the patience to do a whole song without a very good incentive to do so Even then the result is far from perfect, but I can give you the recipe if you’re interested.
thanks Steve, yes I would very much like the recipe!
I had found an eq that came close to getting rid of the sound, and thought about gradually adding some highs back in until a tolerable balance is found. The song I’m trying to save is 7 Bridges, and he only played in the middle section where there is some tambourine, so having a little bit of it isn’t so bad.
I can see from your EQ settings that you have correctly worked out that the bones clicks are mostly above 3000 Hz.
For more precise EQ settings use the “Draw Curves” mode.
What I did in this case was to split the music into two frequency bands - one above 3000 Hz (with the clicks), and one below 3000 Hz (very little “click”).
Select the entire track, then Ctrl+D to duplicate the track.
Select one track and use the Equalization effect to isolate the high frequencies.
This is the EQ curve I used:
Select the other track and use the Equalization effect to isolate the lower frequencies - I expect that you can work out the curve to do that - to make the “cross-over” point match precisely, remove the -120 dB point by dragging it off the edge of the graph - leave the 0 dB point where it is, then create a new -120 dB point to pull down the high frequencies.
The rest of the process is only on the high frequency track.
Switch the high frequency track to Spectrogram view (see: Audacity Manual)
The clicks are clearly visible.
Select one of the clicks, plus enough audio to the left of that for “patching”, then apply EZ-Patch to “patch” over the click.
Try these settings:
First half
Both channels
20.00%
Here is an example selection before patching:
and after patching:
6) Repeat selecting and patching for every *&%^#! click on the track.
Export the finished track. Both tracks will automatically be “mixed” back into one track when you export.
I’ve begun the process – got a bit stuck on step 3 – am I just making the “opposite” eq from the first one (that you posted the screen shot of?) I thought that’s what you were saying by isolate the lower frequencies, so I would have all the lows from 20hz all the way up to 3K, then the sudden drop off from 3k thru the highs? Hope that makes sense. . .I not a sound pro, so I fumble a bit. thanks –
took a chance and did the inversion of the 1st eq, moving into the ez patch part. (and wondering how many hundred clicks there are lol). But, this is like some kind of miracle so far, I think it will work.
Download this file to somewhere that you can find it: split-at-3000.xml (251 Bytes)
Open the Equalization effect and select the “Draw Curves”
Click the “Save/Manage Curves” button
Click the “Import” button
Navigate to where you saved the “split-at-3000.xml” file and select it.
Click the “Open” button to import the new curves.
Click the “OK” button to return to the Equalization effect.
You have imported two new presets.
Click the “Select Curve” button.
Probably at the bottom of the list you should see two new presets - one called “3kHz high-pass” and the other called “3kHz low-pass”.
The “high-pass” version will isolate frequencies above 3000 Hz, and the “low-pass” version will isolate frequencies below 3000 Hz.
I just now got back to this. I had declicked some of the track, and had guessed right about the inverted eq’s – but I went ahead and downloaded yours and started from scratch, since I hadn’t got very far and thought your eq’s are a bit more accurate. Your instructions are very clear and easy to follow, by the way.
So far, it’s working just great. It is a bit tedious, doing it click by click, but very effective. I’m finding coffee and chocolate bits help the process.
When I get it done, I’ll post before and after clips –