Exporting to MP3

Dear Collective Wisdom,

I’m troubleshooting for a friend who’s in the process of setting up a home studio for voice actor work. The problem we’re trying to solve is insufficient volume in the resulting MP3 after export.

She has a Shure SM7B mic, plugged into a Shure MVi Digital Audio Interface (I might have called it a pre-amp, in the days before digital audio). From the MVi it goes into an iMac running OS X 10.11.5. We’ve been plugging it into the USB port at the left end of the keyboard; I don’t know if that port is different in any way from the ones on the back of the iMac. Audacity version is 2.1.2, downloaded in the last week.

I checked volume settings in various places (the Mac control panel, on the MVi, in Audacity) to make sure nothing was muted or set too low. The Mac appears to record and play back at normal volume using its built-in mic and speakers. MP3s recorded elsewhere appear to play at normal volume. But the files we recorded into Audacity and then exported as MP3s seem to play at about 1/2 volume (volume seems okay when playing back from within Audacity). I’ve tried playing them back in iTunes and in VLC.

In the wiki I saw that Audacity needs a LAME file installed for export to MP3 to work properly. I downloaded the LAME DMG file and ran the install, but I didn’t see the libmp3lame.dylib file anywhere in the Audacity directory (the LAME_Library_v3.98.2 etc folder was created, but it was empty). So I downloaded the zip file and unpacked that. Deleted and then (re-)created the LAME_Library etc folder in the Audacity directory, then placed a copy of the libmp3lame.dylib file there. Then following directions in the wiki, clicked on Audacity > Preferences > Libraries. Under “MP3 Export Library”, clicked on the Locate button to the right of “MP3 Library:”, which then gave me a pop-up window titled “Locate Lame”. In that window, clicked on the Browse button and navigated to the Audacity directory, where I found libmp3lame.dylib right where I’d placed it.

Aaaand… foo. The filename was grayed out, I couldn’t click on it to select it, and the Open button was also grayed out. However, my son pointed out that the “File type” drop-down box at the bottom of that window was set to “Only libmp3lame.dylib”; once he changed that to “Dynamic Libraries (*.dylib)” we were able to select the file and click on the Open button. (You may want to change the default there, it was rather confusing.)

So theoretically the LAME dylib file is now properly installed and recognized. But after doing another export, the MP3 file output is still quieter than other MP3 files, so I don’t think the dylib file was the main problem.

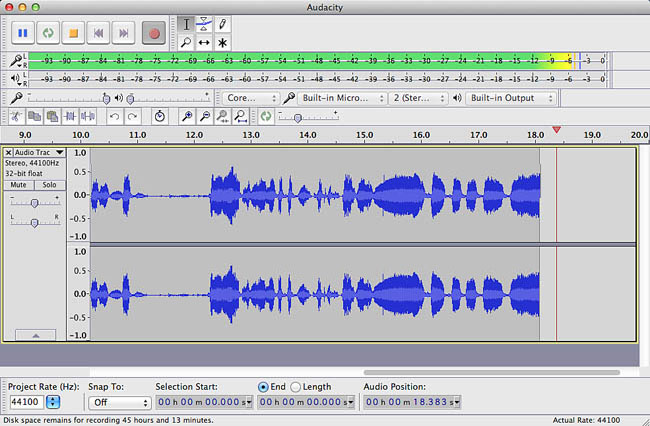
I’ll mention that when recording into Audacity, even with the gain on the active track bumped up to +36dB, the track appears to have plenty of spare room before it gets into the darker gray sections of the track display (I’m assuming that’s where distortion starts to occur?).

My preference with audio recording has been to start out with levels all set about halfway, then adjust as necessary. I don’t like starting with all the controls at max, because then there’s no place to go from there (except down, of course).

Any insight into how to control volume levels, either on the “signal in” side of things or on the “export to MP3” end, would be greatly appreciated.

Thanks.

Welcome to Home Studio Recording.

Let’s do basics. Is there any combination of settings, equipment or technique that can give you an Audacity recording screen that looks like this:

The sound meters can be expanded by grabbing the side handle and pulling. Highly recommended.

That’s the goal. That’s a recording where the blue wave peaks rise to about half (0.5) and the bouncing sound meter rises to about -6dB (same thing measured differently). It’s not unusual for some home recording suites to refuse to do that because low volume is safer than high volume. If you inadvertently go too high and the sound meter goes all the way up and turns red and/or the blue waves go all the way up to 100%, you likely will make harsh, crunchy, permanent sound distortion.

That’s the home studio conundrum. You have to watch the sound meters and read at the same time. If you don’t do that, you may not be able to make technical specifications for posting to a company or client, much less making an MP3.

So how’d you do?

Koz

plugging it into the USB port at the left end of the keyboard

I would not do that. The keyboard USB extensions are not “full” USB connections and some USB devices will refuse to work. Go for one of the ones on the machine.

Koz

Dear kozikowski,

Just sat down to mess with this again. Plugged the USB cable into a USB port on the back of this Mac (instead of the USB port at the end of the keyboard, as suggested). Increased the gain as much as possible with the slider on the individual track we were working with. Still got tiny sound volume when using the Shure mic.

Tried with the Mac’s built-in mic, got much better signal level.
larger sound volume.png
I’ve attached a screen shot of the more successful attempt. Any idea why the signal from the mic/MVi is so much lower?

TIA for any ideas on this.

Marcia

I have a really good idea why they do it. It’s “safe.”

If they created a much higher volume sound work, you have the possibility of announcing too loud and creating overload. In short, that’s when the digital audio system “runs out of numbers” and starts creating very serious, obvious, permanent distortion.

If they did that, you’d send the unit back immediately. As it stands, we are about to spend the next couple of weeks trying to coax a good performance out of this unit. It’s going to be painful and up-hill work, but you’re probably not going to send it back.

I have a good-quality stand-alone USB microphone amplifier/converter that’s so bad at this dance I’ve never used it for an actual job. But I didn’t send it back.


The real down side of this odd problem is the difficulty of making all three of the ACX AudioBook sound specifications, Overload, Volume and Noise on the same sound file. There are very definite, non-magic, plain numbers you have to hit. You can get any two…

the Mac’s built-in mic, got much better signal level.

That’s a highly controlled, internal Mac microphone, so they don’t have to worry as much about someone plugging in something foreign, mis-managed or broken. I created a podcast test with the far side Skype caller (three time zones away) entirely on her MacBook Air built-in microphone. She sounded like she was on the sofa behind me in Los Angeles during the call.

I do wonder if anyone has tried to read for publication by using the built-in. I’ve shot temporary voice tracks for commercials like that.

Koz

The Shure MVi Digital Audio Interface is aimed at modern conderser mics with an output in the 10+ mV range. With only 36 dB gain, it’s not able to cope with dynamic mics.

The SM7b is an old fashioned dynamic, output around 1 mV that needs an excellent preamp to shine. You really need 60 dB gain to use it effectively. There are only a few interfaces out there that offer 60 dB gain.

It’s also easy and cheap.

If you only need to provide 36 dB gain, you can fall back on one of the 5 cent chip solutions. If you want 60 dB of clean, noise free gain, you need a good design, selected transistors and testing after production. And that costs…

Well, after yesterday’s session poking at various settings, I told my friend to get the Golden Age Pre-73 Jr pre-amp. We’ll see if that fixes the signal level problem. Going by the specs, it ought to be sufficient.

Will let you know the results when I’ve got that hooked up.

(I’m sorry the MVi didn’t do the trick, because it’s such a cute little unit.)

M.

“Overload, Volume and Noise on the same sound file. There are very definite, non-magic, plain numbers you have to hit. You can get any two…” I love it. I think that has to go on my “quotes” page.

M.

Koz said, “I have a really good idea why they do it. It’s ‘safe.’ If they created a much higher volume sound work, you have the possibility of announcing too loud and creating overload. In short, that’s when the digital audio system ‘runs out of numbers’ and starts creating very serious, obvious, permanent distortion.”

Um, test sessions? Adjusting the gain down if the signal goes over into the overload /distortion zone? My first reaction is, they must be expecting this gear to be used by idiots. Wait, that’s not very charitable. Better to say, they must be expecting this gear to be used by people who a) know nothing about audio, and b) have no inclination to learn.

(As for myself, I don’t consider myself an audio expert, but I grew up with a dad who was into audio, who had a good turntable, a receiver, a pre-amp, good speakers etc for our home audio system. And then I worked as a musician in bands on the road for a number of years, where we dealt with PA systems, and mics and audio pickups for the various instruments. Have to say the day we blew out our primary PA speakers was not our finest hour. But you learn as you go along.)

Regards,
Marcia

Gah. I thought I had this wrapped up. Now my friend /client says her other tech advisor told her all she needed was a Cloudlifter unit. I have my doubts.

Anyone have an opinion about the Cloudlifter signal booster?

TIA, M.

A Cloudlifter is also a solution. It adds 25 dB gain.

It’s almost as expensive as the preamp you choose and has no settings. I’d go for the real preamp…

But I like to twist knobs… :smiley:

cyrano, that was my leaning as well. The real pre-amp, along with maybe the Scarlet Solo USB audio interface to connect it to the computer (a Mac).

M.

If you want the best, go for an RME babyface (Pro). No need for a separate amp. These are expensive, but you could look for a 2nd hand one.

  • Always stable drivers, even after ten years.
  • 60 dB preamp gain, 80 dB overall
  • NO white noise
  • NO coloring the sound

Another good choice, could be the Audient ID22.

  • Nice preamps, 60 dB gain
  • Hardly any white noise
  • Clean sound

Or the preamp you choose, with a Behringer FCA202, as you don’t need the preamp in the interface. If it is to be used on a Mac without Firewire, just add the Apple 30$ Thunderbolt to firewire adapter.

  • No USB noise or USB problems, very clean.
  • The interface is only 55$
  • 24 bit 96 kHz.

cyrano,

Thanks for your thoughts. The RME Babyface Pro looks like a sweet unit. Unfortunately way out of our price range, even used. Audient ID22 looks decent too, but same issue with price.

I understand clean sound vs whatever color the GAP Pre-73 Jr adds. If I were setting up a recording studio for myself, I’d opt for the cleanest, least altered sound, but I’m not.

We’re going to get the GAP Pre-73 Jr and the Scarlett Solo audio interface and see how that combination sounds with my friend’s voice. And then at that point we can decide whether or not it makes the grade, or if she needs to trade up.

M.

The line input on the Focusrite Solo runs through the mic preamp. With a very high output capable preamp like the GAP in front, you risk distortion.

Just saying… :sunglasses: