That does ‘literally’ what it says.
Let’s say that your initial track has a sample rate of 44100 Hz. That means that in each second of audio there are 44100 samples, or to put it another way, the sampled values from the analog waveform (the “samples”) are spaced out evenly at intervals of 1/44100th second.
If you change the sample rate of the track, it does not alter the sample values in any way. All that it does is to change the spacing between them.
So, if you set the sample rate of the track to 8000 Hz, then the sample values are spaced out at intervals of 1/8000th second.
Doing this will stretch the waveform so that it is longer and sound as a lower pitch.
The length of the track will increase by 44100/8000 (just over 5 1/2 times longer) and the frequency will be reduced by 8000/44100.
Taking your first example: You generate a tone at 7000 Hz, and for arguments sake, lets say that it is 10 seconds long.
If the original track sample rate was 44100 Hz and we change it to 8000 Hz,
the track will now be 10 x (44100/8000) = 55.125 seconds long
the tone will now have a frequency of 7000 x (8000/44100) = 1269.841269841 Hz (very close to the 1273 Hz that you observed).
Similarly for the 5000 Hz tone, the frequency will become 5000 x (8000/44100) = 907.029478458 Hz (extremely close to the 907 Hz that you observed).
In order to see the aliasing that you want to demonstrate, what you need to do is to “resample” the audio to the lower frequency. Normally we want to avoid aliasing because it damages the sound quality, so most methods of resampling use “anti-aliasing filters” to reduce frequencies that will aliasing down to a negligible level.
Unfortunately for your requirements, Audacity’s resampling is extremely high quality, so there is virtually no detectable aliasing.
Luckily for you, Audacity includes a scripting language that allows you to perform all manner of audio processing, and will even let you do things that one would usually want to avoid. This scripting language is called “Nyquist” and it is based on a programming language called LISP.
We don’t need to go into a lot of detail about Nyquist, but it is a fantastic tool for teaching about audio, waveforms and audio processing, so I’d highly recommend that you look into it when you have time.
For now, let’s just deal with the matter in hand.
In the Effect menu is an item called the “Nyquist Prompt”. This is a simple text window that allows simple Nyquist commands to be typed (or pasted) in and applied to the selected audio, just like other effects. (http://manual.audacityteam.org/o/man/nyquist_prompt.html)
Leave the “legacy” check box un-checked, I’ll be using the more recent syntax.
In Nyquist there are two commands for resampling. There is the “resample” function, which is a reasonably high quality resampling function with an anti-aliasing filter, and there is “force-srate” which is a quick and dirty resampling function that uses linear interpolation with no anti-aliasing filter. The latter is exactly what we need here.
In order to resample the sound from the track, there is a key word (a “variable”) that represents the sound from the track. It is track.
To resample to 8000 Hz with no filtering, the command is:
(force-srate 8000 *track*)
That is ‘almost’ all that we need, but there is one problem - Nyquist can change the sample rate of the audio, but it currently has no way to tell Audacity to change the sample rate of the track. Although the above command will nicely (or rather “badly”) resample the sound to 8000 samples per second, when it sends the audio back to Audacity, Audacity puts the samples back into the track and spaces them according to the track sample rate, which is still 44100 Hz.
What we need to do to get round this, is to resample the audio back to 44100 samples per second in Nyquist before we hand it back to Audacity. This time we use the higher quality resampling. The syntax is: (resample ) where our is the sound produced by the first code snippet. So putting the two together we have:
(resample (force-srate 8000 *track* ) 44100)
This will now work fine, provided the original sample rate was 44100 Hz.
We can actually make the code a bit more general, just in case the original track was 48000 Hz or some other sample rate. Nyquist has another special variable which has the value of the track sample rate. This variable is sound-srate
So now we can simply substitute sound-srate for the 44100 value and then the code will work whatever the track sample rate:
(resample (force-srate 8000 *track* ) *sound-srate*)
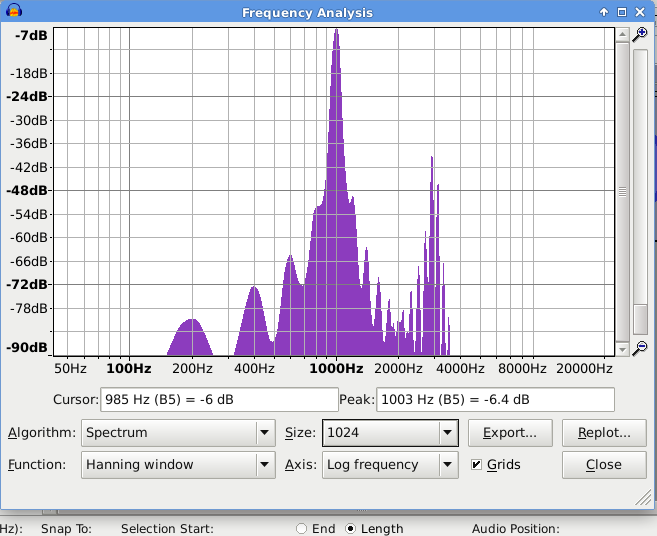
and here we see the nice big peak at 1000 Hz that was expected (and the 4000 Hz cut-off)
More information about Nyquist here:
Missing features - Audacity Support
and we have a forum board for Nyquist here:
Nyquist - Audacity Forum