Hello All! I’m new to Audacity and this is my first post.
I’m recording music from cassette tape into Audacity to be exported to mp3 for use on http://robreillyorgan.com/listen-music , and am trying to determine the best project sampling rate. Will I get better quality by using a high project rate (I’ve been using 96000 Hz / 32-bit float) and re-sampling on export to 48000 or 44100 Hz or by recording the project at the lower rate with no re-sampling on export?
Also, is 48000 or 44100 Hz better for this purpose?
Any advice or suggestions will be appreciated! -Rob
The problems you can get into with oddball sampling rates or other strange characteristics can far outweigh the benefits – particularly since you’re not starting with a live voice.
48000 is the video rate for television. 44100 is the sample rate for Music CD.
If you’re making an MP3, your choices are much more critical than worrying about the quality of the high tones that only dogs can hear. MP3 crappy happens early and quickly. 32 is the absolute minimum MP3 quality setting for a mono show. 64 is the minimum for a stereo show. Any lower than those two and everybody can hear compression problems, gargling, bubbling and honking. Audacity defaults to 128 as does iTunes. Very good is anything above that. 320 is widely considered largely error-free, although the errors never go to zero.
As a comparison, I have an uncompressed stereo WAV file with a data rate of 1400. WAV is the format you need for archive of your work. You can always go down from WAV to everything else. You cannot come back up from low MP3 quality and it’s very difficult to edit MP3.
Koz- Thanks for the reply, which contains a lot of good information, but, unless I’m missing it, doesn’t answer my very simple question: If the sole purpose of a project is to export to mp3, is there any advantage/disadvantage to using a higher sampling rate and then re-sampling down on export to mp3, or should the original project use the same sampling rate as the mp3 with no re-sampling on export?
As the sole purpose is to export as MP3, there are no advantages to going above 44.1 or 48 kHz. My own preference in this situation would be to go with 44.1 kHz.
In order to reduce the file size, MP3 encoding discards unimportant audio data and squashes the remaining data into as small a file as possible. Any additional audio data that may be achieved through high sampling rates will be discarded by the encoding process.
The disadvantages include, much greater disk space requirements, heavier CPU usage and slower processing. Also, unless you have an expensive sound card it is likely that you will get better sound quality (less noise and less distortion) if you use 44.1 or 48 kHz than using a higher sampling rate.
Sample rate conversion in Audacity is very high quality and any losses through sample rate conversion will be insignificant compared to the losses through MP3 encoding, even at 320 kbps.
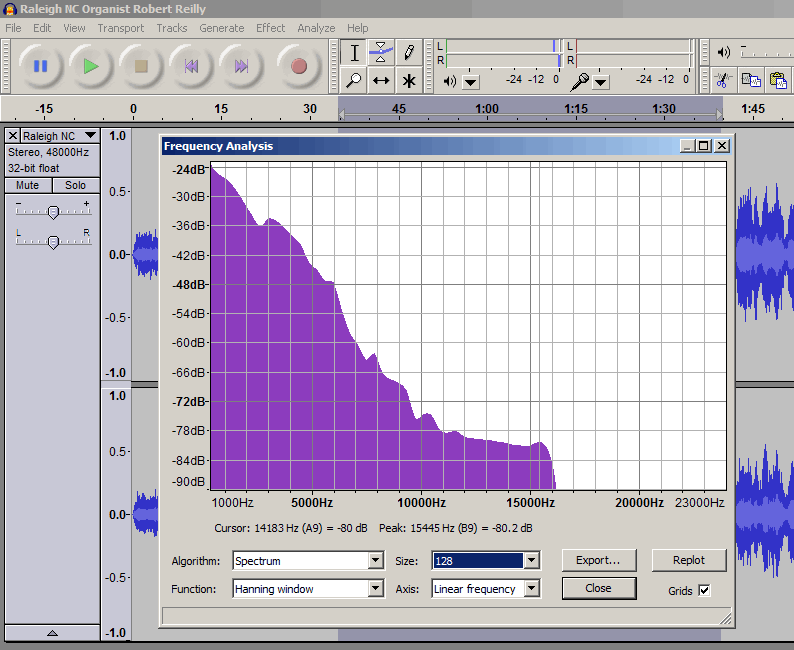
The first two recordings have a sample rate of 48KHz, but they don’t have any frequencies above 16KHz …
i.e. something in your recording/processing chain has a sample rate of 32000Hz.
Trebor- All of the current tracks on the website were recorded at 96000 Hz and re-sampled on export to 48000 Hz mp3. I am in the process of re-recording everything at 44100 Hz and will re-post when it’s up on the site.
is there any point in looking into an audio player for WordPress that will play WAV files, for better quality, or would the larger file size be a problem for people with slow internet connections?
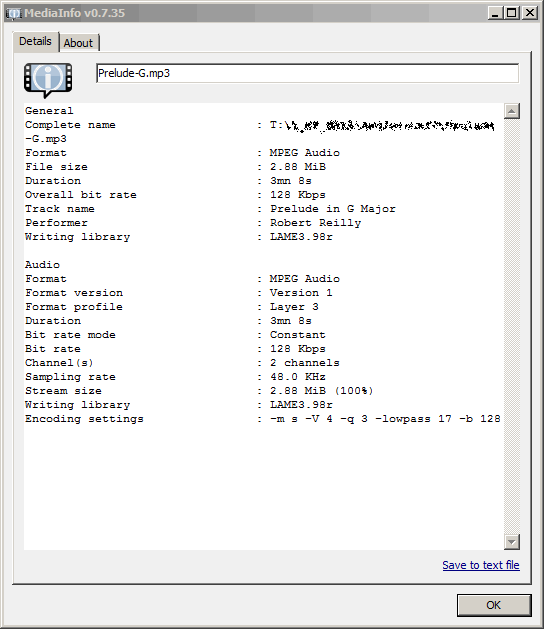
Sometimes the host website will reduce the sample rate (downsample) the submitted audio to reduce the resources (bandwidth) they use to deliver it. However when I downloaded the mp3 from your webpage it still had a sample rate of 48000Hz so I don’t think your host is doing that.
The total lack of frequencies above 16KHz suggests a sample rate of 32000Hz was used at some point, (note the Audacity project rate in the bottom left corner of Audacity determines the sample rate of a track when it is saved, (aka exported), even though the recording was made at a higher rate, like 96000Hz).
The main problem I noticed with your recordings was some noise rather than lack of high frequencies*.
My suggestion would be apply some noise reduction^ and stick to mp3, switching to WAV format won’t help.
[^ if possible it is better to improve the signal to noise ratio when capturing the audio than try to remove the noise later in post production as noise reduction adds digital artifacts ]
MP3 encoding will limit the frequency bandwidth if the bit rate is not high enough (this is the prime reason why it is pointless to use very high sample rates if the final format is MP3). What bit-rate / quality settings are you using for the MP3s?
Yes, WAV files will be annoying for people with slow internet.
Assuming that you are using Audacity 1.3.13 I would recommend that you use “Preset > Extreme” for high quality MP3s and reasonable file sizes.
Could you elaborate? I have been recording as an Audacity project and then exporting to mp3. Where do I find and in what context would I use “Preset > Extreme”?
@Trebor- What technique did you use for cleaning up that clip? It really improved it. Did you use the noise removal tool in Audacity, and if so, what settings? Would you recommend removing noise from the original Audacity project and then exporting to mp3, or just removing noise from the mp3?
(I still don’t have any of the new recordings up yet, but will post when I do. Everything on the site was recorded at 96000 Hz and imported to mp3 at 48000 Hz.)
When you get to the Export dialogue (where you select the destination folder and enter the file name), select “MP3” as the file format and then click on the “Options” button.
(note this is only for Audacity 1.3.x and not 1.2.x)
In old versions of Lame, the “standard” setting would produce better quality, but would take longer to encode. In modern versions of Lame the sound quality is just as good on the “fast” setting.
When “Joint stereo” is selected, audio information that is common to both channels (left and right) is represented only once rather than having two copies. “Stereo” encodes left and right channels separately. The Joint Stereo option generally produces better sound quality. Some users claim that “stereo” gives better stereo imaging than “joint stereo”, but the experts at hydrogenaudio.org say that stereo imaging is just as good with joint stereo (which happily agrees with my own experience )
Thank you, Steve, for some very useful information. I was just reading here when you posted. Now I just need to learn a bit more about noise reduction, and I should be able to get these old recordings cleaned up pretty nicely.
FWIW, the originals were recorded on a Teac half-track stereo reel-to-reel and later transfered to cassette on a Nakamichi DR-2, which is the machine I’m using to play the cassettes into my PC.
Conversion to MP3 should be the last stage in the process, MP3 s a delivery format. Apply the noise reduction to a copy of the project, i.e. don’t overwrite the original. You could apply noise reduction to the mp3, as I did, but processing an mp3 then saving the result as mp3 will add a tiny bit of damage, as mp3 is a lossy format.
That could explain the constant noise I’m hearing: an accumulation of the hiss from each of those analog transfers: mic-> reel, reel-> cassette, cassette-> computer, each one adding more hiss-type noise.
NB: Noise removal is a two step process: first you have to tell Audacity what is noise by selecting a “silent” (i.e. no music) bit at the start of the tape which only has tape hiss, this is called a “noise profile”. Then you select Noise removal from the effect menu again, 10db is a typical value for Audacity noise reduction, but it’s a matter of trial and error, the music will sound distorted in places if too much is applied.
I’m still experimenting with noise reduction, and never seem to be entirely happy with the results. Also, the relationships between the 4 sliders is like a rubics cube and starts to make my head hurt. Some of that noise is from the tapes and some is actually from air flow from the organ.
Steve, I do have access to the original reel-to-reel tapes, but unfortunately I no longer have a half-tract reel-to-reel player, so I’m pretty much stuck with the Nakamichi for this project.
Thanks to you both- you have been fabulous at getting this newbie pointed in the right directions!
If you’re on Windows, you may be able to still get hold of the demo version of CoolEdit 1.53 (now obsolete). The limitations in this demo version is that it is only possible to choose 2 functions at a time, one of which will be the save function and one of the effects, then the program must be restarted. However it has a really good noise removal effect. I don’t know if this program works on Win 7 or Vista. I’ve not used it since Win 98 SE, or was it XP… it was years ago, but it remains one of the best free noise removal effects available on Windows.
Another option on Windows is the Noise Removal effect by Brian Davis http://www.clickrepair.net/
This is not free, but demo versions are available and the software is relatively inexpensive.
If you’re on Linux, there is “Gnome Wave Cleaner”. Unfortunately it’s a bit buggy so it’s essential that you only work on copies and not the original wav files, but it’s free and can do an excellent job of noise removal.