adjusting sound levels for all .wav files

Hi there,

I have many .wav music and some .mp3 files.

The problem is when I set them to play in a playlist I create in VLC Media Player they don’t all play at the same sound level. I’m guessing they were recorded at different sound levels?

Is there a way to make all my .wav and .mp3 files play at the same level?

Is there a magic Audacity wand I can waive over all my .wav and MP3 files so they automatically play at a certain sound level?

I find I have to walk over and crank the speakers on some .wav and/or .mp3 songs and then return to turn the speakers down on other .wav songs as well as some .mp3 songs.

Thank you!

There is a “magic wand”, but not in Audacity :wink:

For MP3 files, it is best to make them “play” at the same volume without actually changing the audio data, because changing the data requires that the file is re-encoded to MP3, which will slightly reduce the sound quality. A program called MP3Gain can do this: http://mp3gain.sourceforge.net/

For WAV files, there is a similar program (same algorithm for determining loudness) and it is called “wavegain”.
There is also a graphical front end for wavegain. See: http://members.home.nl/w.speek/wavegain.htm
Wavegain is not completely lossless, because it does change the files, but it is virtually lossless because WAV is such a high quality format.

A man’s praise in his own mouth stinks, but you may have a look at this tool:
Dynamic Audio Normalizer

(Also integrates into Audacity as a VST plug-in or, if you want to avoid re-encoding, into Winamp as a DSP plug-in)

Actually, mp3gain does avoid any quality loss by directly operating on the compressed MP3 data.

Other tools, including standard audio editors, first decompress the MP3 data, then perform the actual normalization on the “raw” PCM data and finally compress back to MP3 again (this is where the loss happends).

Just FYI - MP3Gain (and the other ReplayGain related applications) will reduce the volume of many (maybe most) of your files.

Some people are surprised by that, but there’s a good reason… Most commercial releases are normalized (maximized) so even the quiet-sounding songs often have maximized 0dB peaks. That means you can’t match volumes by boosting the quiet-sounding songs*, so you have to make the loud songs quieter.


\

  • You can boost the volume by allowing clipping (distortion) or by using dynamic compression and/or limiting. But, these all change the sound/character of the music.

Sorry, I didn’t write that very well.

Take a bit more context:

and put in some parentheses:

For MP3 files, it is best to make them “play” at the same volume without actually changing the audio data, (because changing the data requires that the file is re-encoded to MP3, which will slightly reduce the sound quality). A program called MP3Gain can do this: http://mp3gain.sourceforge.net/

Thank you all for an interesting and informative discussion.

I was unable to locate a wavegain forum or group.

Would anyone be so kind as to share the step-by-step process of applying wavegain to a .wav or multiple .wav files?

Thank you so much.

A simple script like this should do the trick:

@echo off
for %%i in (*.wav) do (
   wavegain.exe --apply %%i
)

If you want to give the Dynamic Audio Normalizer a try too, it can be done like:

@echo off
for %%i in (*.wav) do (
   DynamicAudioNormalizerCLI.exe -i %%i -o "%%~ni.normalized.wav"
)

If you are more comfortable with clicking buttons in an interface, you can use the “WaveGain frontend” instead.

Gale

Thanks for the contribution Gunnar, but that is not what the original post is asking for.

Your application will make loud parts of a track quieter and quiet parts louder. The original question was to make tracks of equal loudness - he did not ask to reduce the dynamic range of his tracks (I’ve read your description of the effect, and tried it for myself, and it does reduce the dynamics. That’s fine because that is what you have designed it to do, but it is not what the OP asked for.)

Well, it will make “quiet” parts of the track louder, but it will not (by default) make “loud” parts quieter. Or, more precisely, the “quieter” a part is, the more gain it will get; the “louder” a part is, the less gain it will get. Parts that already have “full” volume will be left as-is. In the end, this means that all parts will have roughly (i.e. as much as possible without applying a psycho-acoustic model) the same volume, which should be pretty close to what has been asked for.

In contrast, with a “traditional” normalization filter it can happen that a single extraordinary peak prevents the entire track from being amplified adequately - which means this track will end up being much quieter than other tracks.

If you look at the whole track, then yes, equalizing the volume of “quiet” and “loud” parts is definitely a kind of dynamic reduction. But it’s not like a “standard” dynamic range compression filter, where peaks above a certain fixed threshold are cut-off (reduced by a fixed ratio). Instead, each part of the track will get as much gain as possible without clipping. If a certain part already has peaks at 0 dBFS, it won’t be modified at all. Peaks are never cut off.

(Or in other words: Within each local neighborhood, the full dynamic range will be retained. If we look at the entire file, that’s not the case, yes)

Which is not what was asked for.

In some types of music (particularly classical music), there can be sections that are, and should be, much louder or quieter than other sections. Your effect reduces that range, and by default it reduces that range very substantially. I’m not saying that is a bad thing - it is a very good thing if that’s what the user wants. Reducing the range between loud parts and quiet parts is exactly what a dynamic range compressor does.

You are also assuming, or at least suggesting, that peak level equates directly to perceived loudness. It doesn’t. Compare the sound of a click track with a peak amplitude of 0.8 with a 1000 Hz square wave of the same peak amplitude - the square wave sounds much louder than the click track. The same can be found with music. A commercial drum and bass track will sound much louder than an acoustic guitar track that has the same peak level.

Replay Gain is an algorithm that estimates “perceived loudness”. The algorithm is used in both MP3Gain and WaveGain to make audio files play with approximately the same loudness. It does so without changing the dynamics - the calculated gain is applied to the entire track (if used in “track” mode) or to the entire album (if used in “album” mode).

To quote the original poster:

Is there a way to make all my .wav and .mp3 files play at the same level?

My interpretation of that question is that he want to make audio files play with approximately the same loudness.

I’m not averse to you promoting your effect. All of us that write effects like to see them used. However, to recommend your effect every time someone asks about normalization or Replay Gain is misleading.

By the way, I also tried your VST version in Audacity 2.0.6 on Windows XP but it did not show up in the Effect menu. Is it not compatible with XP?

It seems that you could approximate “standard”, “throughout-the-track” normalization by reducing the “Maximum Gain Factor”.

When you say that 100% of dynamic range is retained within each section, how long are these sections? Is it the same as a “frame” which you say is typically half a second?

Another question. The GUI of your plug-in as seen in your docs does not appear in Audacity - you only get the text interface in Audacity even if Graphical Mode is enabled.


Gale

It is rather more since 31 frames are gathered as “neighbourhood”. However, the whole curve is Gauss-weighted and depends therefore from Sigma.

Although this smoothing is applied, the plug-in seems to have a steppy response.
I can’t test it right now but a former test was roughly like this:

  • A tone with fade-in applied (20 seconds or so) and a neighbourhood of about 7 frames for the plug-in.
  • Compare it to Chris’ Compressor with about 0.1 Hardness.

Yes and no. The smallest “unit” for which the peak value is determined and the maximum possible gain factor is computed is a “frame” (typically 500 milliseconds). You can think of it like this: Cut the input audio into separate frames, apply “traditional” normalization individually on each frame and finally join together the normalized frames again.

However, simply applying the maximum possible gain factor to each frame individually could result in very unsteady gain factor “jumps” between neighboring frames, which sounds bad. That’s why a Gaussian smoothing kernel is applied in order to ensure a smooth and steady adaption of the gain factors. The size of the smoothing kernel is expressed in frames. The default is 31, so it will consider the 15 preceding and the 15 subsequent frames around the current one. The “sigma” for the Gaussian filter is computed automatically, based on the selected kernel size. The exact formula used is 1/3 + (((filterSize / 2) - 1) / 3), which is based on the so-called “3-sigma rule”.

VST only allows the plug-in to specify the number of parameters. Also, for each parameter we can define a name (max. 8 characters). But that’s it! The range of each parameter is always 0.0 to 1.0 and it needs to be mapped to something useful inside the plug-in. How the parameters are presented graphically to user totally depends on the individual application! The screenshots in the manual were made in Acoustica. The graphical interface shown by Audacity is a bit more “stripped-down” compared to what Acoustica offers :wink: Alternatively, it’s also possible to write your own VST-GUI from the scratch, which then completely replaces the application’s “native” interface. But I didn’t go that route…

Not quite sure what you mean with that :question:

If you look at this chart, it shows the “raw” max. gain factors determined for each frame (blue), the minimum filter values (green) as well as the final smoothed values (orange).

Only the final smoothed values will be applied…

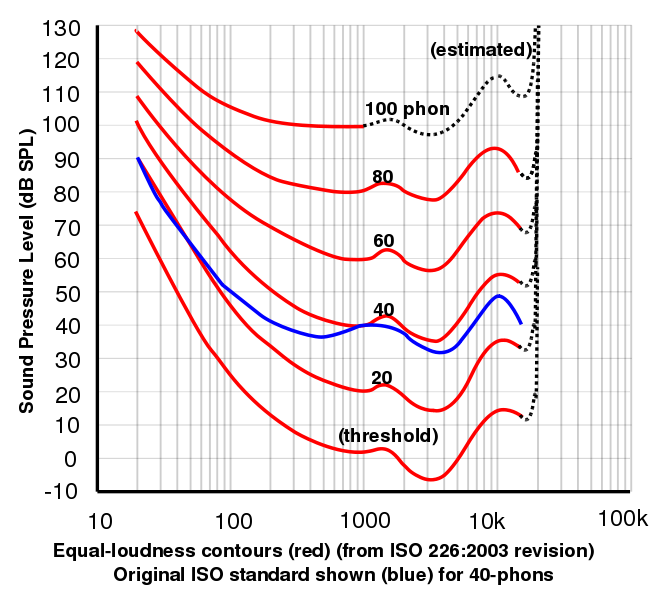
Well, as I have mentioned before, ideally we should apply a psycho-acoustic model. That is: We transform everything into the frequency domain and weight each frequency by how sensitive the human ear is for that particular frequency. Though this would be much more complex and much slower compared to the current approach. And, in my experience, the current approach works pretty well. Last but not least, there already is an optional “RMS based” mode available.

Nonetheless, the current code is written in a way that the function, which determines the “frame local” gain factor, can be exchanged easily - like it’s already done with “RMS based” mode. More modes to be added in future versions…

With such “extreme” synthetic examples the limitations of the current approach are apparent. But with “real world” recordings it is not that much of an issue.

As long as only a single gain factor is computed for the entire track, or even the entire album, we still have the problem that the maximum gain that can be applied (without clipping) is still restricted by the “loudest” peak. That means: Only a single extraordinary peak could prevent the entire track, or even the entire album, from being amplified adequately. And then the affected track/album will sound MUCH quieter than other tracks/album.

(Assuming we do not apply a “compression” filter to destroy the peaks beforehand, of course)

It is supposed to work under WinXP, if that is still relevant these days.

You probably know this, but I need to ask anyway: Did you set the VST_PATH environment variable correctly and did you make Audacity re-scan for new VST plug-in’s after that?

XP is still relevant in market share.

Your plug-in appears for me on Windows XP SP3.

Gale

How exactly did you install it?

I just set Audacity to rescan VST effects, dropped “DynamicAudioNormalizerVST.dll” in the Audacity “Plug-Ins” folder and restarted Audacity.

Might you have used the file of the same name in the “x64” folder? Audacity won’t see that.


Gale

That’s exactly what I did, but the effect was not listed in the Effect menu (though that works for other VST effects).

Another thing to consider: If you use the “DLL” build, then your need both, “DynamicAudioNormalizerVST.dll” and “DynamicAudioNormalizerAPI.dll”. However, due to the way how Windows resolves DLL dependencies, you would have to put the “DynamicAudioNormalizerAPI.dll” into the Audacity main directory (where the EXE file is located), putting it into the “Plug-ins” directory does not help. At the same time, the “DynamicAudioNormalizerVST.dll” needs to be located in the “Plug-ins” directory in order to be recognized by Audacity. In addition to that, the Visual C++ 2013 Runtime libraries must be installed, if you haven’t done that already.

If you use the “Static” build, the “DynamicAudioNormalizerVST.dll” will work on its own. No dependency on “DynamicAudioNormalizerAPI.dll”. No need to installed the Visual C++ Runtime…