I don’t guarantee that this will produce the musical timbre that you want, but this is a bit of information concerning adding harmonics to sine waves:
A sine wave can be said to be the “simplest” waveform in that it may be fully described as a single periodic oscillation (with a given phase and amplitude). If we change (“distort”) the “shape” of the waveform, then it is o longer a sine wave and can no longer be described as a single frequency - in other words, we have added harmonic frequencies to the tone.
One of the easiest ways to change the shape of the waveform is to clip off the peaks. This is called “hard clipping” and sounds similar to a “fuzz box” effect.
The “Limiter” effect in Audacity can produce this effect if you select the “hard clipping” option (http://manual.audacityteam.org/o/man/limiter.html).
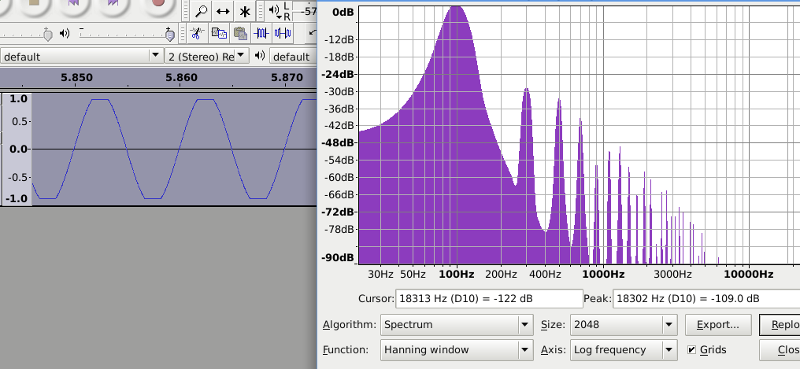
Clipping off the peaks as a straight line (as shown below) produces an infinite series of harmonics that are exact odd multiples of the original sine wave. For example, if the original tone is 100 Hz, the harmonics will be at 300, 500, 700, 900…Hz with gradually diminishing amplitude.
We can also clip audio using the Nyquist function “clip”.
For example, to clip at a linear amplitude of 0.75 (about -2.5 dB) we can use the code:
(clip *track* 0.75)
This code may be run in the Nyquist Prompt effect (http://manual.audacityteam.org/o/man/nyquist_prompt.html).
“track” represents the sound that is passed by Audacity from the track selection to Nyquist.
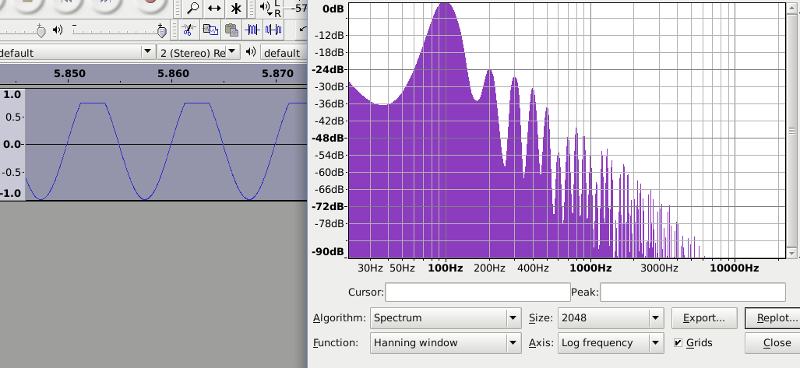
If we want to produce even harmonics rather than odd harmonics, we can clip just one side of the waveform - say the positive going peaks.
The code above clipped at +0.75 and -0.75. If we want to clip at (only) +0.75, one way that we can do it is to raise the waveform by +0.25 (add 0.25 to the value of every sample), and then clip at +/- 1.0. Because we have raised the sine tone by +0.25, it is now in the range of -0.75 to +1.25, so when we clip at +/- 1.0 it only clips the peaks that are above +1.0 (there are no peaks below -1.0). Then we need to drop the waveform back down so that it is not so offset from the zero line. We can get it reasonably close by subtracting 0.25 from every sample, or, adding -0.25 (minus 0.25).
Here it is written as three distinct steps:
(setf *track* (sum 0.25 *track*))
(setf *track* (clip *track* 1.0))
(sum *track* -0.25)
The first line modified track by adding 0.25.
The second line modified the new value of track by clipping at +/- 1.0
The third then adds -0.5 and that produces the “value” (which is a “sound”) that is passed back to Audacity.
Nyquist includes other functions that may be used for “wave shaping”, in particular the function “SHAPE” (http://www.cs.cmu.edu/~rbd/doc/nyquist/part8.html#index447)
You can see some examples of the SHAPE function in this “waveshaper distortion” effect: https://forum.audacityteam.org/t/distortion-effect/33184/1
One limitation that you will find using this on “natural” sounds, is that the shaping is a function of amplitude. If we consider the simple clipping effect in the first example, if the “input” sound is bellow the clipping threshold, then the sound will be unmodified. One possible way to work around this limitation would be to even out the amplitude before applying the waveshaping function. The “Limiter” effect could help here by using the “Soft Limiter” setting, with “makeup gain” enabled, ensuring that the limiter threshold is low enough that it catches all of the sound that you want to processes. You may then want to shape the amplitude of each individual note after apply the waveshaper (possibly using the Envelope tool, or another Nyquist script).