You’re using it beyond its design limits.
The “Limit to (dB)” default setting is -3.0, and the range of the slider is -10 to 0 dB. The ends of the scale are “extreme” settings and you are going beyond the extreme low setting of -10 dB.
It’s (automatically) variable and depends on the threshold (“Limit to (dB)”) level.
When the threshold is close to 0 dB, the “knee” is quite “hard” - that is, there is no effect on audio until it gets really close to the threshold (fractions of 1 dB). With lower threshold settings the knee gets “softer” - that is, the effect is more progressive so the plug-in will start to compress at a lower level (relative to the threshold level).
A picture from Wilipedia illustrating “hard knee” and “soft knee” (Dynamic range compression - Wikipedia )
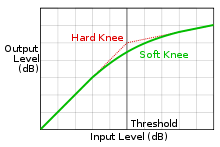
This is the intended behaviour and produces much less noticeable distortion than using a fixed knee.
Let’s say that you have the threshold set to -15 dB ("Limit to -15 dB):
If there is a peak in the audio that has a level of 0 dB, the plug-in has to reduce that peak by 15 dB so that its new level is -15 dB. With a hard knee, there would be no effect at all on audio below -15 dB, then for all sounds above this level, the level would be pulled down to -15 dB. Suddenly you are going from normal dynamics to no dynamics - whether the input sound has a peak level of -14 dB, or 0 dB (which is a BIG range), the output level would be -15 dB. The effect would be very noticeable and not very pleasant.
In this illustration I have applied the Limiter to a “ramp” (fade-in from silence to 0 dB). The first track is limited to -1 dB, the second to -3 dB and the third to -6 dB.
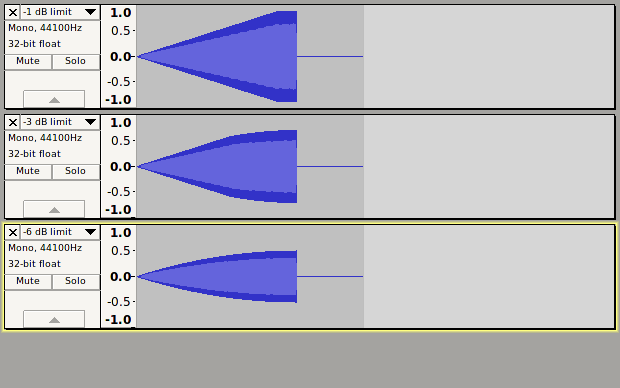
You can see that with a threshold of -1 dB, the effect is almost “brick wall” - no effect until almost at the limit, then a high compression ratio to bring the maximum peak down to -1 dB.
When the limit level is set at -3 dB, the effect starts to kick in at about -4.5 dB and the compression ratio gradually increases the higher the input goes above this level. There is still some dynamic difference for high level peaks, but above -4.5 dB the dynamic range is increasingly reduced such that peaks will never exceed -3 dB.
When the limit level is set at -6 dB, you will see that the knee is soft and compression begins very gradually from a low level, gradually increasing to a high compression ratio as the level approaches the -6 dB limit.
As it says in this article: SOS Past Articles now online (back to January 1994)
A basic compressor does nothing to the input signal until it reaches the threshold, then the full amount of gain reduction is applied as fast as the attack time will let it. This is good for assertive level control, but can be a little too obvious when a lot of compression is being applied to critical sounds within a mix — or to complete mixes for that matter. A gentler-sounding compression can be achieved by using a so-called soft-knee compressor, where the compression ratio increases gradually as the signal approaches the threshold. Once the signal passes the threshold, the full ratio as set by the user is applied, but, because some compression is applied to signals approaching the threshold, the transition from no gain reduction to full gain reduction is far smoother.
In the case of this limiter, the attack and release are fixed and very fast, so if a hard knee is used with low threshold, then the compression ratio will need to be extremely high and it will be very noticeable as the limiter kicks in and out. When the threshold is not so low it should be only exceptional peaks that are affected, so we can get away with a high compression ratio and a hard knee.
In normal operation you would apply this affect after normalizing the audio to 0 dB, then set the limit level to cut down peaks that are higher than the rest of the audio.
Hopefully that explains what is happening with the Limiter, so now onto your job in hand:
The “Pop Mute” effect may be better suited to this job.
Here’s the full forum topic about Pop Mute: New plug-in effect - PopMute
Here is a direct link to the current version of the plug-in: http://forum.audacityteam.org/download/file.php?id=4086
There is a “Help Screen” included in the plug-in that explains the basic operation, but there is a lot of additional information in the forum topic.
This effect would normally be applied only to the region that you want to affect and not the entire track.
You will probably want the “Mute Level” set quite high so that the clapping does not disappear altogether.