I am attempting to create a mix track using Audacity which requires me to create a highs, mids and lows track for each song that, when played together, preserve as much as possible the qualities of the original track. My current method is to import each song three times into three different tracks and then use high/low pass filters on each track to create a high, mid and low track for each song.
Highs track:
High Pass Filter, Frequency: 2100, Rolloff: 48 dB
Mids Track:
Low Pass Filter, Frequency: 2100, Rolloff: 48 dB
High Pass Filter, Frequency: 250, Rolloff: 48 dB
Lows Track:
Low Pass Filter, Frequency: 250, Rolloff: 48 dB
This is the best way I have found to achieve these goals however it does cause minor amplification on (what I assume are) certain frequency ranges around the filters (leading to clipping on many “loud” tracks). Is there a method I can use to split the tracks as (or more) effectively without causing this amplification?
You can’t do it that way. You have to pick the filters carefully so they cross each other at the -6dB points, not right on the frequency. If you don’t do that, the crossover points will be 6dB too loud , which is pretty much what you have now.
Tricky stuff! Filters are not perfect and they sometimes introduce (hopefully slight) peaking and ripples. Sometimes, simply applying a filter will increase the peak value in a file even before you re-combine the frequencies. (There is something called a “maximally flat” filter that minimizes ripple.)
And unless you use linear-phase filters, the different filters will have different phase-shifts that can cause peaks & dips when the frequency bands are re-combined.
The main problem with using the High/Low pass filters is not due the “ripple” (the amount of ripple is extremely low with these filters), but is due to changes in phase close to the filter’s corner frequency and the “radius” of the curve at the crossover frequency.
Let’s say that you split broadband audio into “low”, “mid” and “high” frequency bands. Each band has a sloping roll-off that overlaps the sloping roll-off in the adjacent band. These filters are IIR filters and one of their characteristics is that they create frequency dependent phase shift about the corner frequency. Where the signal is in-phase between the two “crossover slopes”, the signals will reinforce each other, and where they are out of phase they will attenuate each other. Ideally what you would want is for the crossover slopes to exactly sum to unity (flat response through the crossover transition), but that doesn’t happen with these filters.
Fortunately there is a way round this (though it’s a bit fiddly).
Duplicate the original track twice to make 3 identical tracks
Use a High pass filter on one track to create the “high” track.
Make a copy of the “high” track and invert it (Invert effect)
Mix the copy of the high track with the original track. This gives you the “original track minus the high frequencies”.
Use a Low pass filter on another of the track to create the “low” track.
Make a copy of the “low” track and invert it (Invert effect)
Mix the copy of the low track with the “mix” track created in step 4. You now have “original track minus the high frequencies minus the low frequencies”. This is now your “mid” track.
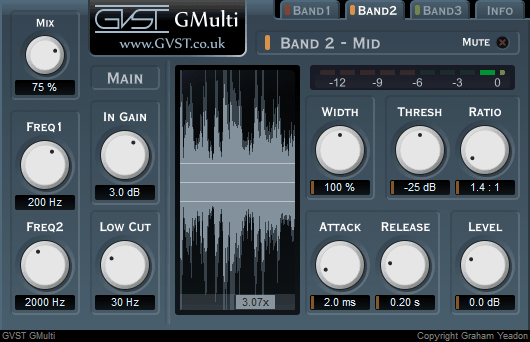
You may be interested in G-Multi plugin , multiband compressor, which splits the sound into three bands :
0-freq1 , freq1-freq2, freq2-halfSampleRate …
You can then adjust the level & the amount of compression in each band.
You can also mute band(s) to create the three [low-mid-high] tracks you desire.
So I’ve tried this but I’m still running into problems. On step 4, when I mix the inverted “high” track with the original track, I end up with a track around 5dB above the original. If I mix the the “high” track and the inverted “high” track, it creates a silent track (as you would expect). So why is it not removing the high frequencies from the original track?
My guess is that you may have inadvertently inverted both the high track and the original track.
However, let’s make this much simpler:
Make two duplicate copies of a track, (so you have 3 identical tracks in total), then select all three tracks and apply this code using the Nyquist Prompt effect (requires a recent version of Audacity):
I was pretty careful to test the manual method a couple of times and the result was reproducible. I’m running the most recent version of Audacity but this Nyquist Prompt gives me the same result as the manual attempts. High and low tracks alright, mid track is amplified.
Sorry to be such a bother! Does this same effect happen on your end too? I’m using both a highly compressed, “loud” EDM track and a track from Rage Against the Machine (my go-to album for audio testing) to test these methods.
OK, I understand the problem.
You’re saying that the peak level of the “mid” track is higher than the peak level of the original track?
For some types of audio (particularly if the audio is highly compressed), that is inevitable and unavoidable.
In order to split into frequency bands, the sum of all of the bands should be equal to the the original. The “manual method” and the Nyquist code should both do that. However, when audio is filtered, there is no guarantee that the peak level of the filtered audio will not be higher than the original.
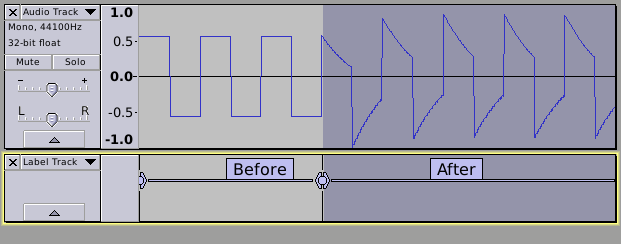
As an example, his is what happens when a 440 Hz square wave is filtered with a 100 Hz second order high pass filter (Note that this is the correct behaviour for a second order Butterworth filter):
I totally missed the fact that the conversation was continuing on a new page! Thanks for your reply again.
Yes, the peak level is higher but it appeared so markedly so that I assumed the whole lot had just been amplified.
I’m trying create a long mixtrack. To do this, I am trying to split the high, mid and low frequencies out so I can manipulate them separately (mostly with the envelope tool) to seamlessly mix one song into another. For the bulk of each track, however, the song is just playing as normal and I would like it to sound no different from the original track, preserving the highest level of accuracy from the original source (usually FLAC or .wav files I have purchased).
So what should I do about all this? Do I need to compress the mids track? What would be the best way to preserve all the original data so when I stitch the three tracks back together, I get a waveform most similar to the original track?
After applying the filter, select all three tracks and apply the Amplify effect to all three tracks so as to bring the peak level down below 0 dB. It is important to amplify all of the tracks together so that they are all amplified by exactly the same amount. This will reduce the overall loudness, but the balance between low, mid and high is preserved - turn up your speaker / headphone volume if necessary.
When you have finished the job, I presume that you will want to recombine (mix) the three tracks back together. When you have done that you can amplify / compress / limit as required.
I’d just use the Amplify effect. There’s no way to predict how much amplification will be required until after the audio has been filtered. Heavily compressed audio tends to peak higher after filtering, but you don’t know exactly how much until you’ve applied the filter.