Clipfix (see waveform pic) - plugins available?

Edit: scroll down and read the bold parts for a quick look at the computational model and coding outline.

Ok, so I made a mistake. I gave a mic a bit too much gain and now the reading went off the scale, resulting in this:

You can see the sine-like waves in there still, so I was wondering if there is a plugin that can reconstruct those waves by completing the parts that went off the scale by fitting them in the sine?

This wave produces a typical clip-distortion sound. I tried clipfix.ny which can be found on the Internet but it didn’t help. Any suggestions? If there’s no plugin available I hope to have inspired someone with math-programming skills to write one :slight_smile:

A “BIT” too much gain :smiley:

What has happened here is that the signal has gone so far off the scale that it has appeared on the other side.
Actually that should never happen, and is partly due to your sound card handling the overload incorrectly.

The distortion in your example is just too badly damaged to be repaired by ClipFix (or any other clip repair tool that I know of).

ClipFix is pretty good at repairing “normal” clipping, but in the example you have shown, the clipped regions have change polarity (overly high positive values have become negative.

Here is an example of a badly clipped audio signal which does not have polarity reversal:


And here is the same waveform after repairing with ClipFix:

Thank you for your reply.

Actually this recording was made in a more sophisticated setup:
Microphones etc. → Samson Mixer → MD Recorder → Laptop
I was testing a Sennheiser wired mic instead of the AKG wireless set we usually use. Lacking a compressor I tend to use the first available link in the chain to limit the volume of each mic to a certain level, to keep the dynamic range within bounds. (The system isn’t only used for recording but also for live amplificaton and I can’t blow people’s ears off just to get a good recording, y’know.)

For the wireless mic this link is the receiver’s volume setting. The receiver would clip where appropriate and its max. output signal to the mixer was set not to clip anything further down the chain. These recordings never gave distortion like this and were straightforward to edit. I guess the AKG box handles clipping nicely.

However the Sennheiser wired mic obviously doesn’t have a receiver with a volume setting, but is inserted straight into the mixer by XLR, so it clips there instead. In this situation I know I made sure that the signal sent through to the MD recorder and laptop was at an appropriate level (but of course the damage had already been done there). So I’m suspecting that the mixer just doesn’t deal so well with clipping. I wish I had a compressor but that’s just no option financially.

Back to the point though: purely from a mathematical point of view I see potential in the graphs of my first post. It has to be possible to reconstruct those sine-like waves if it’s possible to reconstruct your example. I mean, in your graphs there is a flat max-signal at the clipping point; replace the bad (sudden negative) data points from my graph with the highest value found right before/after the negative values kick in, and you have exactly the same situation. Alternatively, reversing back the polarity seems like another option. That’s a simple -1 multiplication.

In fact, if somebody would be able to do the above, it should be sufficient to make the current clipfix.ny finish the job (it fixed your situation)!

Unfortunately I don’t have the appropriate programming skills to convert this idea to code but I was hoping for someone to tag along who does. Of course I don’t want to push anyone to code this specially for me :mrgreen: but I guess it would make a good and easily implemented function for the experienced audio programmer. Or would it? You’d certainly have my graditude, for what it’s worth… :laughing:

It’s not quite so simple - What kind of algorithm would you need to be able to detect that the samples highlighted in this image are incorrect? (if indeed they are incorrect ).


So you are recording a live gig?

For a good recording, you need to be able to be able to avoid clipping rather than try to correct it. Correcting bad recording is really a last resort which can sometimes work in removing small imperfections in an otherwise good recording.

If that is where the clipping occurs, you need to turn down the gain on that channel and use the level fader to bring the volume up to match the other inputs. If the level fader will not go high enough, then you need to turn down everything else.

In the heat of a live session, it is easy to think “oh, the guitar is not loud enough, I’ll turn it up. Oh, now the vocal is not loud enough, I’ll turn it up. Oh, now the Sax is not loud enough, I’ll turn i up. Oh, now the guitar sounds too quiet again…” when in fact you would have been better to turn down the electric bass. Most mixing desks have either a means of metering a single channel “pre-fader”, or at least a “peak” or “clip” indicator. To get a clean sound for recording, you must take heed of these and avoid clipping. If it is not possible to get a high enough level through your PA, then you need a more powerful PA.

Look at the waveform - what is characteristic for the clipping parts from a mathematical point of view? I’d say that the sudden extremely negative slope, i.e. the drop from a very positive to a very negative value of the wave, marks the beginning of the clip area. Likewise, to find the end of such a clip area you could detect the sudden postive slope.

Translating this to a computational definition: considering that the distance Δ_t_ between two samples on the x-axis is constant (defined by the sample rate 44.1kHz), the slope Δ_y_/Δ_t_ is proportional to Δ_y_. The beginning of the clip (sudden negative slope) can be identified by a very negative Δ_y_ and the end of the clip by a very positive. This Δ_y_ can simply be found by y(sample) - y(previoussample).

Of course we still have to establish what exact value of Δ_y_ is required for something to be identified as a clip. This could be left a variable for the user to set himself while executing the plugin. A second requirement for an area to be identified as clipping (to prevent false positives) is that the y-value must remain in the negative until a sudden high slope is found, marking the end of the clip.

A third characteristic that I distinguish in this particular waveform is that when you revert the polarity of the clipping area back to positive, the line seems to approximate the red line that I drew earlier. Computationally speaking -y(clip) ≈ y(just-before-clip). I’m not sure this should be used in a detection algorithm though. If it would be, a user-set variable determining how much the values can differ for an area to still be identified as ‘clip’ is recommended. But that would probably amount to a lot of unnecessary work. Also for a waveform that doesn’t have its zero line at 0 this is an unusable property. An alternative definition would be y(clip) + 1 ≈ y(just-before-clip). But such advanced ideas don’t seem necessary to me.

I hope the characters Δ (delta) and ≈ (approx. equal to) show correctly on your system.

The problem during the live recording is, that the mic is used for both soft speech and loud shouts. The soft speech has to be amplified so that it’s audible on the system, and at the level required to do that the louder parts would blow the people’s ears without a clip limit.

A much better solution:
http://www.behringer.com/COM800/?lang=ENG
http://www.dolphinmusic.co.uk/page/shop/flypage/product_id/5983

(I have a similar problem with the singer in one of my bands - how to prevent him from blasting everything into the red as he … um… emphasizes certain moments. :smiley:

Yeah, I wish I could afford a compressor.

Here’s an illustration to my idea of converting the inversed clips to normal clips:

Also note this parallel topic:
http://www.hydrogenaudio.org/forums/index.php?act=ST&f=30&t=63302&st=0

I can see the idea of your suggestion, and I guess that it could work to some extent since with real world digital audio, consecutive samples tend to be relatively close to each other. I don’t think it very likely that you will find anyone willing to spend a lot of time developing such a tool - as said before, this kind of damage should not happen in the first place, and even after “repair” the output would still be significantly different from what it should have been.

Did you check out the price of that compressor? The box is just plastic, but the price is very good and the electronics are good - probably worth saving up for.

Well, I sent this topic to the mailing list but I did some research myself and found that Nyquist is better equipped for higher level operations than for sample-by-sample processing. However this particular idea should be possible with the following functions:
http://www.audacity-forum.de/download/edgar/nyquist/nyquist-doc/manual/part6.html#index164

This thread gives a great start:
http://www.nabble.com/Processing-individual-samples-td15355625.html
Especially note the framework code for sample-by-sample processing which I’ll cite here:

;nyquist plug-in 
;version 1 
;type process 
;name "DSP Effect..." 
;action "Performing DSP Effect..." 
;control dummy "" int "" 0 0 0 

;; the dummy slider above is only to open a effect window 
;; where you can press the "Debug" button in case of trouble. 

;; Just write TWO semicolons at the beginning of the "control" 
;; line if you want to disable the effect window temporarily. 

;; define a dsp class 
;; 
(setf dsp-class (send class :new '(copy-of-sound))) 

;; initial function of dsp class 
;; 
(send dsp-class :answer :isnew '(sound) 
  '((setf copy-of-sound (snd-copy sound)))) 

;; method to be executed with every call to dsp-class 
;; 
(send dsp-class :answer :next '() 
  '((let ((current-sample (snd-fetch copy-of-sound))) 
     ;; "cond" checks for end-of-samples condition 
     (cond (current-sample 
            ;; 
            ;; replace the following line with your own function(s) 
            ;; 
            (* 0.5 current-sample) 
  ))))) 

;; define a dsp function for mono signals 
;; 
(defun dsp (sound) 
  (let (obj) 
    (setf obj (send dsp-class :new sound)) 
    (snd-fromobject (snd-t0 sound) (snd-srate sound) obj))) 

;; add automatic handling of mono/stereo tracks. Processes both stereo 
;; channels one after the other. To process both channels simultaneously 
;; or whole blocks of samples the object code above needs to be rewritten. 
;; 
(if (arrayp s) 
  (vector 
    (dsp (aref s 0)) 
    (dsp (aref s 1))) 
  (dsp s))

As I said, I personally can’t program in Nyquist/Lisp but using the above code it should be straightforward. Here I’ll attempt to outline the code structure I have in mind for the “inversed polarity fixer”. Being inexperienced with the language I may make mistakes, so correct me where I’m wrong.

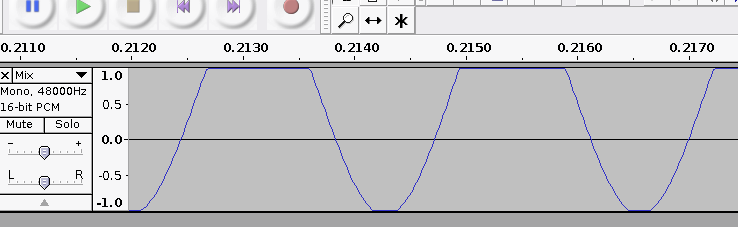
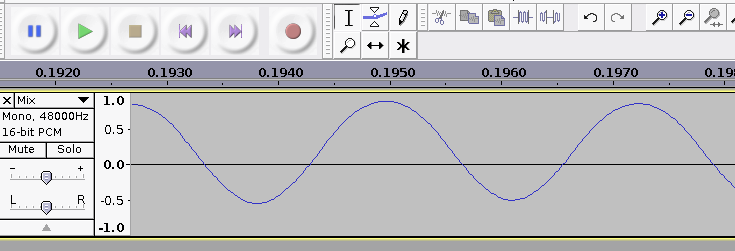
**Current-sample is a function that returns the numerical value of the current sample, that is the y which I used in my previous posts. We also need a symbol (Lisp-variable, right?) that holds the y-value of the sample just before the one in current-sample, because both values are required to calculate the Δ_y_ which is used to identify a clipping area by its large slope. I’ll call this symbol previoussample and I suggest to copy current-sample’s value to previoussample right before switching to the next sample routine.

Here’s the code structure I have in my head, but it may be quite wrong:**

1 WHILE currentsample
2     IF (currentsample-previoussample) < limit
3         SET peakheight = previoussample
4         WHILE (currentsample-previoussample) < -limit
5           SET currentsample = peakheight
6           NEXTSAMPLE... somehow
7         ENDWHILE
8     ELSE
9         return the sample unmodified
10        NEXTSAMPLE
11    ENDIF
12 ENDWHILE

Running you through it:
1 and 12 ensure the routine is carried out from the first to the last selected audio sample.
2 checks the Δ_y_ which I mentioned before, used to find a large negative slope (limit being a negative, user-set variable). If more negative than limit the modification code from 3 to 7 is run, otherwise (8) nothing is done and we go on with the next sample (9).
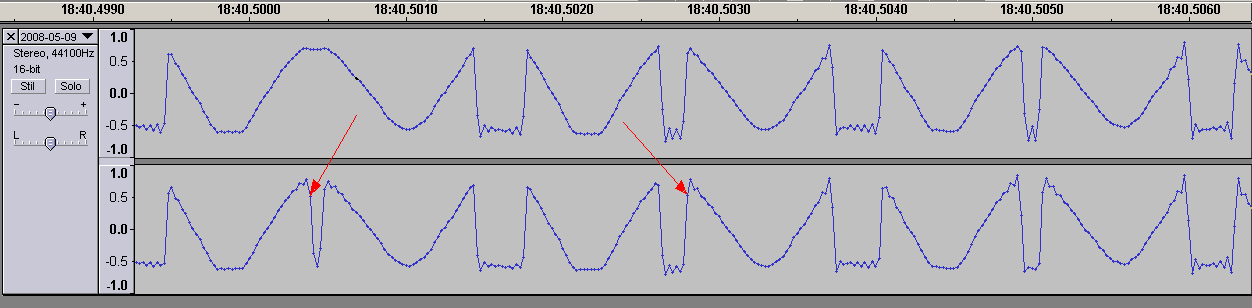
3 writes the y-value of the last ‘normal’ sample (see picture above) to a storage symbol because it will be used to set the next samples, thus creating the straight red line (see picture in previous post). This value comes from previoussample but must be stored because previoussample will changes value when proceeding to the next sample.
4-7 sets the negative clipping samples to the highest normal sample known, thus creating a ‘normal’ positive clipping line (the red line) that can be dealt with by regular clip fixing plugins. When currentsample-previoussample (the Δ_y_) suddenly gets mighty positive, the end of the clip is reached and the action is stopped.

Questions:
How to tell the script to go to the NEXTSAMPLE, i.e. read a new sample value with current-sample? How does this fit in the Nyquist DSP framework code I cited above? Where in the code should the previoussample symbol be set? Can I also remember a sample’s location and go back to it, instead of just going to the next… next…? The latter would allow an observation-first principle, where we first check if there’s an end to the negative clipping area (with high slope) before changing any sample values, instead of rushing on as soon as we find the start and looking for the end on the way.

Some additional thoughts on user parameters.
limit: as seen in the pseudo-code. Any number from -2 to 0 that determines the required shift between two samples for the pair to be identified as starting point of a clip. It’s -2 to 0 because Audacity waves are put on a scale between -1 and 1, making the maximum drop -2. Using a -2 limit means the plugin does nothing, using a 0 limit makes it go nuts.

maxduration: amount of samples that each negative clipping area is allowed to contain. In practice this defines the maximum amount of samples that the algorithm will look ahead to find the very high slope (marking the end of the clip) after having found the very low slope (start of the clip). Not implemented in the pseudo-code because this fits in the observation-first principle as described above.

Hopefully this all is specific enough for someone to work with, otherwise I may try doing it myself. But either way I’ll need some advice though :slight_smile:

Funny that, I was thinking of something very similar for a code structure.
(this is not in any real language. Lines beginning with # are comments)

# $limit is set by our "sensitivity" slider
# $dif is the difference between the current sample and the next sample
# we initialise $dif to zero
$dif=0

# some code to grab first sample
$current = GET (sample)

# some code to grab the next sample and start our loop
# assuming that GET(sample) returns "false" at end of selection
WHILE $next = GET (sample)

# calculate difference ($dif) between next sample ($next) and the current one ($current)
$dif = $current - $next

# we want $dif as a positive number irrespective of whether it is a positive or negative going waveform
IF $dif < 0
$dif -= $dif
ENDIF

# compare $dif with $limit and change the sample if greater than our limit
IF $dif > $limit
$next = $current
# else set value for our new current sample
ELSE $current = $next
ENDIF

# end the loop
ENDWHILE

Almost identical to your scheme except that it allows for both positive and negative going waveforms.

In fact, this would be much better if it could be included in the “clipfix.ny” script since really we want to repair the inverted section, not just set it to flat.

From a quick look at clipfix.ny it looks like Benjamin Schwartz (the author) has copied the track into an array, and then just steps through the array.

Other than playing with the Nyquist prompt in Audacity I’ve not done any Lisp/Nyquist programming either, but if you are interested in having a go I’ll be happy to try and help. It’s about time that I started doing a bit more with Nyquist. :slight_smile:

Sounds great! This week (until Tuesday) I am busy nearly full-time with a course of analytical chemistry but after that I have some time to try coding this.

No problem, I’m a bit busy this week too.
Perhaps you could PM me next time you post so that I don’t miss it (this is quite a busy forum and posts can get buried pretty quick).

I’ve actually just added clipfix.ny (as is, apart from adding some explanatory text, because I’m not a Nyquist programmer) to Audacity source code, so that it will be part of Audacity under the effect menu. Based on deliberately clipping some audio and comparing with the original, I think it reconstructs more of the nuances than declipper in the Steve Harris set does. Have you tried declipper on your inverted polarity clipping? (See “LADSPA Plug-Ins” on this page):
http://audacityteam.org/download/plugins

The fundamental problems with clipfix.ny as it is now are

  • slowness and inability to work with a whole 3 minute track except on the fast machines with a lot of memory (this is as I understand it really a known problem with memory management in the Audacity implementation of Nyquist)

  • manual deamplification of the audio is necessary before running Clip Fix (that could easily be added by someone who knows what they are doing, in my experience a 10 - 15 dB deamplification is necessary).

You could also try prodding the Nyquist list again, advising there have been more discussions in this thread, someone might just jump in and be able to give some help to both of you.

Gale

Cool :slight_smile:

I agree. They work slightly differently as well. The “declipper” seems to look for high level audio, reduce the level and “round off the corners” whereas ClipFix uses cubic spline interpolation.

Yes. It doesn’t help. The declipper works on high level flat sections and does not notice the inversion.

I’ve not noticed it to be demanding in terms of the amount of memory that it needs, but it certainly hammers the cpu on my Pentium 500. Memory usage seems to go up by about 2% (of 512 MB) when using ClipFix, but the CPU is maxed out for ages.

The amount of de-amplification depends on how much the audio is clipped and on the threshold level that is set. Determining a precise amount of de-amplification would be quite tricky and would require a pre-scan, but it could be either set with a second slider, or for a more simple interface could be set to a generous amount, and the waveform normalized post de-clipping. The problem with automating this task by either method is that if the effect is applied to a selection, rather than the whole track, there will be a noticeable jump in amplitude in the processed section.

What Nyquist list?

The amount of de-amplification depends on how much the audio is clipped and on the threshold level that is set. Determining a precise amount of de-amplification would be quite tricky and would require a pre-scan, but it could be either set with a second slider, or for a more simple interface could be set to a generous amount, and the waveform normalized post de-clipping. The problem with automating this task by either method is that if the effect is applied to a selection, rather than the whole track, there will be a noticeable jump in amplitude in the processed section.

I agree with all of that, but the prior de-amplification (even if simply a fixed generous amount) is possibly more important to put in, because if selections are processed some manual re-adjustment of levels is almost always going to be necessary whether Clip Fix normalises afterwards or not. If Clip Fix worked more efficiently it would probably be better in most cases to simply apply it to the whole track, just as applying noise removal to the whole track may leave the whole sounding more uniform.

You can subscribe to the Nyquist list here:
http://lists.sourceforge.net/lists/listinfo/audacity-nyquist

and Arnoud’s post to it is here:
http://www.nabble.com/Clipping-with-inversed-polarity---idea-for-a-fix-td17291110.html

Edgar on that list has I think modified one or two plug-ins to get over memory management problems but I don’t know if Clip Fix is susceptible to such a fix. More RAM does seem to help when running Clip Fix in so far as CPU use may not be fully maxed out or may be so for less time, but I agree the CPU use is what creates the problems for the user and can cause an Audacity crash.

If you like I can also e-mail the author (Ben) to let him know we like Clip Fix and want to improve it - he may have some input. I can’t guarantee I have his correct address now, but I could try.

Thanks

Gale

Thanks for picking this up. Here is a copy of an inversed clip in Wave taken from one of my recordings. It’s a vocal so you don’t have other instruments / stuff in the background. Feel free to redistribute.

Sorry for not being active on this, I’m currently following a practical course of NMR spectroscopy, where RF waves are sent into a sample and RF waves with a small frequency shift are recorded. When the base RF frequency is substracted it leaves us with a FID signal in the audio range, which is digitally sampled and Fourier transformed to produce the “well-known” NMR graph… and I seem to know more of this sample processing than my supervisor :mrgreen:

Anyway. My real, total holidays start in July so hopefully I’ll find some time then.

In case anyone went through the same 30min experience in finding clipfix.ny; here is the link
http://www.gaclrecords.org.uk/audacitydl.html

This plugin rocks BTW!!!

Thanks. Just to remind, clipfix is now included in Audacity source code and will be included in Audacity (including stable) from version 1.3.6 Beta onwards.

Gale

Hello. New to the forum but I had a question… I just downloaded and installed Audacity v1.3.5 (beta) but do not see ClipFix under the Effects menu. Am I looking in the wrong place?

Thanks!

MattG