I updated Audacity to 3.0.3 on my Mac and the plugins Punch Copy and Punch Paste plus Compress Dynamics 1.2.6 appeared in the effects menu as disabled. I enabled them but they still didn’t appear in the menu and when I checked they were disabled again.
I installed 3.0.2 again and selected Keep both rather than Replace, but now the plugins no longer appear in the plugins list. Could you advise please if it’s possible to enable these plugins in the latest version or at least allow me to still use them on the previous version as I could before.
The plugins are still on my Mac but are not being recognized now. Is this issue that those plugins are 32 bit plugins so by updating they are no longer supported? If that is the case though why are they not recognized in 3.0.2?
I copied and pasted the plugins back into the folder again, restarted the Mac and they are all working now. Will I have the same issue when updating Audacity on my Windows PC?
No, that’s not the issue.
Nyquist plug-ins are just text files, so they work on both 32-bit and 64-bit Audacity.
Super
Upgrading from 32-bit Audacity to 64-bit Audacity is not quite straightforward, and unfortunately it seems that plug-ins don’t always transfer across from one to the other as easily as one might hope.
My recommendation would be to make backup copies of your plug-ins (and any important “Macro” scripts that you might have created), and fully remove the 32-bit version of Audacity After uninstalling the 32-bit version, manually delete the hidden folder: "Users<username>\AppData\Roaming\audacity"
Also, if you installed FFmpeg for Audacity, uninstall that as well.
Then install the 64-bit version of Audacity, and check that it launches correctly.
Then, reinstall whatever plug-ins you want.
This approach is possibly more long-winded than really necessary, but hopefully it will ensure that the migration from 32-bit to 64-bit goes smoothly.
Note that if you use any VST effects, you will need 64-bit versions to use with 64-bit Audacity.
Thanks Steve. I’ve now successfully installed the 64 bit version on both my Mac and Pc and both are working fine with the macros and keyboard shortcuts I have configured. I appreciate your advice.
Happy New Year! The PunchCopyPaste plugin you kindly adapted for me is still working brilliantly. If I run the PunchCopyPaste plugin, it takes the first 5 seconds of room tone as normal and replaces the sound I’ve selected with it, no problem.
However I’m finding the standard Punch Paste is no longer working. If I now select a section of room tone, run the Punch Copy/Paste and have Copy (silent) selected, then click OK, it seems to work fine. When I select some sound I then want to replace with room tone and run Punch Paste, I get the error message, Error. Clipboard empty. Use Punch Copy/Paste first, eventhough I have.
I would like to be able to use either the PunchCopyPaste or Punch Copy/Paste and Punch Paste plugins independently which I thought I used to be able to do. Could you advise please?
It sounds like you are mixing different versions of the plug-ins. To use PunchCopyPaste.ny and PunchPaste.ny together, their versions must match exactly.
Just for information / explanation, in “PunchPaste.ny” it says:
; Requires "Punch Copy" with matching id.
(setq id "PunchCopyPaste_02Jun21_02")
That sets a unique ID for the clipboard, which is “PunchCopyPaste_02Jun21_02”. The noise must have been copied to a clipboard with the exact same ID, or it won’t be found.
In the correct version of “PunchCopyPaste.ny” we see the same ID (line 23):
I’ve been playing around with Audacity macros today and have worked out a way of easily repositioning a section of a track such as a laugh in an interview which would sound better if it were moved slightly to the left or right etc. Previously, I had been doing the following:
Select the laugh and click Ctrl + Alt + I select the space where the original section had been until you can see yellow vertical lines either side of the selection. Press Ctrl + Shift + P to fill the section with room tone. This is using the Macro PunchCopyPaste
Click the Select button on the left hand side of that track and press Ctrl + J to join the clips together into one track again. Move the cut section along the new track until it is in the correct position. Now, hold down Ctrl and click Select on the track you first selected and the track with the cut section. Click Tracks/Mix/Mix and Render to combine those two tracks into one.
To simplify this process further, I’ve created the following macro:
01 Split New
02 PunchCopyPaste (Macro_PunchCopyPaste)
03 Select Track Start to End
04 Join
05 End
Now I can select the laugh and press Ctrl + Shift + I which is the keyboard shortcut I’ve assigned for this macro. Move the cut section along the new track until it is in the correct position. Hold down Ctrl and click Select on the track where the laugh had been and the new track with the cut section. Click Ctrl + M (another keyboard shortcut I’ve assigned to run Mix and Render) or Tracks/Mix/Mix and Render to combine those two tracks into one. Bingo!
I was wondering though is there a command I could add to the Macro to allow me to rename the track which I’ve Mixed and Rendered or do I need to do this manually by clicking on the drop down arrow and clicking Name? By default a Mixed and Rendered track is named Mix and I’d love to be able to change that to the name of the speaker each time in a two way conversation.
Thanks for your prompt reply. I created a Macro with:
01 Mix and Render
02 Set Track Status
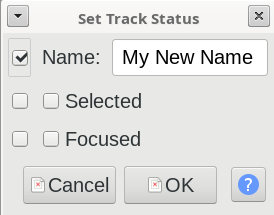
I selected 02 Set Track Status and I clicked Edit on the right, I get the Set Track Status dialogue box with 5 boxes, one next to Name and two next to Selected and Focused. Having run Mix and Render the track named Mix is selected and focused so which option should I choose to allow me to rename it at this point? Which boxes do I need to select?
Thanks Steve. I am now able to change the default name when I mix and render from Mix to something else, but what I would like to do is to be able to launch the Set Track Name dialogue box which appears when you click on the drop down arrow to the left of the track and Name, but I don’t see this as an option in the Macro commands.
I would like to be able to first run my macro
01 Split New
02 PunchCopyPaste (Macro_PunchCopyPaste)
03 Select Track Start to End
04 Join
05 End
then select the track where the section I split came from plus the new track containing the split section, run Mix and Render and be able to change the name Mix of the new track to one of the speaker’s names as this will be different each time. It’s great I can rename the default name away from Mix, but that’s not the functionality I’m looking for. If it’s not possible, that’s fine. I can just click on the arrow and rename it, but it would be great to remove a couple of steps.