It was mentioned in this thread http://forum.audacityteam.org/posting.php?mode=reply&f=16&t=27627 that “mains hum”, while usually having a fundamental frequency of 50 or 60Hz (depending on which part of the world) usually has many “overtones”. These overtones are predominantly “odd harmonics”, though there may also be some amount of even harmonics.
Unfortunately there is no hard and fast rule about how much of each harmonic will be present, though the higher harmonics generally get weaker.
Here’s a plug-in that allows odd and even harmonics to be controlled separately. The default settings should work pretty well with moderate amounts of hum.
One of the main drawbacks of using notch filters is that they cause damage. In this “Hum Remover” effect, the amount of damage is limited by only applying the notch filters to audio that is below the set threshold. During loud sections, the hum will usually be “masked” by the music so it is less damaging to leave the hum than to remove it.
To apply the notch filters to all of the sound and not just low level sound, push the Threshold setting up to 100%. hum remover.zip (1.02 KB)
I’ve strained my brain over this mains hum removal before.
It really is necessary to remove all the harmonics, odd and even , right up to half the nyquist frequency.
Here’s an example with limey 50Hz hum, then dehummed using my plugin, then the hummy original again, then your dehummer applied with all the settings at maximum*
I can still clearly hear a buzz on the final version due to not notching all the harmonics.
[* Odd harmonics max is 119 on your plugin for this 24000Hz sample rate recording].
To be fair my dehummer plugin causes Gibbs ringing, which isn’t too noticable on the echoey example I’ve used.
By attenuating the notching when a spike occurs there is no Gibbs ringing after the spike.
Attached is an example which uses a modified version of your de-hum plug-in …
1st. A hummy recording of my neighbour slamming their rubbish bin lid (and their door squeaking).
2nd. my dehummed version of 1 using my plug-in with he lowest possible amount of dehum, Gibbs ringing immediately follows the loud bin lid slam.
3rd. Same as 1.
4th. Modified version of your dehummer applied , No hum and no Gibbs ringing !
Attenuating the depth of the notching with the absolute value of the rate of change of the amplitude would cure the ringing.
I think that would require “look ahead” (like in Chris’s Compressor).
<<<It really is necessary to remove all the harmonics, odd and even , right up to half the nyquist frequency.>>>
Right. This is one of those “you can’t really do this” tools. Particularly with buzz, by the time you get rid of it all, there’s a great many little frequency notches in the show and musical notes and overtones either damaged or missing.
You might go as far as possible with the notches and clean up the remaining trash with one of the new threshold keyers.
What’s the possibility that a cheap sound card is going to produce a buzzy captured show off pitch? This is the down side of assuming all sound cards are perfect.
Thanks for the feedback Trebor - I really do appreciate it (much better than the deafening roar of silence as tumble-weed rolls across the forum page )
The example you have posted has much more severe damage than this plug-in is designed to deal with. In truth the only “effect” I would consider using on such a low quality sample would be the delete key (unless of course it was an irreplaceable once-in-a-lifetime recording with personal value). In my description I use the phrase “moderate amounts of hum”.
Here is an example at the high end of what I would describe as a “moderate amount”
(apologies to Koz for butchering his lovely piano sample - I don’t have a suitably buzzy recording so I had to record some buzz then mix some audio with it. The buzz is a recording of my finger on the end of a jack plug straight into the sound card).
Here’s the results of the two hum removal effects:
The first section is using your de-hummer and the second section using my de-hummer (not intending to suggest one is “better” than the other - just a matter of differentiating between the two effect).
The first de-hummer certainly removed more noise than the second, but the damage done to the piano is clearly audible.
Of course there is no reason why these two effects could not be combined. The “new” part of this de-hummer is that it makes a smooth transition from filtered low level sound (where it is most needed) to unfiltered high level sound (where it is not needed). There is a degree of “distortion” that occurs during the transition due to difference in phase, but it is pretty negligible and a good trade-off.
Just looking at your effect again - it’s pretty similar to the notch loop used in this one. The main difference is the algorithm for calculating Q.
I’ve deliberately left out any settings for this for the sake of a simple user interface and instead opted for optimised* settings for low to moderate amounts of hum.
(* only roughly optimised - a lot more real world samples would need to be analysed)
The other difference is that you have used a lot more iterations. The number of iterations for “even harmonics” in my plug-in are artificially limited by the slider range but can be overridden through text input right up to half the sample rate.
As well as the damage caused by removing significant amounts of frequencies (the dull sound), there is also the problem that you mention in your previous topic of steep notch filters causing ringing. This will be particularly noticeable with transients, but are virtually eliminated with this “new” plug-in because transients are not filtered.
The other difference is in separating out the odd and even harmonic into 2 loops as per Koz’s comment https://forum.audacityteam.org/t/new-plugin-super-bass-cut/13382/1 . Doing this makes a significant reduction to the amount of damage when dealing with lower levels of hum. My own interest is in looking for ways to reduce low level hum for cleaning up otherwise high quality recordings, so my priority is more concerned with minimising the damage and I’m looking for ways to reduce the damage further.
[Edit] I see there’s been further discussion while I’ve been typing - I’d better post this quick
Nice one Trebor. Yes, different de-noise algorithms can be easily “dropped in” to replace the “dehum” function.
I’ve also left the “gate” parameters near the top so that they can be easily tweaked.
It already uses lookahead.
The envelope follower has a rise time and a fall time set by the “attack” variable (currently set at 250 milliseconds) and the lookahead (“look”) is set equal to “attack”. When there is rise in amplitude the envelope will “fade-in” before the higher amplitude level is reached. When the amplitude drops, the envelope will “fade-out” after the drop.
This is a trade-off. On the downside, there will be a short period of hum that is not removed immediately before and after a transient that occurs during a low level part of the audio. On the plus side, transients will pass through the effect unharmed. It is possible to artificially create audio samples that show up this weakness, but in practice it seems to work well.
Unfortunately this is not an easy thing to do - to do this properly I think we would need to get into FFTs but so far I’ve found that pretty impenetrable. Have you done anything with FFTs yet?
Quite high I’d guess, and almost a certainty if trying to clean up old cassette or VHS recordings.
<<<(apologies to Koz for butchering his lovely piano sample - I don’t have a suitably buzzy recording so I had to record some buzz then mix some audio with it. The buzz is a recording of my finger on the end of a jack plug straight into the sound card).>>>
That’s a Twilight Zone Moment, isn’t it? One of my chores over the weekend was to create an illustration page on the technique of rapidly generating a “test signal” by… say it with me… touching the end of a jack plug straight into the sound card.
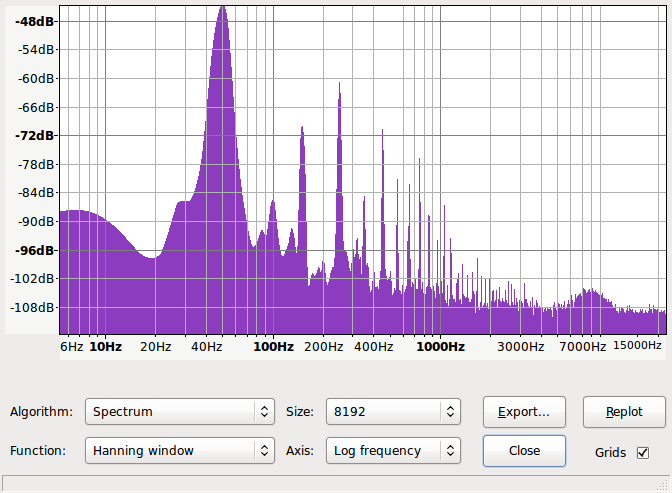
So I’m in a perfect position to tell you that if you do that in the US, you do get all the harmonics, odd and even. And there are seemingly billions of them. I’ll post the sound clip before I finish the web page. It’s almost Monday in California.
indistinct beyond -90dB though harmonics are visibly present up to 4000Hz (80th harmonic)
At 105dB and below, harmonics are visually indistinguishable from other noise.
There’s only 20dB difference between the third harmonic and the 19th. The one that I generated is much worse starting out; the fundamental is only a handful of dB down. I have a much better finger than you do (I live under high tension wires). There is serious trash out so far only dogs can hear it. 17KHz plus.
Now I can see where Steve got the idea of only notching the odd harmonics up to 2kHz, as it would get rid of the worst offenders.
What about notching all the harmonics, odd and even, but applying a deeper notch the odd ones than the even.
Combine this with a general reduction in notch depth as frequency increases, (to both odd and even harmonics).
And the envelope follower thingy, (which I don’t yet understand), which cured the ringing artifacts from transients.
Then I think we’d have a mains dehummer that would suit most purposes.
There is no really satisfactory way to control the “depth” of a notch as far as I can see.
The Q factor controls the “width” of the notch (the frequency spread at a specified attenuation level). This looks like it affects the “depth” (when viewed on the Spectrum Analysis window), but the depth at f0 is -inf, irrespective of the Q factor.
The depth of the notch can be limited by mixing in a proportion of the original unprocessed signal…
Unfortunately this can, in some cases, have undesirable side effects as the notch filter causes frequency dependent phase shifts that can “interfere” with similar frequencies in the unprocessed portion. I’m not sure how significant these issues are, and may turn out to not be too important, but there is still a practical implementation difficulty of setting different depths for specific notches.
One thing that I have been looking at is splitting the signal into two parts using a graphical equalizer function, but unfortunately neither (nband) or (nband-range) are currently implemented in Audacity
So that means that the graphic equalizer would need to be coded into the plug-in itself.
Here’s what I’ve got for a graphic equalizer:
;control f0 "40 Hz" real "dB" 0 -15 15
;control f1 "160 Hz" real "dB" 0 -15 15
;control f2 "640 Hz" real "dB" 0 -15 15
;control f3 "2.5 kHz" real "dB" 0 -15 15
;control f4 "10 kHz" real "dB" 0 -15 15

(setq gains (make-array 5))

(setf (aref gains 0)(const f0))
(setf (aref gains 1)(const f1))
(setf (aref gains 2)(const f2))
(setf (aref gains 3)(const f3))
(setf (aref gains 4)(const f4))

(defun inf-const (x)
  (stretch-abs (/ ny:all *default-sound-srate*)
               (const x)))

;;Graphic Equalizer Function
(defun nband-range (sig gains lowf highf)
  (let ((bandsep ;; bandwidth of each channel in steps
	     (/ (- (hz-to-step highf) (hz-to-step lowf)) (length gains)))
	    lowstep ;; low frequency in steps
	    (newsnd sig)
        (chans (length gains)))
    (setf lowstep (+ (hz-to-step lowf) (* 0.5 bandsep)))
    (cond ((< bandsep 0)
	       (error "band width must be greater than 0"))
      	  (t
           (dotimes (i chans newsnd)
             ;; gains[i] can be either a number or a signal
             (cond ((numberp (aref gains i))
		            (cond ((not (zerop (aref gains i)))
				           (setf newsnd
				                 ;; note: gain in dB
                                 (eq-band newsnd
                                          (step-to-hz (+
                                                       (* i bandsep)
                                                       lowstep))
                                          (aref gains i)
                                          (/ bandsep 12))))))
                   (t
                    (setf newsnd
                          (eq-band newsnd
	                               (inf-const (step-to-hz (+
					                                       (* i bandsep)
		                                                   lowstep)))
                                   (aref gains i)
					               (inf-const (/ bandsep 12)))))))))))

(nband-range s gains 20 20000)