Low volume from ATR2100 USB microphone

Hello,

I am having some issues with an Audio-technica mic which I just purchased. Most of my problems probably just come from the fact that I know very little about sound recording and editing.

Some information:
Audio-technica ATR2100 USB/XLR Microphone
HP Pavilion laptop
64-bit Windows 8.1
Audacity 2.1.0

I sometimes make instructional videos and such to put on Youtube, and until recently I have just used the mic on my laptop. But I finally got fed up with the crappy sound quality and decided to break down and buy a real mic. I looked at some reviews, and the ATR2100 was consistently mentioned as one of the top mics within my (low) price range. I was really impressed with the audio that I heard from it, so I ordered one. Once I received it, I plugged it in to my Laptop to test it out. When I tried to record with sound recorder, nothing showed up on the waveform. I opened up recording devices, selected the ATR USB mic, and adjusted the level of it to max. I tried again, and it registers now, but just barely. I tried it with Audacity as well, and it was also very quiet.

I did some research, and found that the ATR2100 is a dynamic mic. Not totally sure what that means, but from what I can gather sound levels from this type of mic are generally lower, and they are meant for recording at close distances. I tried at different distances, and found that if I put the mic inside of my mouth, the levels are about what I would expect from having them turned up all the way. If I am any comfortable distance away, It is really quiet. I also found that there is sometimes issues with the drivers on Windows 8. I tried it out with a Windows 7 laptop and it wasn’t any better.

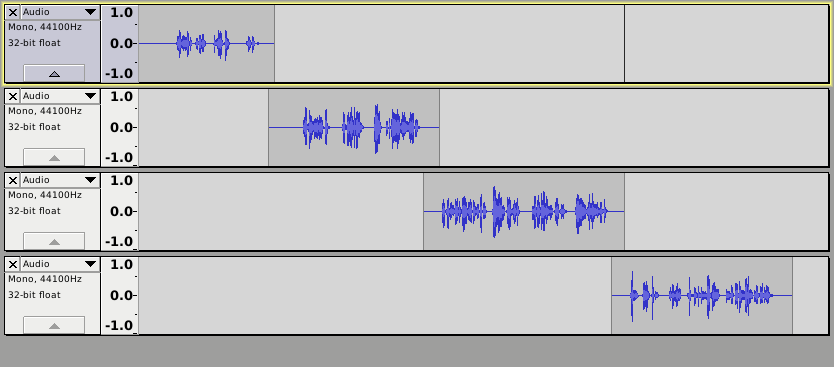
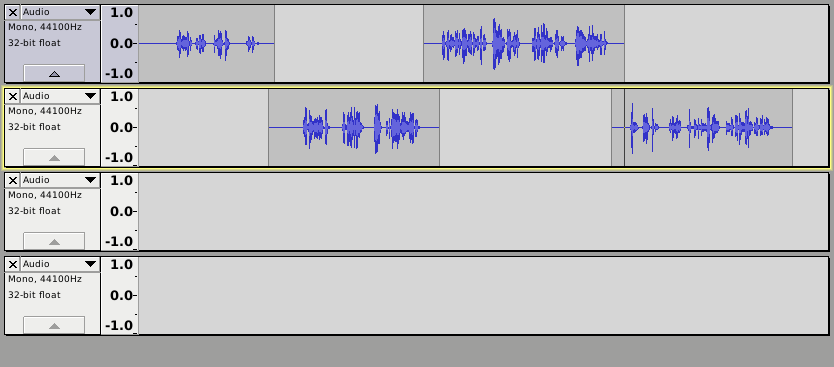
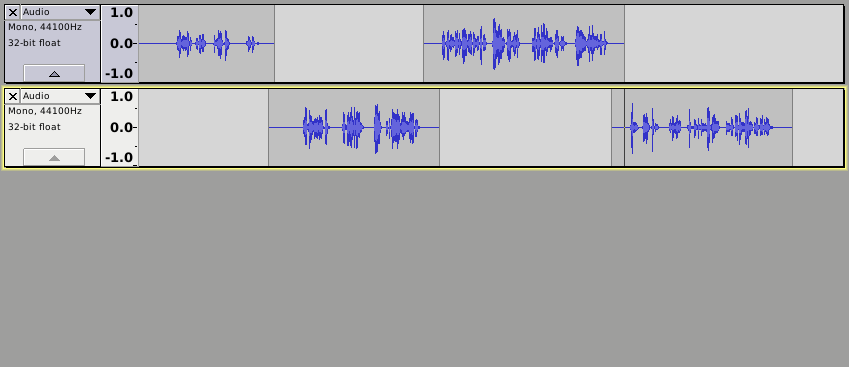
My question is this: is this a problem or do I just not know what I am doing? I don’t know if these levels are normal for a mic like this one. I have attached a sample of recording from different distances. I can amplify it in Audacity, but the sound quality seems to suffer. I don’t really care so much if it is just for the audio for my Youtube videos since it is still way better than what I had before, but the other part of the reason that I bought this mic was to record some long boring rule manuals as audio books. I would like to have as high of quality as possible for that.

Any thoughts?


-DakotaSamuel

We’ve been watching an unfortunate design standard for USB microphones. They’re low. On purpose. Yours may be a little too low for comfort but that’s probably normal.

The makers have to deal with unskilled users and an uncontrolled environment. No knobs or adjustments. Proper level is very difficult to hit by unskilled performers and very-loud, overload and clipping is permanently fatal. If the performance in any digital system gets so loud that the system “runs out of numbers,” it will stop faithfully following the performer’s voice and create trash from which there is no recovery.

A good loud microphone is going to get returned if it consistently turns out crunchy, buzzy, harsh-sounding voices. Low volume, however, is more robust because if the voice sounds reasonable, the performer thinks it’s their fault. This is where we came in.

I haven’t done this yet, but Google your microphone product number and “complaints.” Ignore the views that tell you it will cure cancer and offer world peace. Those were written by the manufacturer. Look for the reviews with a typo here and there and look for multiple complaints that say similar things.

I don’t know that there is a cure for this other than plug it into an analog sound mixer which is what I do. In that case you do have adjustments and can make up for low volume. But that also means you can’t be a beginning newbie any more.

We do warn people that Windows machines like to “help you” sometimes whether you want it or not. The machines have Windows Enhanced Services which try to automatically set volume and quality for conferences and chat. I would recommend turning that on, except it’s very unlikely you will pass ACX AudioBook standards with it running. It’s very likely it was running while you were announcing on your built-in microphone and may contribute to it not sounding so hot. It’s goal is not Beautiful Pear-Shaped Tones. Its goal is punching your voice through a distorted chat session.


But I do think although the voice sounds just fine, you will never make AudioBook standards with very low volume because you also have to hit background noise as one of the three specifications. That’s the quiet FFFFF sound when you stop talking. It’s very low now, but when you boost your voice, the hiss level is going to come up, too, and it will be too loud when it does.

I’m trying to think of something to do that will help. Some Windows machines have a Microphone Boost setting. All this stuff is in the audio control panels. I’m not a Windows elf, so a lot of this is a mystery to me.

This is how to work with Windows Enhanced Services. This is in response to what happens when you try to record music with a voice system. Look for how to get to the settings.

http://manual.audacityteam.org/o/man/faq_recording_troubleshooting.html#enhancements

Koz

I did get the ‘six inches’ voice to pass ACX AudioBook with a little patching here and there. I didn’t need noise reduction, either.

Attached, last sentence (don’t worry about the rest of that).

Koz
Screen Shot 2015-10-22 at 20.28.25.png

Ok, thanks for the reply. Good advice for weeding out the reviews. I usually severely overresearch before I make a purchase, but this was a bit of an “I need it as soon as possible” deal. It is still a pretty good mic, other than the low volume.

So maybe if I just do a bit of an amplify and maybe some noise cancellation if needed, I should be fine?


-DakotaSamuel

I’ll tell you how I got there, but I need to get to a grown-up computer. There are tricks to using some of the tools.

In the mean time, you should download and install ACX Check and Steve’s Vocal Filter. These are from kozco.com because I can never find the ones on the forum. Have you ever installed a custom effect or plugin? ACX Check is a plugin and appears under the “Analyze” menus. LF Rolloff is an add-on to Effects.

http://kozco.com/tech/audacity/Documents/acx-check.ny.zip
http://www.kozco.com/tech/audacity/Documents/LF_rolloff_for_speech.xml.zip

As we go.

Koz

OK. Here we go.

I isolated your clip by deleting everything before 2 seconds and everything after “away.” This leaves just the “six inches” segment (attached 1).

Apply Equalize > LF-Rolloff with the “Length” slider all the way up. This is from the filter that you downloaded, uncompressed and installed.

Audio Compressor
– Select the whole clip or show by clicking just above MUTE.
– Effect > Normalize: [X]Remove DC, [X]Normalize to -3.2 > OK
– Effect > Compressor: Thresh -20, Floor -40, Ratio 2:1, Attack 0.2, Release 1.0, > OK
– Effect > Normalize: [X]Remove DC, [X]Normalize to -3.2 > OK

And we’re done. Analyze > ACX Check (attached 2)

Sound file. Attach 3.

As long as you don’t move around very much during the performance, those settings should work with longer readings.

If you have trouble with any of that, or you want to know what each step does, post back. I personally would do a much longer posting, say several minutes and do those steps to that. Do leave at least one second of holding-your-breath silence at the beginning for the noise tools to chew on.

Koz

Screen Shot 2015-10-23 at 19.28.44.png
Screen Shot 2015-10-23 at 19.26.19.png

We do warn people that passing the automated ACX AudioBook Robot only gains you access to the ACX AudioBook Quality Control Human. The human is looking for different things. They’re concerned with whether or not you can read. You are simulating a voice actor (I’m assuming you’re not already a voice actor).

My particular talent is voice that goes through soundproof walls only to put people to sleep on the other side. My voice is qualified as a non-lethal weapon by the Geneva Convention. I would not be a good candidate for an AudioBook.

I will also warn you that it’s not unusual for people to get much better over the course of reading their first book. They get so much better they realize the beginning of their book sucks and they start over.

Let me know where you get stuck in that process.

Koz

ACX has their own production web pages and instructions, including videos. I don’t know that I would finish production the same way McElroy did, but he has the recording basics down.

http://blog.acx.com/2014/06/26/how-to-succeed-at-audiobook-production-part-1/

http://www.acx.com/help/video-lessons-resources/200672590

http://www.acx.com/help/acx-audio-submission-requirements/201456300

http://g-ec2.images-amazon.com/images/G/01/Audible/en_US/acx/pdf/ACX_MP3_Encoding_Tutorial_04242014._V338366800_.pdf

You don’t need an external MP3 encoder. You can download and install the LAME software and do it in Audacity.
http://audacityteam.org/download/windows

Koz

I personally would do a much longer posting

That’s a typo. Longer than ten or twelve seconds will not fit on the forum. Do a much longer recording.

Koz

Wow, thanks for all the help! On the Recording & Editing section of this page, the video discusses roll and punch recording. Is it possible to do that with Audacity? I see that with Shift+R I can append to the current track, but the sections of the recording merge so there are no split points. I assume this will make it difficult when trying to find the goof-ups when doing the final editing.


-DakotaSamuel

The main difference between Roll and Punch in Pro Tools compared with Audacity is that Pro Tools allows multiple audio clips to overlap on the same track. Audacity can’t do that. In Audacity, if audio clips overlap they must be on different tracks. So, in Audacity, the way to “Roll and Punch” is a little less convenient:

(On Mac OS X, the Command button is usually used instead of the Ctrl button)

  1. Delete any bad bit that needs to be replaced.
  2. Click on the track a couple of seconds before the end of the track (your “pre-roll” time).
  3. Press the Record button (shortcut “R”). The new take appears on a new track.
  4. Space to stop (or “Stop” button).

To avoid building up a huge number of tracks, non-overlapping clips may be easily moved to the same track by dragging with the Time Shift tool while holding down the Ctrl key. (Tip: Use the F5 key to select the Time Shift tool and F1 for the normal “Selection” tool).

Example:

After 3 “Roll and Punch” recordings, you will have 4 audio clips on 4 separate tracks:


Ctrl + drag with the Time Shift tool to move non-overlapping clips, so that you now have all of the clips in 2 tracks:

Delete the empty tracks by clicking on the in the top left corner of the track:

The traditional way to do this is set a label at the fluff point so you can go back later.

http://manual.audacityteam.org/o/man/label_tracks.html

Koz

Alright. Thanks again for all the help!


-DakotaSamuel