Sure SM7B sounds muddy with sharp sibilance.

I recently upgraded my mic setup from an Audio-Technica AT2020 to the Sure SM7B with Cloud Lifter + DBX286S pre-amp + Focusrite Scarlett Solo Interface. I went with the upgrade as my AT2020 was picking up a lot of sharp sibilance and people were recommending the SM7B as a great mic that is much better at handling sibilance.

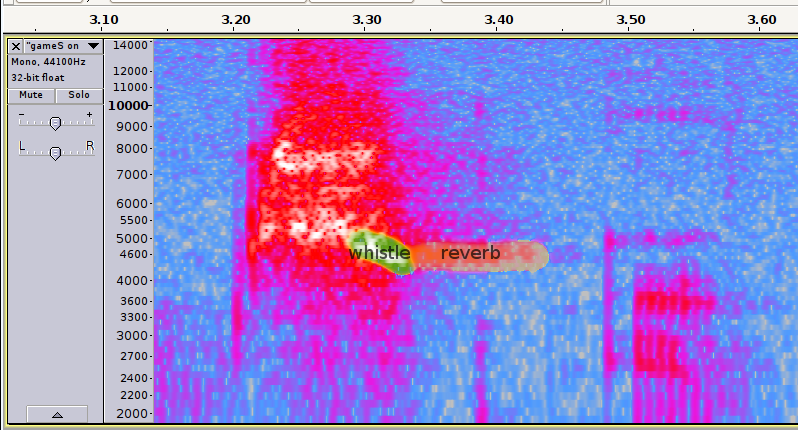
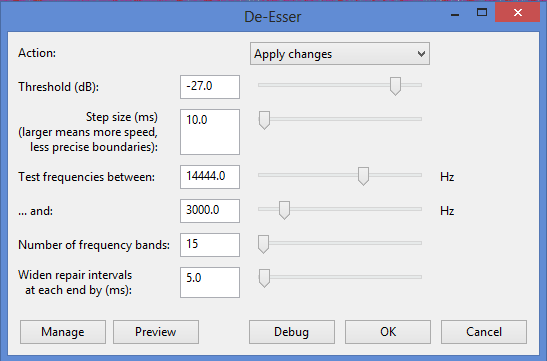
However I think I’ve made a terrible mistake as my audio seems to have gotten a lot worse since I started using the SM7B. It sounds a little muddy or muffled. I feel like it’s missing the clarity of my old AT2020, but the biggest issue is that it didn’t really solve my sibilance problem. You can still hear sharp sibilance in my recordings. I’ve tried de-essers and EQ plus using the mic in different positions but I just can’t seem to get rid of it.

I’m also questioning myself thinking that maybe I’ve just gotten so used to hearing my voice from the AT2020 for years, that I feel it just sounds wrong in another mic. Maybe I need a second opinion or two. I’ve attached a sample of both mics where you can hear the clarity and sibilance.

I record video tutorials 20 to 30 minutes long so I need the audio to be clear and with as little sharp sibilance as possible.

Any recommendations on audacity settings I could use to get rid of the sharp sibilance and improve the brightness/clarity of the SM7B? Problem is whenever I try to improve the clarity of the mic with EQ & compression it just amplifies the sibilance.

Any advice would be greatly appreciated.

To catch all the whistley sibilance you need a de-esser with ~10 bands*, e.g. … Paul-L’s …


(* typical de-essers only have one band).

But even then the reverb in the room is prolonging the sibilance in a way that a typical de-esser won’t touch.

Worth trying a foam cover on the mic, but you may have to apply acoustic treatment to your room to reduce the reverb.

That’s really annoying, isn’t it? The ice-pick in the ear sound. What’s fascinating about this is the SM7b is a ‘dynamic’ microphone. That means it’s a moving coil and magnet type and they don’t do that. That sound error is happening somewhere else or from a mismatch in the microphone chain somewhere.

I’ve seen that microphone used in other shows and it just doesn’t do that. The sibilance tones are easily two or three times louder than they’re supposed to be.

I record video tutorials 20 to 30 minutes long

Past the microphone problem, you’d be way ahead of the quality game by tamping down the room echoes and get rid of that fan noise or whatever that is in the background. Computer fan noise? There’s a phrase: If you can tell the computer is on just by listening, it’s going to be a long day.

I need to look through your equipment list. Don’t send anything back yet.

While we’re doing that, you can perform a newspaper test. Crumple up a standard newspaper in front of the sm7b. Stand far enough back so it doesn’t overload the sound channel. If you’re in stereo (two blue waves) you can go out to ten seconds.


Koz

https://www.youtube.com/watch?v=cF7_AaY9tCg

Koz

Plug the Lifter directly into the Solo and leave out the DBX286S pre-amp. You should turn on the Solo 48v phantom power because the Lifter need it. Record a test.

Do Not plug the SM7b directly into the Solo with 48v on.

Then, as a test, disconnect everything, turn off the 48V on the Solo and plug the SM7b directly into the Solo. Record a test. You may need to turn the Solo GAIN control all or most of the way up. The soft volume of the SM7b is what you’re fixing with the Lifter. It “lifts” the volume of quiet microphones.

Record a test. I’m guessing the SM7b directly into the Solo is going to sound OK, if a little quiet. The lifter in the middle with the Solo 48V on may even sound OK. If it does, use it that way.

Then fix the room echoes and fan noises.

Koz

I don’t think there is a hardware-fix for the whistling esses, (other than dentistry :slight_smile: ) …

''S'' of ''gameS'' has a whistle which reverberates.png
IMO a high-resolution (multi-band) de-esser is the only cure for whistling esses.

That’s much better than I’ve been able to get with that De-esser. Could you give me the exact settings you used? I have tried that De-esser testing frequencies between 3600Hz and 15000Hz as that seems to be the range where most of the sibilance lies. But I find it doesn’t make enough of a difference unless I turn it up so high that it’s just lispy. Also my DBX286S has a De-esser built in but I have the same issue with that.

Worth trying a foam cover on the mic, but you may have to apply > acoustic treatment > to your room to reduce the reverb.

The SM7B comes with two foam covers a smaller one and large one. I have tried both to no avail.

I had my processor disabled for that sample to get the raw audio. I normally have the expander gate enabled on my DBX286S when recording to cut out the background noise, which it does a decent job of. But I know that doesn’t completely solve the problem so I will look into getting some acoustic treatment.

Well I hope that’s not the case as I had braces as a child and so my teeth are pretty straight. No gaps in my front teeth either so it could just be down to my accent?

I ran the tests without DBX and without CL close and further away from mic and the whistling esses are prevalent in all of them.

My normal settings are Mic > Cloud Lifter > DBX286S ~40db Gain with expander gate and 48v phantom power > Solo Gain turned all the way off as it introduces noise > Computer, Level set to 100%, 1 channel, 24bit, 48000hz.

Thanks for all the advice btw. It’s invaluable.

SM7B_Solo.mp3

That’s impossible. I expect that setup to give you a flat waveform in Audacity.

I need a single XLR cable between the SM7b and the Solo with the Solo 48v turned off. I expect the Solo to only give Audacity modest waveforms with the Gain almost all the way up. It doesn’t matter if that setup doesn’t give theatrically perfect sound, I’m doing diagnostics other than that.

Koz

That recording “SM7B_Solo.mp3” Was with the SM7B XLR Cable going straight into the Solo with 48V disabled and the gain turned all the way up to max on the solo. That used to introduce noise when using the default Windows driver but since I installed the latest drivers for the Solo it doesn’t seem to have the noise anymore. I’m wondering if maybe the reason it doesn’t sound right is that the drivers for the Solo which also come with some software that runs in the background is maybe doing something to the audio that I was unaware of?

Have to use ~15 bands to catch the whistles: some are only ~300Hz wide …

11kHz range needs a lotta bands.png

That recording “SM7B_Solo.mp3” Was with the SM7B XLR Cable going straight into the Solo with 48V disabled and the gain turned all the way up to max on the solo.

I believe you. That’s very surprising because the reason you’re using the Lifter, and the reason many suppliers sell you a Lifter in addition to the microphone, is because of Dynamic Microphone’s restrained volume.

Wearing my obsessive engineer hat for a second, another quick test with the Solo GAIN almost all the way up. Put a little air between all the way up and your setting.

Engineering practices tell us never to operate equipment at extremes—all the way down in the case of the processor and all the way up in the case of the SM7b. Particularly in home equipment, messy things can happen at the extremes.

There is an electrical mismatch between the processor and the Solo. The Solo is expecting a proper well-behaved microphone with modest (-40dB to -60dB) volume at the XLR connection. The Processor output is line level (-10dB to +4dB.) That’s a basic mismatch.

One last pass with SM7b > Lifter > Solo with the Solo +48 on. That should allow you to work with the Solo GAIN control somewhere in the middle.

You might consider a Kitchen Table Sound Studio. That will help with the echoes and even possibly the fan noises.

Koz

It still lets some through but it’s a lot better than before.

Normally when going through CL + DBX Line Gain is set to 40 to 43db and output gain is set to 0, aka 12 O’clock position. Then to Solo with gain turned all the way down. I will try adding a bit of air on the solo gain and turn down the DBX a little to compensate.

But I have attached the test with just the SM7B > CL > Solo.

There’s a free VST plugin called “JB Smash Pro” which works in Audcaity on Windows.
It’s a multi-band compressor (& equalizer & exciter). It can be used to de-ess.

Advantages of JB over Paul-L …
Real-time adjustment, so you can quickly find the right settings by experimentation.
Independent attack & release times for each band, (long release kills the reverb) .
Wet & dry knob, (mix processed & original)

Disadvantages …
Only 5 bands (max) in sibilance zone.
complex/confusing GUI.

Better.

You’re on Windows 10, right? Did you turn off all the Windows Enhancements and Processing?

https://technicallyeasy.net/disable-audio-enhancements-windows-10/

Those enhancements can include tone controls and loudness compensation, not very welcome in this case.

You mentioned drivers for the Solo. Do they have controls or settings?

I used slightly stiff noise reduction and got rid of that vacuum cleaner in the background. Your clips also have award-winning earthquake/rumble sounds. I got rid of that with the Low Rolloff for Speech setting on the Effect > Filter Curve equalizer.

Then I applied the other two audiobook tools, RMS Normalize and Limiter which put the piece volume within range of the DeEsser.

That was still a little bright, so I brought the Treble down 6dB in Effect > Bass and Treble.

So there’s still something wrong, but all that correcting put the posting in good enough quality for commercial submission. You sure you don’t know where that vacuum cleaner noise is coming from? It would help a lot not needing the noise reduction.


And yes, I am clear that the microphone-lip spacing sound shift isn’t quite right. Are you speaking into the end of the microphone? The Audio-Technica AT2020 was a side-fire microphone. You speak into the company name. The SM7b is end-fire. You speak into the narrow end. That’s David Greene speaking into an RE-20, for example.

Koz

Oh. Look at that. The SM7b has tone controls. Unscrew the back panel and see where they’re set.

Screen Shot 2020-04-12 at 20.05.04.png
Screen Shot 2020-04-12 at 20.07.05.png
That’s screen grabs from the microphone instructions.

Koz

I have already tried the switches on the back. All my sample recordings were with the Flat Response setting. I have the Mic position over to the side not directly in front of my mouth. I’m doing that because other people have said not to speak with the Mic directly in front of your mouth as it can make the sibilant problem worse. Is that not true with the SM7B?

The noise is coming from my computer. The low rumble can be fixed with the 80Hz High Pass filter on the pre-amp and the expander gate which I normally use in my recordings to get rid of those issues. But of course that sample was without the pre-amp so none of those effects were present.

What settings did you set the RMS Normalize and Limiter to?

Also the audio enhancements in Windows is just for the headphones not the Mic and I notice no difference when it’s enabled or disabled.

This software comes with the driver and runs in the background on my computer. I don’t think it’s effecting the audio as I tested with the default windows driver and it sounds the same to me.

Is that not true with the SM7B?

Both leaky-teeth sibilance and P-Popping go down when you use oblique microphone placement. The most effect is to suppress P-Popping. The worst thing you can do is put the microphone directly in front and low like Joe Rogan does it. When you’re Joe Rogan you can get away with that. I notice in recent shows his voice doesn’t have annoying explosive breath popping any more. Somebody put a low-rolloff in there somewhere—suppress low pitch rumble and thunder (breath) sounds. Possibly more than one.

ObliqueMicPlacement2.jpg
Please note I applied these tools as an average of the two clips in your posting. They sound different. Normally, you would only have one of those two and the corrections would be less obvious.

In order of appearance:

– Drag-select a portion of Room Noise Only (Room Tone). Effect > Noise Reduction > Profile. Select the whole track with the SELECT button on the left. Effect > Noise Reduction: 12, 6, 6 > OK. That’s heavy reduction and can, in some cases, affect the voice quality. That’s to get rid of your vacuum cleaner. Get rid of the vacuum cleaner and skip this step.

– I applied plain Audiobook Mastering. The theory here is if you can pass audiobook quality control, you can post anywhere. You have to download and install RMS-Normalize. ACX Check is not important for you unless you plan on submitting for an audiobook. Note the first tool in the suite is a 100Hz rolloff filter. That’s important because sometimes the actual microphone electronic pathway makes the rumble sounds and corrections at the microphone won’t cure it.

Screen Shot 2020-02-15 at 4.16.02.png
That’s the shortcut from these more complete instructions.

– So that’s the right volume, but it’s still too Essy, so I applied the DeEsser with these settings:

Screen Shot 2020-04-13 at 7.20.38.png
That’s slightly heavier DeEssing than is normally called for. You can watch the blue waves dip here and there at all your “SS” sounds as the effect applies. DeEsser is volume dependent, so you need something like Audiobook Mastering to set the performance volume first, then DeEss.

– Still slightly bright:
Effect > Base and Treble: Treble -6dB > OK

Screen Shot 2020-04-13 at 7.24.17.png
And that’s how I got there.

There is one odd left-turn available here. If you think you need a slightly more forward sound without making the Essing worse, try switching in the Presence booster on the back of the microphone. Traditionally, that provides a “haystack” tonal boost around 3000Hz (maximum ear sensitivity) without affecting Essing which is higher in pitch.

Then go lie down for a while.

Koz

Get rid of the AIR setting on the Solo. That’s another tone control.

Koz

Thanks for the details on the effects.

I have always had the mic in the B position as per the image you sent. The air setting is already disabled.