I have Windows 10 and a hp Envy desk top I have mixed several songs off cd’s and exported to the wav option and the file plays just fine, but it will not let me burn a new cd, I get a message saying some files may be corrupt. Can anyone tell me what I am doing wrong?
Audacity won’t burn anything, so how are you burning a new CD?
Koz
Let me try this again. After I have recorded my project in Audacity and have exported the file to windows media player, I get a message saying some files may be corrupt when I try to burn in my windows media player to cd. I guess what I am asking is what settings should I have in Audacity before I export to windows media player?
We have a tutorial for CD burning in other applications: http://manual.audacityteam.org/man/burning_music_files_to_a_cd.html. See the yellow box in that article about Windows Media Player.
Gale
I could recommend you to forget about Windows Media Player when it comes to burning Audio CDs as I didn’t experience quite good results using Windows Media Player as Audio CD burner. In fact, WMP corrupted my Audio CD to be able to play only in WMP. It was Audio CD format, but unplayable in my portable CD player, nor my radio cassette deck with CD player. Use some freeware image burning software instead (ImgBurn is quite good to go). In fact, I once tried ImgBurn to burn Audio CD and it plays well in car radio CD player, which supports only Audio CDs, it plays also on my cassette deck with CD player and my portable discman.
I’ll describe steps to burn Audio CD multiple ways.
Way 1: Using CUE sheet and multiple WAV files as single tracks (works in most of cases)
- Export your Audio CD into single tracks in WAV format (make sure to export exactly 44100 Hz sample rate, stereo, 16bit PCM format → most accurate conversion will be achieved from there)
- Open ImgBurn (you can download it from official sites at imgburn.com)
- Open Tools>Create CUE File…
- Lay out all your WAV files in here and set album, performer and single tracks informations (track name) - in case of Audio Book, book title as album, speech voice as performer, single chapters as track titles
- Set gap between tracks, silence before first track, silence after last track, etc. (for recording of a concert all gaps settings will be 0)
- Save your CUE sheet anywhere on your disk (best would be right next to WAV files)
- Burn that CUE sheet as Audio CD image to actual CD-R
- Listen and enjoy

Way 2: Using CUE sheet and single WAV file containing all tracks as layed out in actual CD (minimum of conversion required here)
- Export your Audio CD into one giant single track (make sure to export exactly 44100 Hz sample rate, stereo, 16bit PCM format → otherwise it won’t work properly)
- Write down markings of single tracks (you can export track listing from text track below your Audio CD)
- Convert miliseconds to frames (CUE sheet has 70 frames per second), so timestamps are in this format: MM:SS:FF
- Write CUE sheet file using correct syntax (see below)
- Save your CUE sheet right next to your WAV file
- Open ImgBurn
- Select your CUE sheet to burn and burn to actual CD-R
- Listen and enjoy
In case you select way 2 to burn your Audio CD, please refer to this sample CUE sheet. It has self describing syntax:
FILE "AUDIO.WAV" WAVE
  TRACK 01 MODE1/2352
    INDEX 01 00:00:00
  TRACK 02 AUDIO
    PREGAP 00:02:00
    INDEX 01 35:17:41
  TRACK 03 AUDIO
    INDEX 01 37:37:70
  TRACK 04 AUDIO
    INDEX 01 39:02:74
  TRACK 05 AUDIO
    INDEX 01 41:34:17
  TRACK 06 AUDIO
    INDEX 01 43:43:29
  TRACK 07 AUDIO
    INDEX 01 46:35:11
  TRACK 08 AUDIO
    INDEX 01 48:47:52
  TRACK 09 AUDIO
    INDEX 01 51:29:30
  TRACK 10 AUDIO
    INDEX 01 53:43:54
  TRACK 11 AUDIO
    INDEX 01 56:28:53
  TRACK 12 AUDIO
    INDEX 01 58:53:44
  TRACK 13 AUDIO
    INDEX 01 60:53:66
This code was copied from DOSBox Wiki page: https://www.dosbox.com/wiki/Cuesheet
More about CUE sheets is at Wikipedia article: https://en.wikipedia.org/wiki/Cue_sheet_(computing)
You can read similar code using MP3 files as single tracks at the Wikipedia article to learn CD-TEXT syntax (naming album, performer, single tracks names, etc.)
It looks like more complicated, but I can assure you better results. Once you practice a little bit, it gets much easier and better. For a good start I’d recommend you to use way 1 to produce Audio CD as it’s more user-friendly and requires almost no conversions and little typing. You in fact only click to add files and it generates the CUE sheet for you.
In fact, WMP corrupted my Audio CD to be able to play only in WMP.
Then it didn’t make an Audio CD. There is only one sound format for Audio CD. 44100, 16-bit, Stereo. Most of the time you can arrive with other sound formats and the CD Authoring Program will convert it for you. Somewhere in the Paleolithic Era, I had a burner which refused to convert from Mono to Stereo, but all since then have been able to handle it.
If the music won’t play on an Audio CD player, there’s a terrific chance you made a Data CD with music files on it.
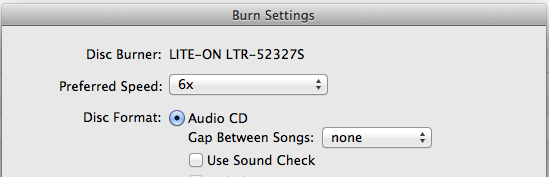
A good test of which format you’re making is the ability to set the Gap Between Songs. If you never get that dialog, then you’re not making an Audio CD.
@jmreans
Can you open up the broken files in Audacity? Sometimes a good test is make a sound file and then turn straight around and see if it opens in Audacity.
Did you Export all your music files? Audacity will not Save a sound file.
Koz
Well, I used WMP’s feature of burning Audio CDs and it was able to play it in “dumb” CD player only for Audio CDs (car radio CD player is one of them). It’s quite long time I’ve used WMP’s CD-DA burn feature, but what I certainly know is that after some time the CDs started to skip. Well, Czech roads are something that is pretty much hostile to CD playback, but we have an original CD in our car radio CD changer and it never skips. We have burnt CDs which are exact copy of original CDs - they never skip. All CDs created with WMP’s CD-DA burn feature skip after only 1 month and their skipping progress grow up each time. It skips horribly and it’s almost unlistenable. Dad may not notice it, but I hear it clearly and while it’s my favourite band, it leaves me pretty upset.
Those CDs are all scratched from bumpy Czech roads, but how do you explain that original CD and copied CDs are much more durable than CDs created from WMP? I scratched once CD created as testing one from ImgBurn CUE sheet and guess what - no single skip. And I scratched it accidentally when played back in my radio CD player. I looked at it and it was pretty nasty scratch. In fact, it had several scratches across the surface. But it played very well. WMP’s Audio CD skips after few scratches and standard Audio CD created by program made specifically for burning play well after much more scratches. It will start skipping after some time as more scratches will come up, but they are much more durable.
Well, it’s only recommendation. I experienced pretty bad CDs from WMP, so I recommended ImgBurn as freeware program made specifically for burning. It uses various standards for burning data CDs, DVDs, and of course Audio CDs. If you want Audio CD that is more durable, forget about WMP. Windows Media Player was not created specifically for burning, but only simple playback. Burning was added only as a feature, and it’s not fully functional and standardised. Burning programs on the other hand use pretty well defined standards and they are specially designed to work with most of burners. That’s another reason why burning program is better to make Audio CDs…
Those CDs are all scratched from bumpy Czech roads, but how do you explain that original CD and copied CDs are much more durable than CDs created from WMP?
Original CDs are stamped (not burned) and the ones & zeros that make-up the data are more defined and easier to read. In the past there were CD players that couldn’t play burned at all or that wouldn’t play them reliably.
I scratched once CD created as testing one from ImgBurn CUE sheet and guess what - no single skip. And I scratched it accidentally when played back in my radio CD player.
There shouldn’t be any difference with different software, except ImgBurn allows you to burn at a slower speed which might give you better results and I don’t know if you can slow down WPM burning. The blank discs can make a difference, and the burner (drive) can make a difference. I’ve had a “stack” of blanks where more than half of them were turning-out bad, and once I figured-out what was going on I threw the remaining discs in the trash.
It can also depend on the “nature” of the scratch. It’s not unusual to have a damaged disc but you can’t see any damage, and it’s not unusual to have an obviously scratched CD that plays OK. In case you don’t know this, CDs are more-easily damaged by scratching the top (label side). The data is on the top and the CD is read through the full-thickness of the polycarbonate. (This is not the case with DVDs (data layer in the middle) or Blu-Ray (data on the bottom).
after some time the CDs started to skip.
You may find that stand-alone players turn to trash faster than built-in computer drives. This gives you the chance to rip the disk and make a new one just as its dying. This may be a Mac thing. If you have an important disk dying, look for someone with a Mac that still has a SuperDrive and see if they can rip it in one piece.
Home Burnable CDs use a chromogenic dye layer similar to color photographs. The laser pops holes in the dye during recording to represent ones and zeros. Like color photos they can fade over time. Never leave a CD in the sun or in a hot environment.
As above, everybody is expecting the optical (shiny) surface to be the big deal, when in fact the music is closer to the label. Beating up the label side is the fastest way to destroy your disk.
The shiny side is serious magic. It’s deep and the laser beam approaches the surface as an unfocused cone, only hitting perfect, sharp focus at the dye layer. This means it doesn’t care about minor scrapes, bruises or some finger prints. The player also features error correction and if there is a scratch from the center out, the laser can most times hop right over it. Not so if you have a scratch that goes round and round. If you have a scratch that goes more or less the same direction as the laser travel, you’re dead.dead.dead.dead.dead.dead.dead.dead.
There is such a thing as home cleaning a CD (and DVD).
I would not use a CD cleaner machine.
This process works just dandy. Moisten the bandanna corner (illustration) and stroke lightly from the center out all the way around the disk. Go multiple times. Go from the middle out all the way around to dry it although you don’t need to. The cleaner solution dries clear. Try the disk when it’s dry.
Handle disks by the edges only.
The Fukushima earthquake gave us a weenie. I’m not sure if this is correct or not, but the last top-quality blank CD manufacturer (Sony?) went off line during the Fukushima earthquake and wave. All we had was second tier makers for a long time. I’m running out of blanks, so I may look for Sony CD-Rs spindles again.
Koz
I got tasked with creating client disks at work, so I found it valuable to have a crappy player. I do this at home, too. If it plays here, it will play anywhere. That’s how I homed in on the best burning speed. Do Not use As Fast As Possible. I have a burner that produces ratty disks at 8X and perfect burns at 6X. I didn’t check further.
Koz