The problem:
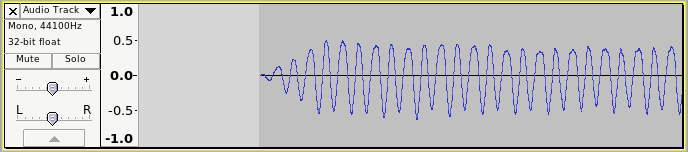
When an audio clip is made by cutting (or copying) a section from a piece of audio, there will often be a “click” at the start/end of the audio clip. This will happen whenever an audio clip starts / ends at a non-zero point in the waveform. As can be seen in this zoomed-in image, there is a “discontinuity” at the start of the audio clip, and that will produce an audible “click” when played: A solution:
One possible solution is to apply a short fade to the audio clip (fade-in at the start, fade-out at the end):
Such fades can be quite easily created using Audacity’s Fade-in / Fade-out effects (http://manual.audacityteam.org/o/man/effect_menu.html#linearfade), but this can be quite fiddly and time consuming when working with a lot of short audio clips.
The plugin concept:
The idea of this plugin is to make the process of applying a short fade to the start / end of an audio clip, quicker and easier.
Ideally, for this purpose, the effect should be a “one click” effect to which we can allocate a keyboard shortcut.
Keyboard shortcuts can be set for installed Nyquist effects in “Edit > Preferences > Keyboard” (http://manual.audacityteam.org/o/man/keyboard_preferences.html)
Limitations:
Because we want this to be a one-click effect, it will not have an interface - just select the audio clip and apply (no user options).
The crossfade length is therefore fixed (we will initially go for a 5 millisecond (0.005 seconds) fade, as that seems to work well for most audio clips. The length can be changed by a simple modification to the code.
The way that Nyquist is currently implemented in Audacity requires that the selected audio is loaded into the computer’s ram memory to apply this effect, therefore it can only be used on relatively short audio clips (it should be OK for up to 30 minutes duration on most modern computers, which for the intended purpose is more than plenty )
Why a Nyquist Plugin:
Probably the most useful thing about Nyquist plugins is that they can be written by anyone. They are written as plain text documents, and they run directly from that text file.
The main documentation for Nyquist plugins for Audacity is here: http://wiki.audacityteam.org/wiki/Nyquist_Plug-ins_Reference
All technical information relating to this little project can be found from that documentation (including the Nyquist manual, which is linked at the top of that page).
Important note about “plain text” files:
“Plain text” means standard ASCII characters. These files can be created or modified using any “plain text editor” (such as Microsoft NotePad). Word processing applications such as MS Word, or MS Write should NOT be used. These programs use special formatting that will completely mess up the Nyquist code.
For Windows users I would highly recommend the free text editor Notepad++ (http://notepad-plus-plus.org/), though any “plain text” editor will do.
The main advantages of Notepad++ is that it has “parentheses matching”. Nyquist code uses a lot of “parentheses” - round brackets “(” and “)” - and the open/close brackets must all match up. Notepad++ also supports “syntax highlighting” for the LISP programming language. “Syntax highlighting” will colour code key words, making the code easier to read. The Nyquist language is based on LISP, so, although not comprehensive, LISP highlighting is generally helpful.
The Code:
This is the processing code that we are starting with (copied over from previous discussion):
It applies a simple linear fade because that creates the least amount of distortion for very short fades (for longer fades, “curved” fades will provide less harmonic distortion than linear fades, but we are only dealing with very short fades).
To turn this code into a plugin we need to add the “plugin header”.
At the time of writing, the release version of Audacity is 2.0.6, so we shall write this as a “version 3” plugin (the most recent version supported by Audacity 2.0.6).
So here is the plugin code:
;nyquist plug-in
;version 3
;type process
;name "Fade Clip Edges"
;action "Applying Fades..."
;author "Steve Daulton"
;copyright "Released under terms of the GNU General Public License version 2"
;; fade-edges.ny by Steve Daulton Feb 2015
;; Released under terms of the GNU General Public License version 2:
;; http://www.gnu.org/licenses/old-licenses/gpl-2.0.html
;;
;; For information about writing and modifying Nyquist plug-ins:
;; http://wiki.audacityteam.org/wiki/Nyquist_Plug-ins_Reference
(setq fade-length 0.005)
(setq dur (get-duration 1))
(abs-env
  (control-srate-abs *sound-srate*
      (let* ((fl fade-length)
             (env (pwlv 0 fl 1 (- dur fl) 1 dur 0)))
        (mult s env))))
And here as a downloadable file: fade-edges.ny (726 Bytes)
So far there is no error checking in this code.
We should probably add a warning if the selected audio is too short for applying the fades.
Question for Steve Bender: How are we doing so far?
I will not be able to test this until this afternoon, which will be about 10 or 11 PM GMT. I will definitely let you know what I think after that. But I was satisfied with the Nyquist code from before, so I’m not expectign any issues. I’m exctied to have this be a one touch, keyboard command effect!
I tried it out. It works just as I expected. Thanks. This has already made editing much easier.
While I was at it, I downloaded a few other plugins - the butterfly effects - and I cannot get them to work. They load, the window comes up to let me set the parameters, I hit ok and… nothing. What gives? Are some plugins not compatible any longer? Or am I doing something wrong? I installed it the same way I did this one.
Make a stereo track that has audio in the left channel only (silence in the right channel), then apply “Stereo Butterfly (LFO)…” with the default settings. The result should be clearly visibly. Listen through headphones for maximum effect.
I just wanted to take this opportunity to give a little update on this plugin and also to give thanks again.
This tool has already significantly sped up my editing in so many ways. It has allowed me to experiment with things in ways that I was previously avoiding because the time cost was too high. I highly recommend this plugin to anyone that does any kind of sample chopping, looping, beat creation etc. in Audacity. It’s a HUGE time saver. Instead of spending time finding zero crossings and THEN making cuts (which often cuts it in a spot not 100% ideal anyway), now I just cut it exactly where it needs to be cut, apply the fades and get to work actually making music.
Specifically, this plugin works really well in conjunction with the “Regular Interval Labels” function and the Split Cut function. You can take a clip that is at a specified bpm, add a Regular Interval Labels track at specified time points (say, every 16th note, 8th note, quarter note etc), then line up the cursor to those label points, Split Cut, then apply fade-edges.ny to the entire track (which is now composed of multiple smaller clips). Now you have a whole slew of “crackle-free” little beat components or melodic/harmonic building blocks that can be endlessly looped, duplicated, compounded, rearranged etc. to your heart’s content, all in under two minutes of work.
P.S. if anyone can think of a faster way to accomplish this same thing, please, I’m all ears.
Thanks. I’m sure that’s useful to some people. But for me Regular Interval Labels + Excel is really where it’s at. I often use note values that aren’t “standard,” like 3 eighth notes, or 7 sixteenths etc. Just figure out the duration of whatever I want, punch it in, and I’m off to the races.
Actually, one method that works really well for me is to use multiple rows of labels - one set to whole notes, one set to quarters, one to sixteenths etc. That way the big divisions are clearly visible, but the small divisions are there to lien up my cuts. Works like a charm. I love Audacity
And once you make one of these multi-label “grids” at a given bpm, you store it away to be used at a later time.
This is exactly what I’ve been looking for. However, I would like to simplify it even further and have working code for just the fade-out part. I know it’s probably just a matter of omitting some part in the piece-wise linear envelope section. But I don’t know lisp so I thought asking here would be quicker before I go ahead and bash my head to much. Any help or tips is greatly appreciated!
Thanks for replying Steve. I don’t think I was clear enough. I don’t want a fade in(!) for the file, just the fade out-part at the end of the file. So no fade at all in the beginning (in the context I’ll be using this it’s very important to preserve all transients). So I wasn’t asking to differentiate between the comment header and the actual code block. Maybe I’m missunderstanding some detail as well, but the code block you gave is identical to the first one right? But I understand that my question could’ve been read that way, english is not my first language.
Steve, you’re awesome! I think I better understand the coding now as well… probably flawed but, modifying the breakpoints (jump from end of the file to 5 ms before the end and from there decreaze volume (linear curve, represented as 1 to 0 with duration being the fade length) Is there any reason in particular reason why you ommit the sample rate from the original code? Not really needed? thx
For efficiency, Nyquist uses (by default) 2 different sample rates.
The “sound rate” is the sample rate for sounds in the current environment. In Audacity effects, this comes from the sample rate of the selected track.
The other sample rate is the “control rate”. This is intended for control signals, and by default it is 1/20th of the sound rate.
The PWLV function creates a “control signal” (at the “control rate”), based on time/amplitude pairs.
In this case:
(pwlv 1 (- dur fade-length) 1 dur 0)
The first point is implicitly at time=0 and the amplitude is set at “1”.
The next point is at time=(duration - fadetime), and the amplitude is still at “1”.
The final point is at time=duration, and the amplitude is 0. The final amplitude could be omitted in this case as for PWLV it is implicitly “0”.
Because the sample rate of the control signal is much lower than the sample rate of the sound, there is a small degree of imprecision, but in this case it does not matter. In cases where it does matter, the control rate can be forced to a higher sample rate. Wrapping a behavior inside a “control-srate-abs” function causes the behavior to be evaluated with the specified control rate. For example, this would calculate an envelope at a sample rate of 100 Hz:

 )
)