Using Audacity 2.1.2 on Windows 10, originally installed from the .exe installer I believe.
When selecting a section of audio e.g. for deletion, or applying an effect to, is there any way of getting the start and end of the selection to have lines going across the waveform to assist with accurate selection of the audio section? I have attached an example of what I would like to be able to do as it is difficult to put into words.
I thought Audacity used to work like this ages ago, though I cannot be certain. I cannot find an option to switch this on anywhere.
If its not possible currently, how do you raise a development request for it to be considered for a future version?
Also, if you have a selection in one track, and want to move that selection to the track below so you can work on the selection in that track, you can do it with the keyboard sequence ENTER, down arrow, ENTER (assuming the upper track already has the yellow focus border). See How do I extend or move the selected region into other tracks?.
In that case you don’t need any vertical lines because the movement of the selection is exact.
Thanks for those suggestions. I have looked at them but they don’t work for what I am doing.
I am editing a single stereo track. I just select portions of the audio to delete, fade in/out, amplify, etc. and I really only need a line to go all the way across the 2 channel waveforms when I am selecting a block of audio to process, 1 line at the start of the selection and 1 line at the end.
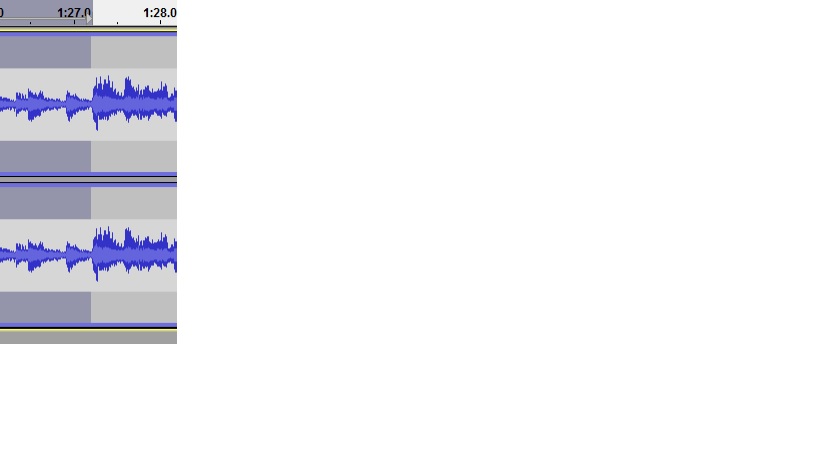
Starting the selection is not too bad, as the current position in the audio is marked by a line that does go all the way across the waveform. But as soon as you left click and hold to drag it, the line disappears. Much more difficult that way to determine the precise start and end point of the selected audio. I know I could manually set the start and end/length times of the selection but that would take much more time than simply selecting using the mouse.
If you only have a single stereo track, the lines are the left and right boundary of the selection. Why do you need lines going down below the track?
Because you didn’t include images in your RTF file, we don’t know what you are trying to do. “Across” means left to right, but that is not what you said in your file. Can you resubmit your file, or just attach images in PNG or JPG?
In other words, the vertical line of the editing cursor changes to become the edge of the selection. That is intended, not a bug.
Why? When you click and drag from the editing cursor to create a selection, the starting or ending point of the selection does not change.
Is the problem that you are working with tones or other block-like waveforms, so that the edge of the selection is visually behind the waveform? That is a minor problem - I have always thought the selection should be laid on top of the waveform.
Sorry, the attachment did include images when I originally edited and saved it, it seems that Open Office has not bothered to save them with the last version of the RTF, though they are still there in the original source, I don’t know why. Unfortunately, I don’t have MS Office on the laptop I am currently using, I am stuck with using Open Office.
I have now attached the ‘current’ view I get as “Audacity selection current.jpg”, and what I would like to be able to do as “Audacity selection I would like to see.jpg”. I hope that’s clearer now.
I am only a simple user as I said, I just wanted to know if I could get the line to go all the way across the track to make it easier and faster for me to make my selection. As the line doesn’t currently go all the way across, it is difficult to judge exactly where the selection starts and ends and I often get it wrong. I know I can zoom in more, but then it takes longer to drag the selection to the other end of the section I want to edit and is more difficult if I can’t see it in the view in relation to the start/end that is already set.
If there is not a way of doing this, no problem, I will carry on as I am now, just thought I would ask.
You have Envelope Tool or Multi-Tool enabled. That will make it harder to see the selection edges. Press F1 to go back to Selection Tool, unless you really need those other tools.
After making the selection you can CTRL + I (as it sounds to pronounce “eye”) to make the selection a clip that you can move separately from the rest of the track. This has the incidental effect of drawing a “split line” at the selection edges, but it won’t help you because you can’t click and drag on the line without removing the line and the clip.
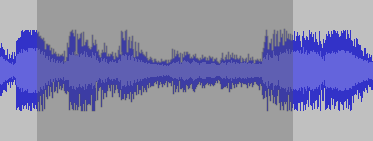
So would it be enough if the selection was drawn as transparent over the top of the waveform - like this?
Or do you want non-transparent hard edges to the selection as in your image?
We can add a “vote” for anything that is reasonable, but it is up to a developer to implement it if they feel motivated to do so. They may also be influenced by the number of “votes” a feature request has.
Thank you for the responses, it is now working as I would like it to, I don’t need the actual line now I can see the edge in relation to the waveform. I knew it could be done somehow. I obviously pressed F2, must have been quite a while ago, I associated it with installing a new version.
I will also look at using temporary labels if I need to as they will help when having to select a larger block of audio to process.